
If you’re looking to learn the new Vue Router that uses Vue 3, you’re in the right place. Many things are the same in Vue 3 using Vue Router, but there are a few small differences from Vue 2. In this article, my aim is to give you an introduction to Vue Router for Vue 3, while highlighting the differences for those of you already familiar with the Router. We will cover:
- Why use Vue Router
- Starting from scratch
- Vue Router Basics
- Installing from Vue CLI
- Named Routes
- Dynamic Segments
- Handling 404 Not Found
- Where to continue learning
Why Vue Router?
Vue is powerful for creating Single Page Applications: highly interactive webpages that don’t refresh when you change from page to page. If your website has multiple pages (or “views”) and you’re using Vue, that’s why you need Vue Router.
Starting From Scratch
I’m going to be building Vue 3 routing by starting with a basic Vue 3 app that I created using the Vue 3 CLI. Feel free to code along. From the command line I’ll need the most up-to-date CLI. You can do this by running:
$ npm install -g @vue/cli
or
$ yarn global add @vue/cli
Then we’ll create our basic Vue 3 app.
$ vue create my-router-project
This will give us a screen where we’re going to choose to use “Vue 3 Preview”:

This will create a base Vue 3 application, and we can ensure it works by going into the directory and running the server:
$ cd my-router-project

then

$ npm run serve
Then when we go to [http://localhost:8080](http://localhost:8080) we should see our server running.
Vue Router Basics
To install Vue Router into our base Vue 3 project (as we created above) or into an existing project that already uses Vue 3, we’ll follow the steps below:
- Install the Vue 3 Router from the Command Line
$ npm i vue-router@next
- Add a routing directory & configuration file
/src/router/index.js
import { createWebHistory, createRouter } from "vue-router";
import Home from "@/views/Home.vue";
import About from "@/views/About.vue";

const routes = [
  {
    path: "/",
    name: "Home",
    component: Home,
  },
  {
    path: "/about",
    name: "About",
    component: About,
  },
];

const router = createRouter({
  history: createWebHistory(),
  routes,
});

export default router;
Notice that we create our routes in an array, where we specify for each route a few important items:
- Path - the URL path where this route can be found.
- Name - An optional name to use when we link to this route.
- Component - Which component to load when this route is called.
Below this array you’ll notice we create the Router itself, using the routes and we also pass in createWebHistory. This is used to switch from using hash to history mode inside your browser, using the HTML5 history API. The way we configure this is a little different then we did in Vue 2.
Notice we export this at the bottom because we’ll need to import it in our main.js file.
3. Importing our Routes & using Vue Router
Next we’ll need to edit our main.js file to use our router in our application.
/src/main.js
import { createApp } from 'vue'
import App from './App.vue'
import router from './router' // <---

createApp(App).use(router).mount('#app')
Here we’re importing our router file, and then we use the router when creating our application. The way our application is created in this file has changed in Vue 3.
4. Using <router-view> and <router-link>
There are two directives our Vue application gives us to use in our template:
<router-view /> - When a route is navigated to in the browser, this is where the component is rendered. For example, in our code going to / will render the Home component where we list <router-view />.
<router-link> - This is the directive we use to create links between our different component pages, instead of using <a href>. See below.
These both can be used in our simple example in App.vue like so: (FYI, I erased what was already in the App.vue).
/src/App.vue
<template>
<div id="nav">
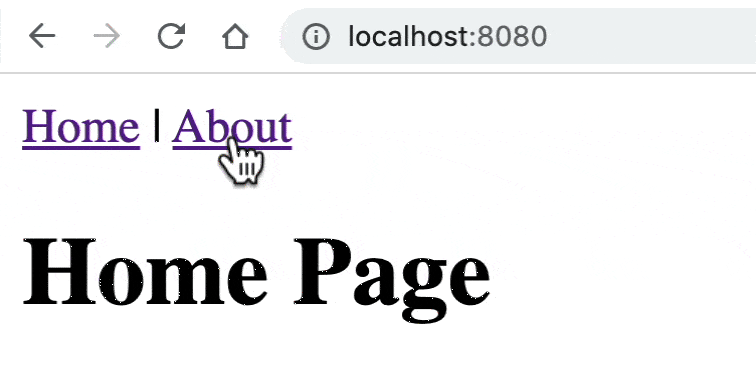
<router-link to="/">Home</router-link> |
<router-link to="/about">About</router-link>
</div>
<router-view />
</template
We’ll need to create our Home and About components which we referenced above. Instead of putting them in our /components/ directory, I’m going to create a new /views directory. They’re going to be really simple for our example:
/src/views/Home.vue
<template>
  <h1>Home Page</h1>
</template>
/src/views/About.vue
<template>
  <h1>About Page</h1>
</template>
And now if we fire up our server and head up to [http://localhost:8080](http://localhost:8080) we should see the following:
Installing from the CLI
Much of the above configuration and setup you can actually have Vue 3 do for you from the CLI, but it’s valuable to know how to do it on your own. If you create a new Vue Project:
$ vue create my-router-project
Then you select “Manually select features”

You can select Vue Router:
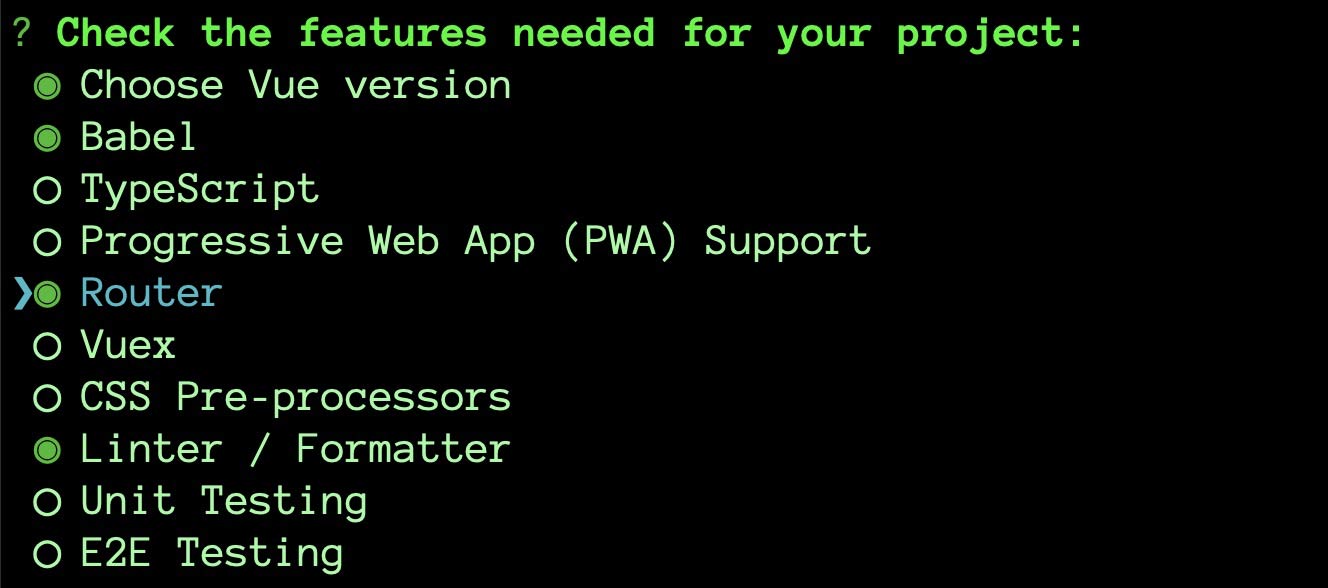
The latest version of Vue Router will be installed, and it will pre-generate most of the same configuration we’ve created above.

Named Routes
In our router we specified optional names in our routes: Home and About. If we wanted to use route names instead of paths, we could write our router-links like so:
/src/App.vue
<router-link :to="{ name: 'Home' }">Home</router-link> |
<router-link :to="{ name: 'About' }">About</router-link>
Now our navigation works the same as before, but we’re not using paths. This can be useful if our URL paths change in the future. We wouldn’t have to change all the router-links if the path changes, since they’re referencing using name.
Dynamic Segments
If we want to create a path URL which has a variable, like /user/gregg or event/5 where the ‘gregg’ or ‘5’ can be any name or any number, we need a Dynamic Segment. This is done JUST like we used to do it in Vue 2.
In the router, we specify in our route with the : denoting the variable.
/src/router/index.js
{
  path: "/user/:name",  // <-- notice the colon
  name: "User",
  component: User,
},
(Don’t forget to import the User view in our route if you’re following along)
To access that dynamic segment in the view itself, we could now write:
/src/views/User.vue
<template>
  <h1>The user is {{ $route.params.name }}</h1>
</template>
And sure enough we get:

Also just like Vue 2, I can opt to have the dynamic segment passed into my component as a prop, but specifying props = true.
/src/router/index.js
{
    path: "/user/:name", // <-- notice the colon
    name: "User",
    component: User,
    props: true,
 },
Now inside my component, I can have:
/src/views/User.vue
<template>
  <h1>The user is {{ name }}</h1>
</template>
<script>
export default {
  props: ["name"],
};
</script>
Notice I have to specify that my component is expecting a prop.
I get the same result:

Handling 404 Not Found

Since we have a single page application, you’ll notice that if we go to any URL that doesn’t have a route mapped in the routing file we get an incomplete page. It loads up our App.vue, but no component. We’ll need to tell our router what to do when it doesn’t match any routes, and the way we do this is a little different in Vue 3.
We’ll need a route at the bottom of our routing list that looks like this:
/src/router/index.js
{
  path: "/:catchAll(.*)",
  component: NotFound,
},
(If you’re coding along don’t forget to import the NotFound component at the top of your file.)
Notice the dynamic segment and the regular expression. :catchAll is the dynamic segment and (.*) is a regular expression, which essentially matches against anything. So if none of the routes above this one match, it will use this one. Also, I’ve imported a new component called NotFound which looks like this:
/src/views/NotFound.vue
<template>
  <h1>Oops, it looks like the page you're looking for doesn't exist.</h1>
</template>
Now when I try to go to http://localhost:8080/asdf, I get:

Where to Continue Learning
If you weren’t familiar with Vue Routing before, hopefully this gives you an idea just how easy it is to get going. If you are familiar, hopefully this comforts you to see there’s not a whole lot of differences between Vue 2 and Vue 3.
To dive deeper into Vue Router, I’ve created a full Touring Vue Router course here on Vue Mastery, and you can start watching it now for free.