
Getting Started
In the previous article, we explored why to do unit testing in Vue.js and what you should and shouldn’t test. In this article, we are going to write our first unit tests. I’m going to make assumptions here that you have written a Vue application before and that you have the Vue CLI installed. In this section we are going to create a new Vue application using the Vue CLI, write some components, and write some tests for them. We will do all of this before ever actually running npm run serve.
Adding tests to a new project
To get started, we’ll create a new project called vue-testing using the Vue CLI. From the command line run the following command.
vue create vue-testing
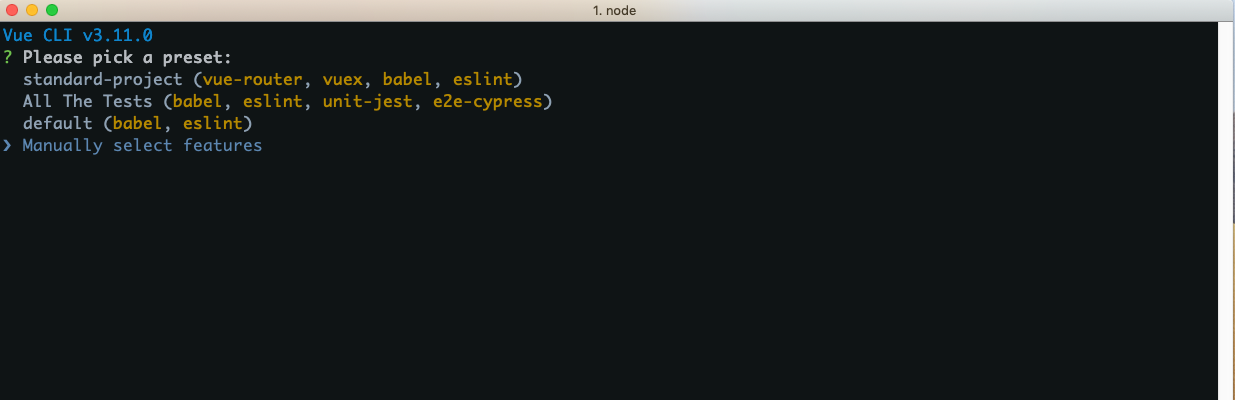
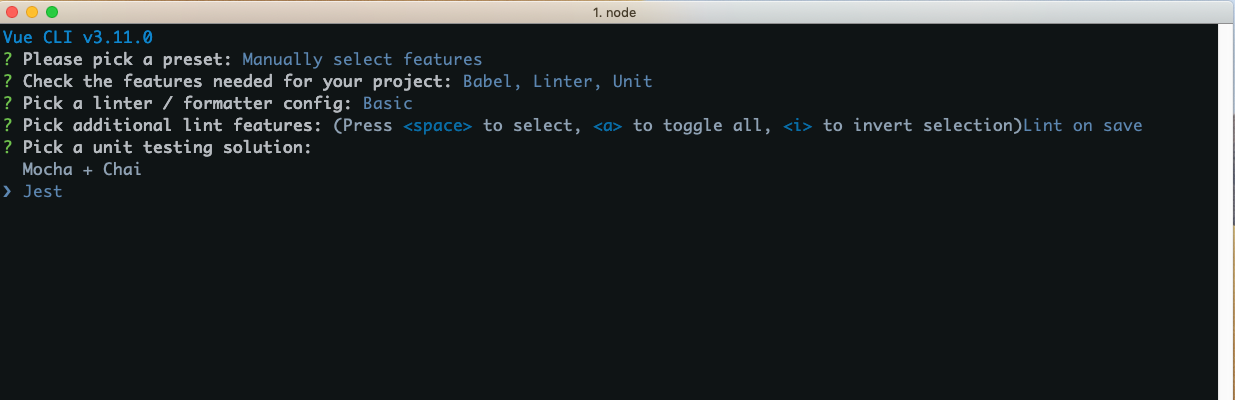
Select “Manually select features” and click enter so that we can be explicit about which libraries we want to include in our new project.
In this step we will select Unit Testing to add the appropriate libraries to our project. TIP: You can use your arrows to move up and down and then press the spacebar when you want to select/deselect a feature.

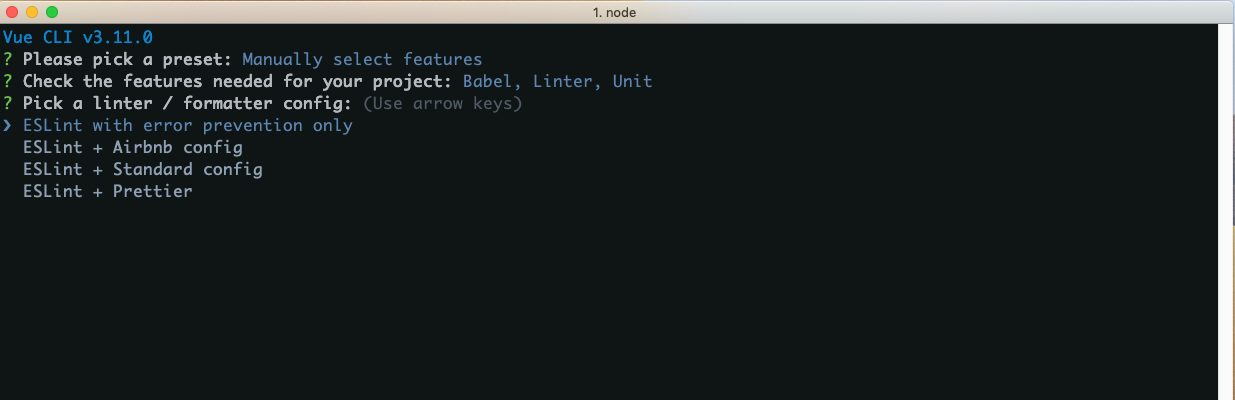
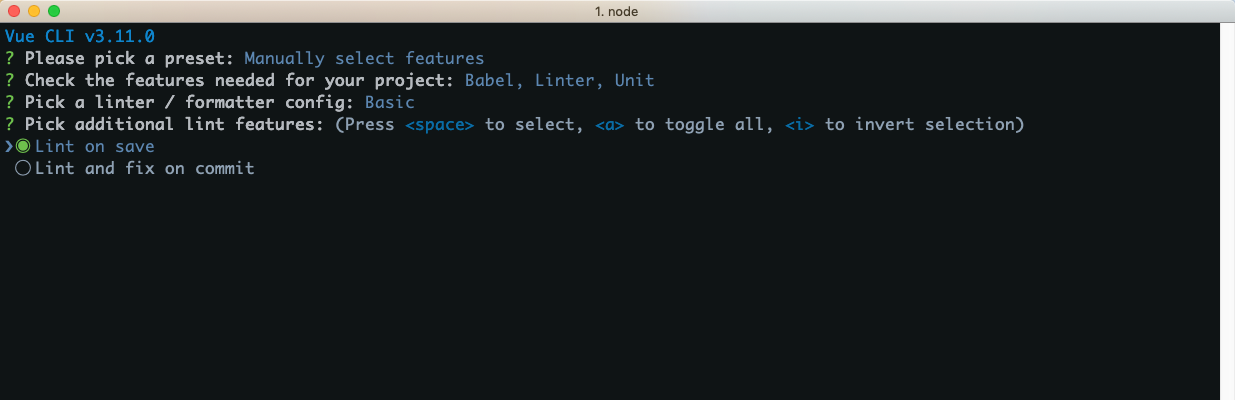
In the previous step Linter / Formatter was selected by default, this step is allowing us to customize that feature. We can just use the default and hit enter on this screen and the next.
Because we selected Unit Testing as a feature to include in our project, this step is asking us what library we want to use for Unit Testing. We are going to use Jest.
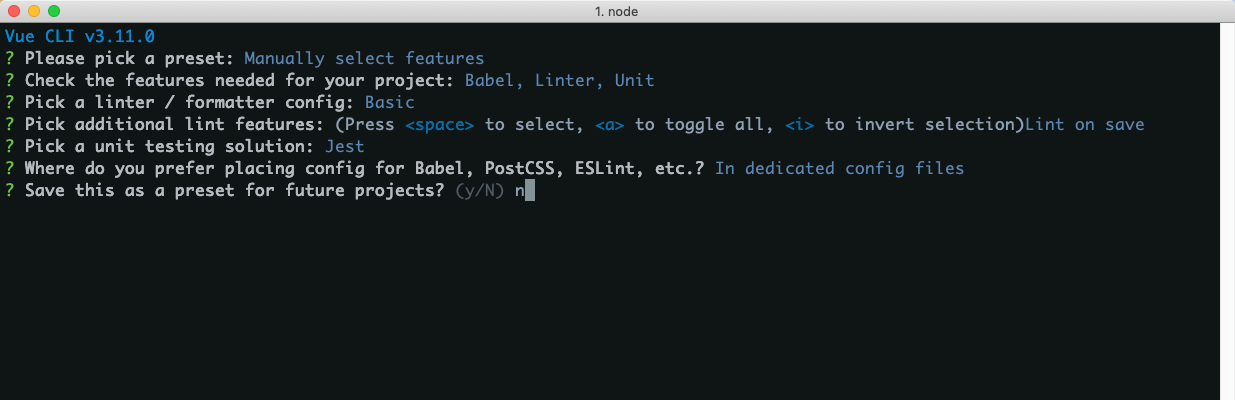
We are going to put all of our configuration in their own dedicated files so you can leave the default here and press enter.

If you want to save this as a preset you can, if not type n and press enter.
When the Vue CLI finishes creating our application, we’ll open up the vue-testing folder in our text editor. Looking at the package.json, we’ll see that Jest and vue-test-utils were installed for us.
    "devDependencies": {
    	"@vue/cli-plugin-unit-jest": "^3.11.0",
    	"@vue/test-utils": "1.0.0-beta.29"
    }
So what are these libraries exactly?
Jest
Jest is a JavaScript Testing Framework that focuses on simplifying your unit tests. In all of the examples we’ll look at in this article, Jest will run the unit tests for us and report back to us if the test passed or failed. While Jest is a pretty large framework (there are entire books written on the subject) you will only need to understand a few pieces to write some basic tests.
Vue Test Utils
Vue Test Utils is the official unit testing utility library for Vue.js. It gives you the ability to render your component in your tests and then perform various operations on that rendered component. This is crucial for determining the actual results from a component’s behavior.
Running your first test
When we selected Jest as our testing library, the Vue CLI created a sample test /test/unit/example.spec.js for us. This tests the /src/components/HelloWorld.vue component that was also created for us by the Vue CLI . After we are done running this test as an example, we are going to delete it and focus on writing our own tests.
So now that we know we have a test that can be run, how do we actually run it? If we take a look at the package.json we’ll see that the Vue CLI added some scripts for us.
    "scripts": {
    	"serve": "vue-cli-service serve",
    	"build": "vue-cli-service build",
    	"lint": "vue-cli-service lint",
    	"test:unit": "vue-cli-service test:unit"
    },
Specifically, test:unit is the one we care about, since it is a nice shortcut to run unit tests. From the command line, we can run the command npm run test:unit to execute the example.spec.js test. If we do so, we’ll see one test pass.

That was easy enough, right? Instead of worrying about the example code that was just tested, we’re going to start from scratch and build our own test in order to understand all of the concepts and libraries that make up unit tests.
At this point we can remove the tests/unit/example.spec.js file, the /src/components/HelloWorld.vue file, and any reference to the HelloWorld component in /src/App.vue.
Writing our first test
The best way to learn how to write unit tests is just like learning anything new, repetition. In this section, we’ll learn the different unit testing concepts, libraries, and techniques through a series of examples. In each example, you will be provided with the component code, which you can paste into a new Single File Component (SFC) in the src/components directory.
App Header
The App Header component should look pretty familiar because we used it as an example in the last article while identifying inputs and outputs. We’ll start by pasting the code below into a new file: src/components/AppHeader.vue.
    <template>
      <div>
        <button class="btn" v-show="loggedIn">Logout</button>
      </div>
    </template>

    <script>
    export default {
      name: 'app-header',
      data() {
        return {
          loggedIn: false
        }
      }
    }
    </script>
In the example earlier, we identified the inputs and outputs of this component:
Inputs
- Data: loggedIn - This data property determines if the button shows or not
Outputs
- Rendered Output: button - Based on the inputs, is our button displayed in the DOM?
Now that we’ve identified those, we can think about the kinds of tests to write for this component. Before looking at the answer below, what are two tests that you might write to ensure the component was working as desired?
- If loggedIn equals false (default), don’t show the Logout button
- If loggedIn equals true, show the Logout button
Now that we know what tests to start with, let’s write our first test. To begin, let’s create a file under tests/unit that follows the convention ComponentName-spec.js. In the case of our app header component, we’ll create AppHeader.spec.js.
TIP: What is the spec suffix for? Spec is short for specification.
Each test will contain one or more describe block, which allows us to group related tests. When we run our tests we will see the name of the describe block printed in the console. The describe method takes a string for the name of the component along with a function as its arguments.
    describe('AppHeader', () => {

    })
Now that we have a grouping for our tests, we can start writing individual tests. We do this by using the test method. The test method takes a name and a function as its arguments, just like the describe method does.
    test('a simple string that describes your test', () => {
      // test body
    }
TIP: You might also see test blocks that use it() and this will also work because it’s an alias for test().
Now that we know what tests we want to write and how to write them, let’s create an empty test with a good description of what our test is going to do. In the testing world, this is also known as a stub. I am going to start with the default: when the user is logged out.
    test("if a user is not logged in, do not show the logout button", () => {
      // test body
    });

    test("if a user is logged in, show the logout button", () => {
      // test body
    });
So we have the tests set up, but they don’t do anything yet, because we need to add some logic in the body of them to determine if the actual result matches the expected result
Understanding Assertions
In Jest, we use assertions to determine whether what we expect the test to return matches what is actually returned. Specifically, we do this by using the expect method, which gives you access to a number of “matchers” that help you validate different things.
We can start writing tests with something that we know will fail and come back later to fix each individual test. By taking this approach we know the test case is functionally working and it is our job to make it pass. In the following tests, we start with the expect method and pass it a value, in this case true ,which will be the actual result. For the expected result, we’ll use the Jest Matcher toBe() and pass that a value of false.
In plain english we are saying: “I expect true to be false”, and as you probably have guessed, that will fail since true is definitely not false.
    describe("AppHeader", () => {
      test("if a user is not logged in, do not show the logout button", () => {
        expect(true).toBe(false);
      });

      test("if a user is logged in, show the logout button", () => {
        expect(true).toBe(false);
      });
    });
In fact, if you run your tests using the command npm run test:unit you should see that two tests failed for your AppHeadeder.spec.js.
So far, we’ve used toBe(), which is just one of many Jest matchers. Understanding how to write tests means understanding what matchers are available to you, so take some time to understand the API.
Introduction to Vue Test Utils
Now that we have some basic tests set up (even though they are failing), we’re off to a good start. We wrote an assertion using our first Jest matcher toBe() to test the expected result. What we need now is a way to get the actual result from the component itself. To do so, we’ll use the Vue Test Utils library.
Mounting a component
The first method we’re going to look at in the Vue Test Utils API is mount(). This method will create a Wrapper that contains the mounted and rendered Vue component. A Wrapper is an object that contains a mounted component and methods to test the component. It is important to understand the different properties and methods on the wrapper, so take some time to dig through the documentation.
To mount your component, we’ll need to import mount from @vue/test-utils and the component that you want to mount. In our test, we’ll set a variable called wrapper (this is done by convention) that is equal to the mounted component we are testing.
    import { mount } from "@vue/test-utils";
    import AppHeader from "@/components/AppHeader";

    describe("AppHeader", () => {
      test("if a user is not logged in, do not show the logout button", () => {
        const wrapper = mount(AppHeader);
        expect(true).toBe(false);
      });

      test("if a user is logged in, show the logout button", () => {
        expect(true).toBe(false);
      });
    });
TIP: In the Vue Test Utils you will also find the method shallowMount(). If your component has children shallowMount() will return a simple implementation of that component instead of a fully rendered version. This is important because the focus of a unit test is the component in isolation and not the children of that component.
This still hasn’t actually done anything yet, but now we have a wrapper of the AppHeader component. In this first test case we know that by default the user is not logged in so we want to check and make sure the logout button isn’t visible. To make assertions on the state of the logout button, we’ll need to get a reference to the button element that is defined in the template. To accomplish this we will rely on two methods in our wrapper, find() and isVisible(). The find() method will search through our template for a matching selector and isVisible() will tell us if the element is visible in our component.
    import { mount } from "@vue/test-utils";
    import AppHeader from "@/components/AppHeader";

    describe("AppHeader", () => {
      test("if logged in is false, do not show logout button", () => {
        const wrapper = mount(AppHeader);
        expect(wrapper.find("button").isVisible()).toBe(false);
      });

      test("if logged in, show logout button", () => {
        expect(true).toBe(false);
      });
    });

    toBe(false)
Just to recap, here is what our first test is doing:
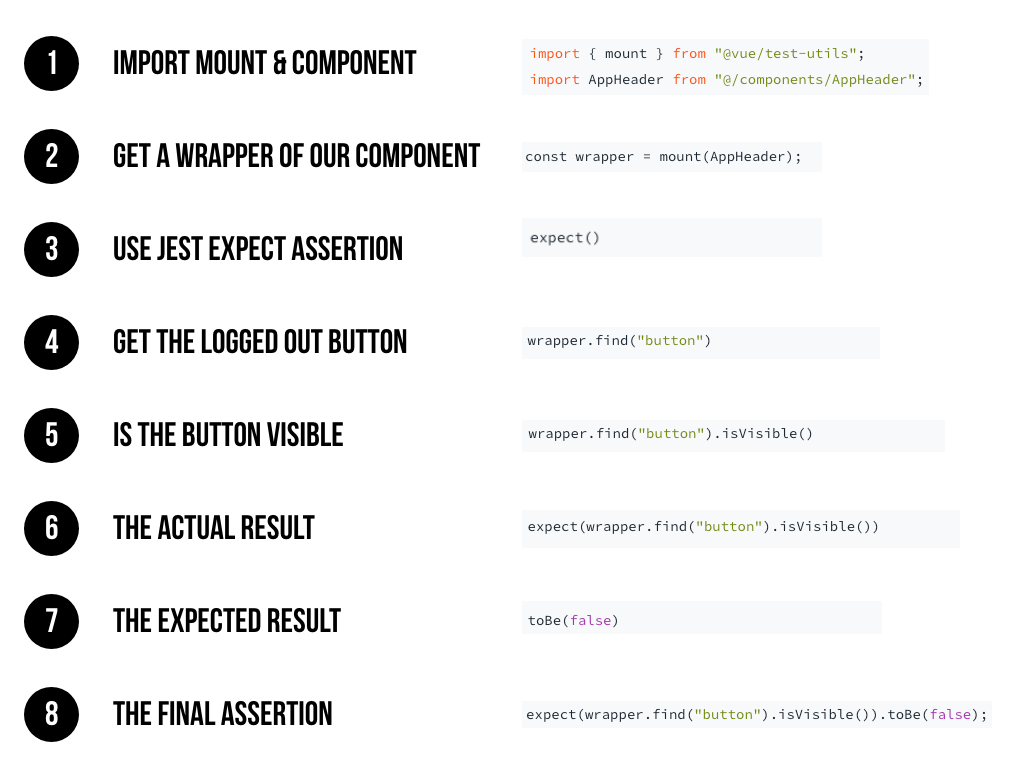
Now you need to write the second test, which is the inverse of the first test. It’s going to be pretty similar except for the task of making the component’s data loggedIn equal to true. You can use the wrapper method setData() to set the loggedIn property to true. Finally you will test the visibility of the button and expect it toBe(true).
    test("if logged in, show logout button", () => {
    	const wrapper = mount(AppHeader);
    	wrapper.setData({ loggedIn: true });
    	expect(wrapper.find("button").isVisible()).toBe(true);
    });
Conclusion
You just wrote your very first tests, nice job! Now that you have your tests written it’s time to run them and verify that they work. To run your tests you can use the command npm run test:unit from the command line. You should see a similar output to the one below, with two tests passing.

In this article we had a chance to write and run our first tests. In the next article we will build on that knowledge and look at another component that presents some new challenges.