
In the previous article you learned how to write and run your first unit test. Like any other skill in programming the best way to learn testing is through repetition. The more times you look at a component, identify what to test and then write those tests, the easier unit testing becomes. In this article, we are going to continue writing tests by looking at an example that has a few more moving parts.
Random Number Component
You saw this component earlier in this series, but this is a component that will generate a random number. We’ll start off by creating the component here: /src/components/RandomNumber.vue and use the following code:
    <template>
      <div>
        <span class="number">{{ randomNumber }}</span>
        <button class="btn" @click="getRandomNumber">Generate Random Number</button>
      </div>
    </template>

    <script>
    export default {
      props: {
        min: {
          type: Number,
          default: 1
        },
        max: {
          type: Number,
          default: 10
        }
      },
      data() {
        return {
          randomNumber: 0
        }
      },
      methods: {
        getRandomNumber() {
          this.randomNumber = Math.floor(Math.random() * (this.max - this.min + 1) ) + this.min;
        }
      }
    }
    </script>
What tests should we write?
With the component in place, we need to identify what tests to write. In the first lesson, we identified the inputs and outputs for this component:
Inputs
- Data
- random number
- Props
- min & max
- User Interaction
- Generate Random Number Button
Outputs
- Rendered Output (DOM)
- Is the number displayed on the screen between min and max?
Looking at that list, can you come up with some tests to write?
Tests could include:
- By default, the count should be
0 - If we click the generate button, we should get a random number between
1and10. - If we change the min and max to
100-200and click the button, we should get a number between100and200.
Random Number Tests
To get started, you will create a new test: /tests/unit/RandomNumber.spec.js and stub out each test that you will write along with a default assertion that you know will fail. This allows you to run your test and see each test fail, which gives you confidence that you set everything up correctly.
📃**/tests/unit/RandomNumber.spec.js**
import { shallowMount } from "@vue/test-utils";
import RandomNumber from "@/components/RandomNumber";
describe("RandomNumber", () => {
test("by default the random number should be 0", () => {
expect(true).toBe(false);
});
test("if we click the generate button, we should get a random number between 1 and 10", () => {
expect(true).toBe(false);
});
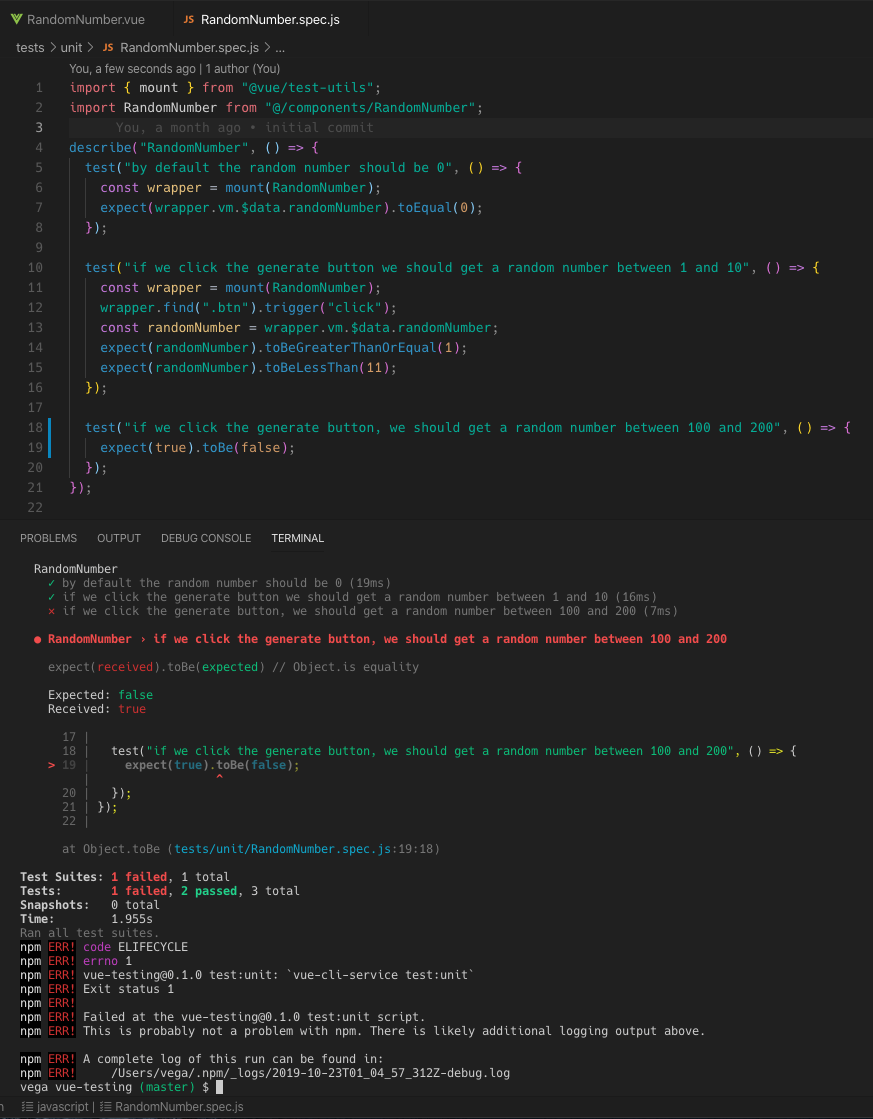
test("if we click the generate button, we should get a random number between 100 and 200", () => {
expect(true).toBe(false);
});
});
If we run npm run test:unit, we’ll see 3 failures for this test.
Checking the default random number
Looking at the component, we know that the default value for randomNumber is 0, so why would you even test for this? Well, what if someone else changed the default randomNumber? Testing it gives us confidence that if someone loads this component the first time, they will see the random number 0 displayed.
Earlier we talked about some things that we don’t want to test for, and one of those was testing the framework itself. If the randomNumber property is 0, you don’t need to test the rendered output because we can trust that Vue will render it correctly. So we can avoid writing tests like this:
📃 /tests/unit/RandomNumber.spec.js
    test('by default, the random number should be 0', () => {
      const wrapper = shallowMount(RandomNumber)
      expect(wrapper.html()).toContain('<span class="count">0</span>')
    })
Instead we can use the vm property of the wrapper to get access to all of the instance methods and properties of a vm. A property that will be helpful here is $data, which gives us access to all the data properties Vue is observing.
If we have the actual value of the randomNumber data property, we can use expect() and the Jest assertion toEqual() to verify that randomNumber is 0.
    test("by default, the random number should be 0", () => {
      const wrapper = shallowMount(RandomNumber);
      expect(wrapper.vm.$data.randomNumber).toEqual(0);
    });
Now that you have the first unit test completed let’s run it to make sure it passes. If you run npm run test:unit you should now have 1 test that passed and 2 that are failing.

So far we have created our random number component, stubbed out some tests and written our first one. Next, we are going to continue on our testing journey by learning how to handle user interaction and changing prop values.
Clicking the generate random number button
The next test that we are going to write is to verify that when we click the generate random number button that we get a random number between the min and max props. The defaults for min and max are 1 and 10 respectively, so the random number should fall in that range.
Just as we have before, we’ll call shallowMount(RandomNumber) and get a wrapper back for the component. We’ve already seen how to get a reference to an element using the find() method, so we’ll do that using the .btn class. The wrapper class also contains a method called trigger(), which triggers an event on the Wrapper DOM node. The first and required argument to the trigger method is a string for what event type to trigger. In this case, we want to trigger a click event on the button.
📃 /tests/unit/RandomNumber.spec.js
    test("if we click the generate button, we should get a random number between 1 and 10", () => {
      const wrapper = shallowMount(RandomNumber);
      wrapper.find(".btn").trigger("click");
    });
Now that the button was clicked, it should have generated a random number. Just as before, we don’t need to test the actual rendered output. We know that will work. We want to get the new value of randomNumber and then test that it is between 1 and 10. We already know how to get the randomNumber using the wrapper.vm.$data.randomNumber, so we’ll do that first. Finally, we can use some Jest assertions to make sure the random number falls between 1 and 10.
📃 /tests/unit/RandomNumber.spec.js
    const randomNumber = wrapper.vm.$data.randomNumber;
    expect(randomNumber).toBeGreaterThanOrEqual(1);
    expect(randomNumber).toBeLessThan(11);
If we have everything correct, our full test should look like this:
📃 /tests/unit/RandomNumber.spec.js
    test("if we click the generate button, we should get a random number between 1 and 10", () => {
      const wrapper = shallowMount(RandomNumber);
      wrapper.find(".btn").trigger("click");
      const randomNumber = wrapper.vm.$data.randomNumber;
      expect(randomNumber).toBeGreaterThanOrEqual(1);
      expect(randomNumber).toBeLessThan(11);
    });
If we were to run the tests now we should see 2 passing leaving us just 1 more test to work on.
Setting different prop values
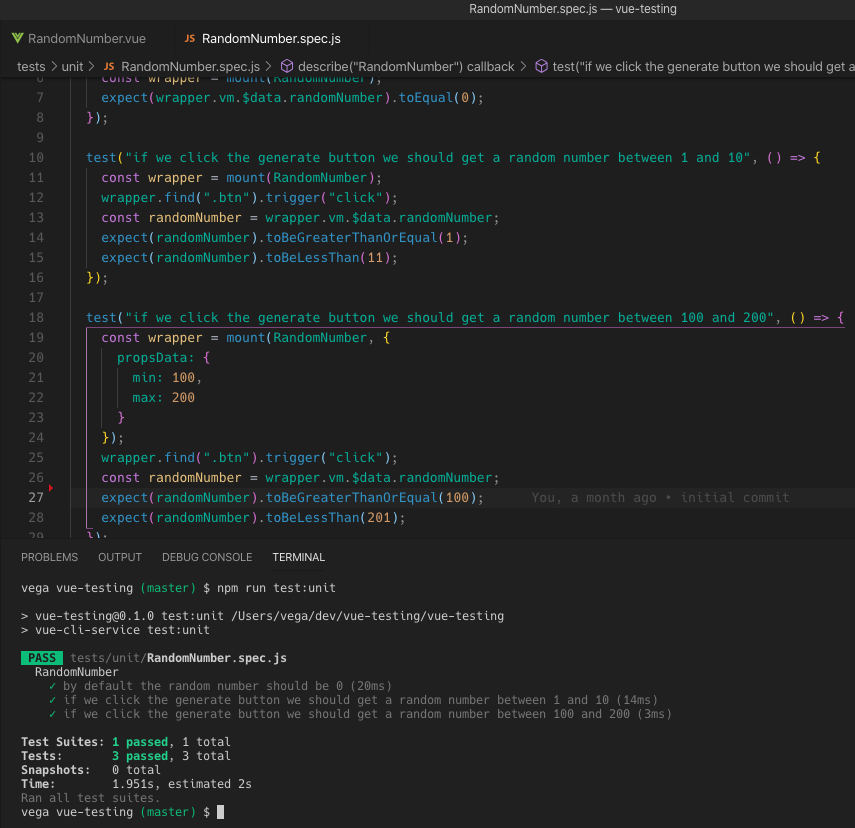
Since someone using this component can change the min and max value range via the min and max props, we need to test for this.
The shallowMount() method takes an optional second argument, where we can pass in some options, including propsData. This can be used to reset the min and max values, to 100 and 200 respectively, in this case.
📃 /tests/unit/RandomNumber.spec.js
    test("if we click the generate button, we should get a random number between 100 and 200", () => {
        const wrapper = shallowMount(RandomNumber, {
          propsData: {
            min: 100,
            max: 200
          }
        })
      });
With our new min and max, the test is going to look pretty similar to the one we just wrote above.
📃 /tests/unit/RandomNumber.spec.js
    test("if we click the generate button, we should get a random number between 100 and 200", () => {
        const wrapper = shallowMount(RandomNumber, {
          propsData: {
            min: 100,
            max: 200
          }
        })
        wrapper.find('.btn').trigger('click')
        const randomNumber = wrapper.vm.$data.randomNumber
        expect(randomNumber).toBeGreaterThanOrEqual(100)
        expect(randomNumber).toBeLessThan(201)
      });
At this point you can run your tests and all of them should pass. Congratulations, you’re on your way to writing better software!
Wrapping it up
If you’re just getting started with unit testing in Vue, I hope you learned a lot here. If it wasn’t apparent in the article, half the battle is really understanding the tools that are available to you. Jest and Vue Test Utils are two really great libraries that can do so many things. It is going to take time to learn them both. At first, you’ll spend a lot of time looking at the documentation, and that’s ok.
If you want to get the code for everything in this article, you can grab them from my github repository here.
A Full Unit Testing Course
If you’re interested in learning more about Unit Testing in Vue.js, keep an eye out for Vue Mastery’s upcoming full course on the subject.
Conclusion
You already knew that testing was important ,which led you to read this entire article. If you have tried testing before and just found it confusing, I hope this article cleared some things up for you. If you know what to test, what not to test and how to use the tools available to you it can actually be a great experience. Good luck on your new testing journey and if you have any questions please feel free to contact me.