

In the fluid world of web development, the innovative Vue.js team brings us Vapor Mode. This mode optimizes Vue’s core rendering process, helping our applications run light as well… vapor, without the developer having to delve into intricate optimizations themselves.
In this article, we’re going to uncover how Vapor Mode elegantly enhances app efficiency and how to get started trying it out. But first—let’s get clear on why Vapor Mode has been developed in the first place.
Why Vapor mode?
If you’ve used a JavaScript framework before, you’re likely familiar with the concept of the Virtual DOM. It involves creating and updating a virtual representation of the DOM and storing it in memory to sync with the real DOM. Since updating the VDOM is faster than updating the actual DOM, it gives frameworks the freedom to make necessary changes to the VDOM relatively cheaply.
In the case of Vue, its VDOM-based rendering system converts the code in our <template> sections into actual DOM nodes. This system also efficiently manages changes to the node, which can be dynamically made using JavaScript functions, API calls, and so on.
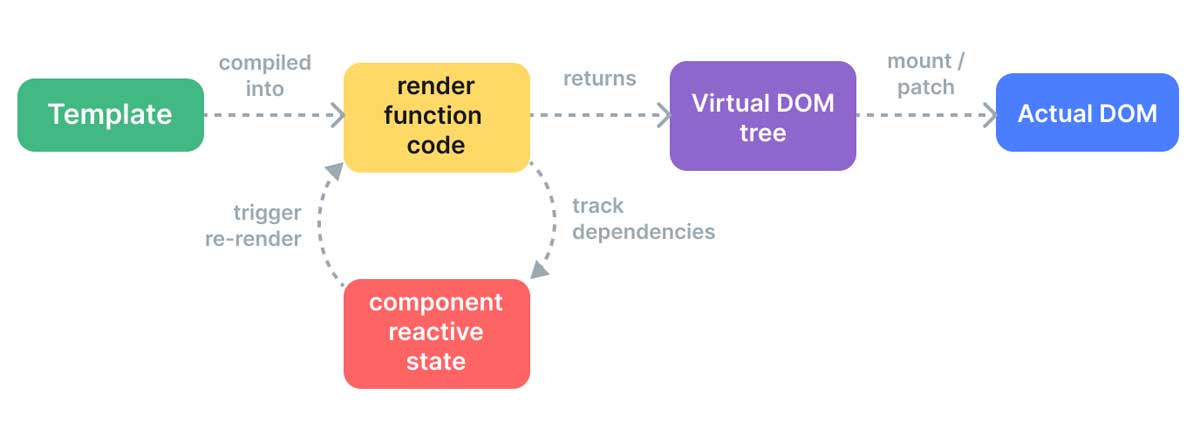
While the VDOM improves speed and performance, updating the DOM does still necessitate traversing the node tree and comparing the properties of every virtual node for accuracy. This process also includes generating new VNodes for each part of a tree, regardless of any changes, which can lead to unnecessary strain on memory.
But in Vue, another approach was introduced to tackle this issue, which is called “Compiler-Informed Virtual DOM”.
This is a hybrid approach that introduces some optimization concepts that help tackle this issue, including:
- Static Hoisting
- Patch Flags
Let’s take a closer look at these to gain a clearer understanding of Vue’s rendering system so we can better understand what Vapor mode brings to the table.
Static Hoisting in Vue
Static hoisting is a technique that automatically extracts VNode creation from the render function, allowing for the reuse of VNodes across multiple re-renders. This optimization is effective because these VNodes remain unchanged over time.
For example, given this code:
<div>
  <p class="vue">Vue.js is Cool</p>
  <p class="solid">Solid.js is also Cool</p>
  <p>Agree?{{agree}}</p>
</div>
When compiled using a static hoisting technique, we get:
import { createElementVNode as _createElementVNode, toDisplayString as _toDisplayString, openBlock as _openBlock, createElementBlock as _createElementBlock } from "vue"

const _hoisted_1 = /*#__PURE__*/_createElementVNode("p", { class: "vue" }, "Vue.js is Cool", -1 /* HOISTED */)
const _hoisted_2 = /*#__PURE__*/_createElementVNode("p", { class: "solid" }, "Solid.js is also Cool", -1 /* HOISTED */)

export function render(_ctx, _cache, $props, $setup, $data, $options) {
  return (_openBlock(), _createElementBlock("div", null, [
    _hoisted_1,
    _hoisted_2,
    _createElementVNode("p", null, "Agree?>" + _toDisplayString(_ctx.agree), 1 /* TEXT */)
  ]))
}
In the example above, you’ll see there are two variables: _hoisted_1 and _hoisted_2. They contain the static code that will remain unchanged, which is lifted or hoisted out of the render function to avoid re-processing code that is not dynamic.
We declare and re-render the element in the last p tag because that element contains a dynamic variable, which could change at any time.
It’s worth noting that when there are enough consecutive static elements, they are merged into a single static Vnode (using createStaticVNode) and passed to the render function.
Let’s look at an example:
<div>
  <p class="vue">Vue.js is Cool</p>
  <p class="solid">Solid.js is also Cool</p>
  <p class="vue">Vue.js is Cool</p>
  <p class="solid">Solid.js is also Cool</p>
  <p class="solid">React is cool</p>
  <p>{{agree}}</p>
</div>
When compiled, we get:
import { createElementVNode as _createElementVNode, toDisplayString as _toDisplayString, createStaticVNode as _createStaticVNode, openBlock as _openBlock, createElementBlock as _createElementBlock } from "vue"

const _hoisted_1 = /*#__PURE__*/_createStaticVNode("<p class=\"vue\">Vue.js is Cool</p><p class=\"solid\">Solid.js is also Cool</p><p class=\"vue\">Vue.js is Cool</p><p class=\"solid\">Solid.js is also Cool</p><p class=\"solid\">React is cool</p>", 5)

export function render(_ctx, _cache, $props, $setup, $data, $options) {
  return (_openBlock(), _createElementBlock("div", null, [
    _hoisted_1,
    _createElementVNode("p", null, _toDisplayString(_ctx.agree), 1 /* TEXT */)
  ]))
}
Instead of many hoisted consts, we now only have one that contains all of the template’s static code.
Patch Flags in Vue
Patch flags allow Vue to be smart about how it updates the DOM. They’re used to identify the type of updates required for elements with dynamic bindings, such as class, id, value, etc. Instead of a blanket update approach where everything might be re-rendered or checked, it selectively updates only what has changed based on these flags, without re-rendering entire components or checking every element.
This not only speeds up the update process by focusing only on elements that have changed, but also avoids unnecessary operations, like reconciling the order of elements that haven’t been altered.
This is accomplished by passing the VNode to the render function when updating. The createElementVNode function accepts a number as its final argument. This number signifies a patch flag, which indicates the type of dynamic binding that requires an update when the render function is called.
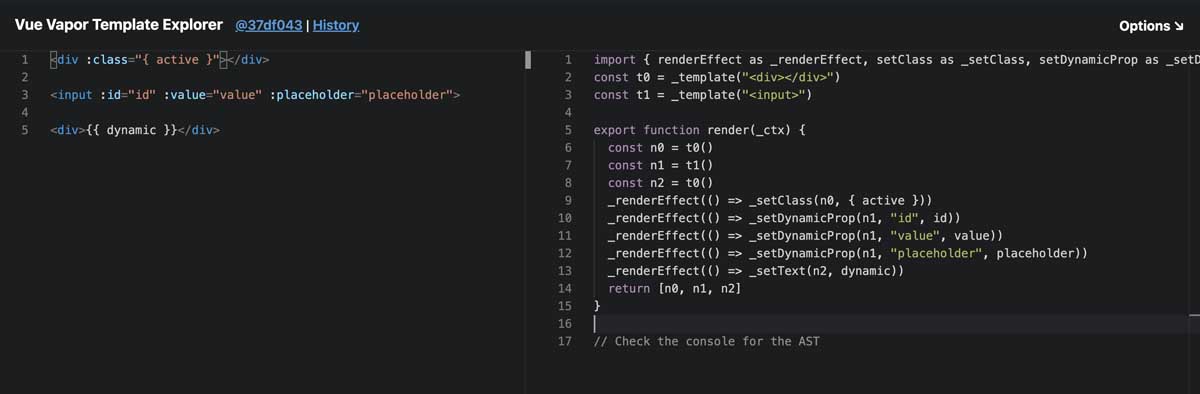
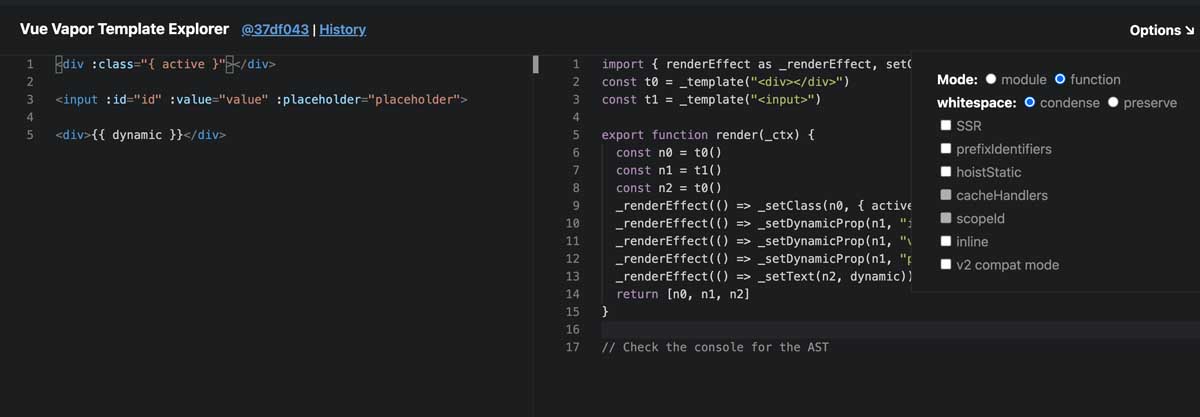
<div :class="{ active }"></div>

<input :id="id" :value="value" :placeholder="placeholder">

<div>{{ dynamic }}</div>
Here, we have a div with a dynamic class active, an input element with dynamic id, value, and placeholder, and another div with dynamic text.
When this code is compiled, we get this:
import { normalizeClass as _normalizeClass, createElementVNode as _createElementVNode, toDisplayString as _toDisplayString, Fragment as _Fragment, openBlock as _openBlock, createElementBlock as _createElementBlock } from "vue"

export function render(_ctx, _cache, $props, $setup, $data, $options) {
  return (_openBlock(), _createElementBlock(_Fragment, null, [
    _createElementVNode("div", {
      class: _normalizeClass({ active: _ctx.active })
    }, null, 2 /* CLASS */),
    _createElementVNode("input", {
      id: _ctx.id,
      value: _ctx.value,
      placeholder: _ctx.placeholder
    }, null, 8 /* PROPS */, ["id", "value", "placeholder"]),
    _createElementVNode("div", null, _toDisplayString(_ctx.dynamic), 1 /* TEXT */)
  ], 64 /* STABLE_FRAGMENT */))
}
Here, each createElementVNode function takes in a number, which represents an attribute as its last argument. The first number is 2, which represents a class, 8 which represents props, and 64, which represents a stable fragment. You can find the full list of each flag on GitHub.
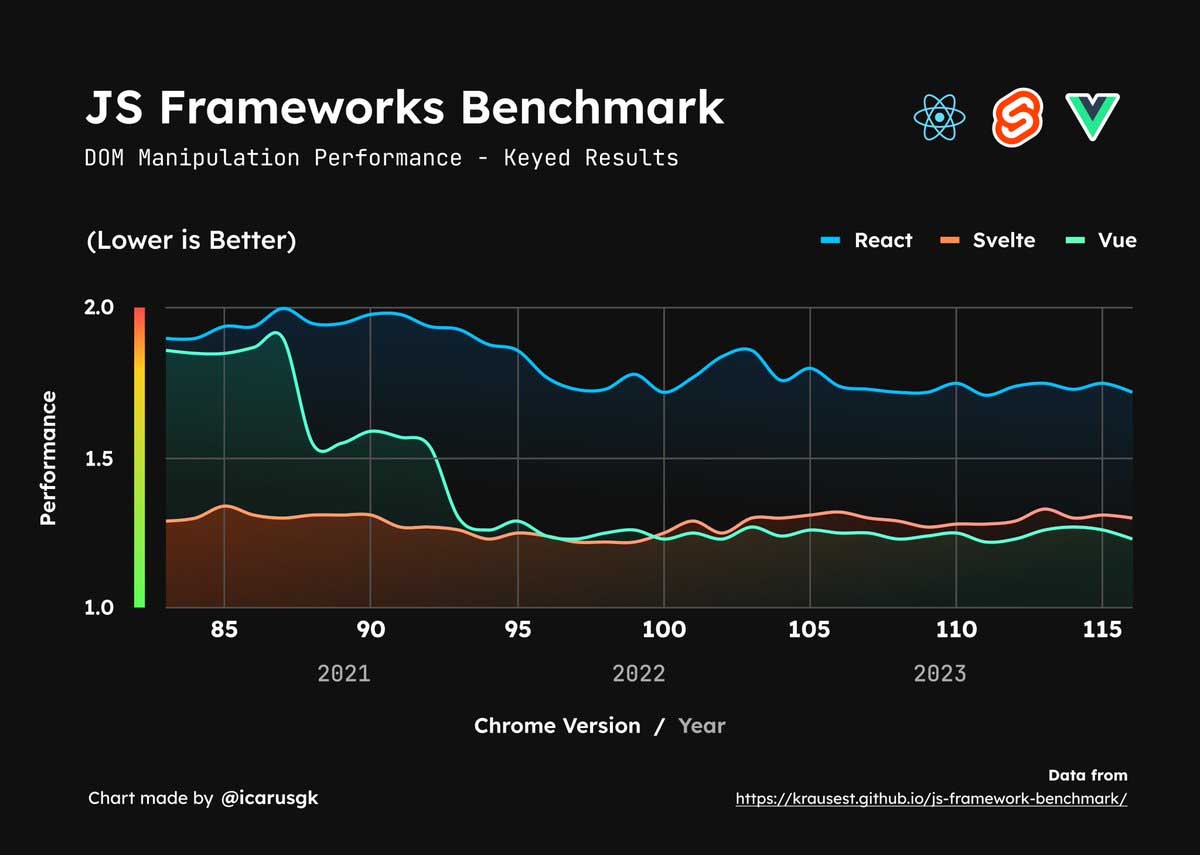
With this approach, Vue can perform relatively better than React and Svelte as is shown in the diagram below.
The case for Vapor Mode
Despite Vue’s refined approach, a few performance issues still exist. These issues span from unnecessary memory usage, tree diffing, and the pitfalls of the VDOM.
Vapor Mode was created to fix this.
Vapor mode is an alternative compilation strategy that aims to improve the performance of your Vue.js application by compiling your code into a more efficient JavaScript output that uses less memory, requires less runtime support code, and avoids the pitfalls of the Compiler-Informed VDOM approach illustrated above.
Some of Vapor Mode’s benefits include:
- It is opt-in and does not affect your existing codebase. This means you can start using vapor mode to optimize the performance of your Vue 3 applications immediately without having to make any changes to your code.
- Using only Vapor components in your application lets you completely drop the VDOM runtime from the bundle, reducing the baseline runtime size.
❕ Vapor mode will only support Composition API and <script setup>
How Vue’s Vapor Mode Works
According to Vue (and Vite.js) Creator Evan You, Vapor mode was inspired by Solid.js, a declarative JavaScript library for creating user interfaces, which takes a different approach to compiling and rendering nodes.
Instead of using a Virtual DOM, it compiles its templates to real DOM nodes and updates them with fine-grained reactions. Like Solid, Vue uses Proxies in its Reactivity System with read-based auto-tracking.
Given the same code in our last example, with Vapor Mode on, it compiles and gives us:
import { renderEffect as _renderEffect, setClass as _setClass, setDynamicProp as _setDynamicProp, setText as _setText, template as _template } from 'vue/vapor';
const t0 = _template("<div></div>")
const t1 = _template("<input>")

export function render(_ctx) {
  const n0 = t0()
  const n1 = t1()
  const n2 = t0()
  _renderEffect(() => _setClass(n0, { active }))
  _renderEffect(() => _setDynamicProp(n1, "id", id))
  _renderEffect(() => _setDynamicProp(n1, "value", value))
  _renderEffect(() => _setDynamicProp(n1, "placeholder", placeholder))
  _renderEffect(() => _setText(n2, dynamic))
  return [n0, n1, n2]
}
In the compiled version of the code, you’ll see the imports of renderEffect, setClass, setDynamicProp, setText, and template from the vue/vapor package.
Let’s look at what each one of these functions does.
Sure, here’s the text with each link formatted in HTML to open in a new tab:
- renderEffect: This function is responsible for listening to changes in the classes, props, and text to ensure that the right changes are made to these nodes on update.
- setClass: As the name suggests, this function assigns a class to a node element. It takes two arguments: an
element(ornode) and aclassthat it assigns to the element. - setDynamicProp: This function is used to set dynamic properties on an element. It requires three arguments: the
element, thekey, and thevalue. These are used to determine the appropriate values to assign or update each time this function is invoked. - setText: This function accepts a
nodeand possible values. It sets the given value as thetextContentof the node, while also verifying if the content has been modified. - template: This function accepts a valid HTML string and creates an element from it. Upon examining the function, we can see it uses basic DOM manipulation methods. Specifically,
document.createElementis used to create the element. The content of the element is then appended usinginnerHTML, which accepts the HTML string.
Using a combination of these functions, Vue can compile your components and applications into faster and more efficient code that ultimately improves the performance and bundle size of your application.
To get developers acquainted with Vapor Mode, the Vue team has released a playground and template explorer.
The playground lets you compare the compiled version of your code when Vapor mode is enabled and when it is not.
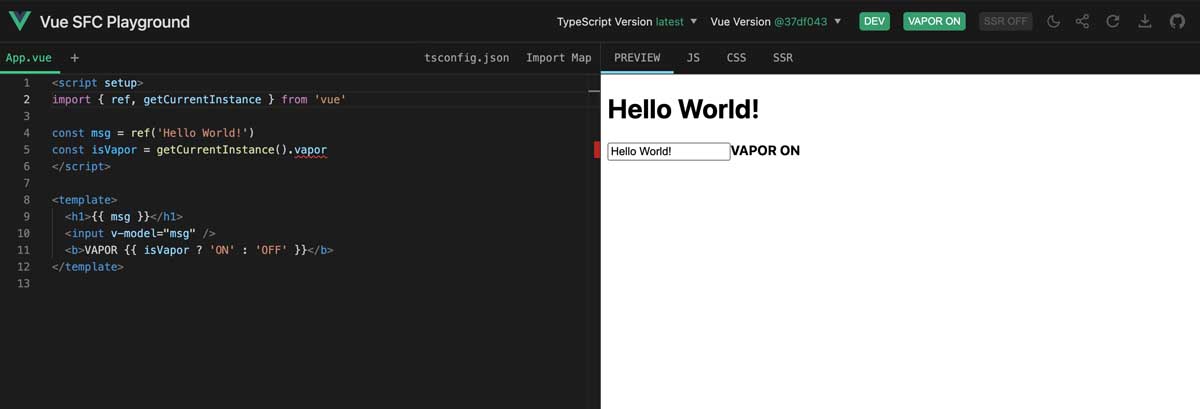
Within the playground, you can inspect your code’s CSS, JS, and SSR output. It also allows you toggle the Vapor mode feature to easily compare the difference in output.
The Template Explorer is similar to the playground, but it only gives the JavaScript output of your code with a few options like SSR, module, etc.
Using Vapor Mode
According to the Vapor Mode repo, here is an example of building a component using Vapor mode:
<script setup lang="ts">
import {
  onBeforeMount,
  onMounted,
  onBeforeUnmount,
  onUnmounted,
  ref,
} from 'vue/vapor'

const bar = ref('update')
const id = ref('id')
const p = ref<any>({
  bar,
  id: 'not id',
  test: 100,
})

function update() {
  bar.value = 'updated'
  p.value.foo = 'updated foo'
  p.value.newAttr = 'new attr'
  id.value = 'updated id'
}

function update2() {
  delete p.value.test
}

onBeforeMount(() => console.log('root: before mount'))
onMounted(() => console.log('root: mounted'))
onBeforeUnmount(() => console.log('root: before unmount'))
onUnmounted(() => console.log('root: unmounted'))
</script>

<template>
  <div>
    root comp
    <button @click="update">update</button>
    <button @click="update2">update2</button>
    <input :value="p.test" :placeholder="p.bar" :id="p.id" />
  </div>
</template>
In contrast to what Vue developers are used to, notice how we import ref, onBeforeMount, onMounted, and other functions from the vue/vapor package.
These functions are all part of the Composition API, and the only difference is that they are now imported from the vapor package, which does not rely on the VDOM.
This allows us to use both Vapor Mode components and non-Vapor Mode components in our application without requiring additional configuration.
Supported Features
As part of the efforts to improve performance and drop the baseline runtime size, Vapor Mode will only support the composition API and only with<script setup>.
As the Vue team continues its work, we will see more examples of the features supported in Vapor Mode but one thing is clear: the supported features in Vapor Mode components will work the same way it does for non-vapor mode components.
Wrapping up
Now that we have seen how Vue currently compiles code using the Compiler-Informed Virtual DOM approach and its drawbacks, it will be exciting to see how well Vapor Mode performs and how it delivers on its promise of smaller bundle size and improved performance. As we continue to wait for the launch date, it’s important to get familiar with the available features of Vapor Mode, which can be done using the Vapor playground.