
When writing code, there are certain things we do over and over again that can be a pain and hard to reuse. That’s where macros come in handy. What is a macro? Think of them as a shortcut or pattern that tells the computer how to replace one thing with another. Macros can help us make our code shorter and easier to write.
In JavaScript, macros aren’t built-in like in some other languages. However, we have techniques and special libraries at our disposal to achieve similar benefits. One such library is Vue Macros, which allows us to perform advanced operations with Vue.js, making coding easier and more efficient.
In this article, we’ll take a look at VueMacros for enhancing Vue.js development. We’ll cover installation & configuration, different macro types, and their benefits. By the end, you’ll have a solid understanding of integrating Vue Macros to streamline your Vue.js projects.
Getting Started with VueMacros
VueMacros is a library that implements proposals or ideas that are yet to be officially implemented by Vue. This means it will explore and extend more features and syntax sugar to Vue. This library was created by and is currently maintained by Kevin Deng, a member of the Vue core team. He also contributes to and supports other open-source projects like unplugin and unplugin-vue-components. Using VueMacros requires basic knowledge of Vue, as it plugs into existing Vue code and syntax. It also requires a minimum Node.js version of 16.14.0 or higher and Vue ≥ 2.7 or Vue ≥ 3.0.
Installation & Configuration
Before we can start using any of the available macros in VueMacros, we need to install it in our project. Depending on your preference, this can be done using either npm, pnpm, or yarn.
Yarn
yarn add -D unplugin-vue-macros
After installation, the next step required is to configure our project to use it. There is more than one way to set up a Vue project, and as such, the configuration process would vary depending on the bundler (Vite, Webpack, Vue CLI, etc.) used.
Bundler Integration
By default, VueMacros comes with first-class support for Vite and Rollup, but it also attempts to make the process of integrating with the bundlers seamless.
For this article, we’re going to use Vite as our preferred bundler, but the process for other bundlers is similar and also straightforward.
By default, this is what a vite.config.js file looks like;
vite.config.js
import { defineConfig } from "vite";
import vue from "@vitejs/plugin-vue";
// https://vitejs.dev/config/
export default defineConfig({
  plugins: [vue()],
  test: {
    environment: "happy-dom",
  },
});
In order for us to use the library, we need to import the library and update our plugin configuration. So we’ll update the file to this:
vite.config.js
import { defineConfig } from "vite";
import VueMacros from "unplugin-vue-macros/vite";
import Vue from "@vitejs/plugin-vue";
// https://vitejs.dev/config/
export default defineConfig({
  plugins: [
    VueMacros({
      plugins: {
        vue: Vue(),
      },
    }),
  ],
});
Here, we import the VueMacros library into our config file. If we look closely, we can see that it is specifically the Vite version of this library, and this is because it is the only version of the library that will work with a Vite-powered app.
After importing, we add it to the list of plugins and then pass in an object that contains the plugins property. This property accepts an object of plugins, which we pass in the Vue plugin that we also imported into the config file.
If your project is built with TypeScript, additional configuration is necessary in order for things to run smoothly.
tsconfig.json
{
  "compilerOptions": {
    // ...
    "types": ["unplugin-vue-macros/macros-global" /* ... */]
  }
}
Nuxt Integration
If you’re using Nuxt, you can also take advantage of VueMacros. To start with VueMacros in Nuxt, the first step would be installing the library.
Yarn
yarn add -D @vue-macros/nuxt
Once this installation is complete, the next step is to add the library to the list of modules in the nuxt.config.ts file:
nuxt.config.ts
export default {
  modules: [
    '@vue-macros/nuxt',
  ],
}
By default, most macros are enabled and readily available for use in your project after installation, except for a few.
Types of Macros
All the macros that are available in this library have been categorized into three categories based on their availability. These categories are;
- Implemented by Vue 3.3.
- Stable macros.
- Experimental macros.
Implemented by Vue 3.3
This includes features that were introduced with the announcement of Vue 3.3, and there are currently three of them, which include:
defineOptions: This macro allows declaring component options directly in<script setup>without requiring a separate<script>block.defineSlots: As the name implies, this macro declares expected slots and their respective expected slot props.shortEmits: This macro was created to simplify the definition of emits. While this feature was introduced in Vue 3.3, the VueMacros library also offers support for function-style declaration, which is unavailable in the official version.
Stable Macros
Stables macros includes macros that are already stable and often do not require extra configuration before usage. Examples of stable macros include:
defineModels: This is one of the most used macros in the VueMacros library. It helps abstract the process of two-way data binding between a parent and child component by eliminating the use ofpropsandemits.definePropsRefs: This macro returns refs fromdefinePropsinstead of a reactive object. UnlikedefineProps, which does not support destructuring without losing reactivity, this macro can be destructured and still remain reactive.shortVmodel: This macro helps map thev-modelto a shorter form (::,$, and*).
Experimental Macros
The macros in this category are all experimental features that should not be used in production, but can definitely be experimented with in playground projects. A few of them include:
definePropdefineEmitsetupComponent
Tour of Macros
Now that we have seen a breakdown of macros available in this library, let’s take a look at how some of them work and when to use them.
defineOptions
The defineOptions macro allows developers that prefer the composition API and <script setup> to take advantage of some of the properties and configurations available in the options API.
In order to use this macro, we need to import the package into our vite.config.ts
vite.config.ts
import { defineConfig } from "vite";
import VueMacros from "unplugin-vue-macros/vite";
import DefineOptions from "unplugin-vue-define-options/vite"; // import defineOptions
import Vue from "@vitejs/plugin-vue";
// https://vitejs.dev/config/
export default defineConfig({
  plugins: [
    DefineOptions() //add to the list of plugins
  ],
});
When working with TypeScript, we also need to add configuration for this macro to tsconfig.json in order for it to work.
tsconfig.json
"compilerOptions": {
    // ...
    "types": ["unplugin-vue-define-options/macros-global"  /* ... */]
  }
Here, we import the defineOptions package into our vite.config.ts file and add it to the list of plugins that our application is making use of. Since we’re using TypeScript, we also add the macro to the types property in our tsconfig.json file.
After doing this, we can use the defineOptions macro in any of our components. It accepts values like name, inheritAttrs, etc.
<script setup lang='ts'>
  defineOptions({
    name: "SearchComp",
  });
</script>
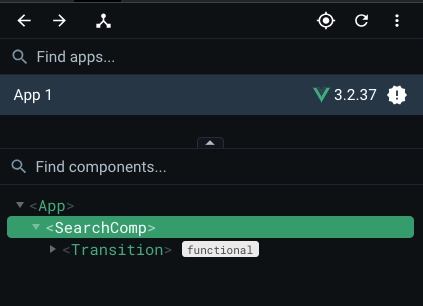
In this example, we make use of the name property to assign a name to our component. This comes in handy when we do not want to assign the same name of the component file as the component name when viewing from the Vue Devtools.
definePropsRefs
By default, we have access to the defineProps macro in Vue 3, and it works like this:
<script setup lang="ts">
  defineProps(['modelValue'])
</script>

<template>
  <section class="search search--expanded">
    <transition name="fade-transform" mode="out-in">
      <form @submit.prevent="">
        <input
          type="search"
          name="search"
          id="search"
          :value="modelValue"
          placeholder="Search ..."
          ref="searchInput"
          @input="$emit('update:modelValue', $event.target.value)"
        />
      </form>
    </transition>
  </section>
</template>
But one of the challenges we constantly face with defineProps is that restructuring props usually leads to the prop losing its reactivity.
const {modelValue, count} = defineProps(['modelValue', 'count']) // loses reactivity
And the only way around this is usually to assign a variable to all the props in the component and then wrap the prop around a computed property:
const props = defineProps(['modelValue', 'count'])

const modelValue = computed(() => props.modelValue)
With the definePropsRefs macro, we can successfully destructure props while still retaining reactivity. This is because it returns refs from defineProps instead of a reactive object.
const { modelValue, count } = definePropsRefs<{
  modelValue: string
  count: number
}>()
With this, we can access any of our props by directly attaching a .value at the end of each prop with their values constantly reacting to changes from the source.
defineSlots
This macro makes it possible to declare expected slots and their respective expected slot props.
<script setup lang="ts">
defineSlots<{
  // slot name
  title: {
    // scoped slot
    foo: 'bar' | boolean
  }
}>()
</script>
This is also similar to the type property we have when defining props.
defineProps({
    title: {
      type: [Boolean | String],
    },
  });
defineModels
When working with a parent and child component, where the child component utilizes two-way data binding with v-model and the parent component also needs to access and modify this value, the recommended approach has traditionally involved utilizing props to receive the default value from the parent component.
Additionally, custom events are used to notify the parent component of any changes that occur within the child component.
An example where this applies would be a custom search component:
search.vue
<script setup lang="ts">
  defineEmits(["update:modelValue"]);
  defineProps(["modelValue"]);
  const vFocus = {
    mounted: (el) => el.focus(),
  };
</script>

<template>
  <section class="search search--expanded">
    <transition name="fade-transform" mode="out-in">
      <form @submit.prevent="">
        <input
          type="search"
          name="search"
          id="search"
          :value="modelValue"
          placeholder="Search ..."
          ref="searchInput"
          v-focus
          @input="$emit('update:modelValue', $event.target.value)"
        />
      </form>
    </transition>
  </section>
</template>

<style lang="scss" scoped>
  .search {
    transition: width 300ms ease-in-out;
    &--expanded {
      width: 100%;
      max-width: 100%;
      @media (min-width: 768px) {
        width: 370px;
      }
    }
    &__form {
      flex-basis: 100%;
      display: block;
    }
    &__button {
      color: #4c5b90;
      font-size: 15px;
      padding: 8px 14px;
      border-radius: 4px;
      &:hover {
        background: transparent;
        cursor: pointer;
      }
    }
    &__input {
      border: 1px solid #dde1e9;
    }
  }
</style>
Here, we have a modelValue prop that accepts a string (if it applies) that sets the default value in the input field. We also have a vFocus custom directive that automatically focuses the user’s input in the search box.
We need a way to inform the parent component whenever there is a change in value inside the input field, and for this, we use the native @input event present in every input field. In this native input event, we emit an update:modelValue event, which passes the updated value to the parent component.
After this, we import the <search /> component into the parent component, where we can see and interact with it.
Parent.vue
<script setup>
  import { ref } from "vue";
  import search from "./components/search.vue";

  const searchValue = ref("");
</script>

<template>
  <form>
    <search v-model="searchValue" />
    <p>{{ searchValue }}</p>
  </form>
</template>

<style>
  #app {
    font-family: Avenir, Helvetica, Arial, sans-serif;
    -webkit-font-smoothing: antialiased;
    -moz-osx-font-smoothing: grayscale;
    text-align: center;
    color: #2c3e50;
    margin-top: 60px;
  }
</style>
This method works as intended, but it can definitely be cleaner and shorter. This is what led to the introduction of the defineModels macro. The defineModels macro was created to handle the declaring and mutation of v-model props without the need to emit custom events or create props for the sole purpose of communicating updates made to a variable between a parent and child component.
defineModels vs defineModel
It is important to note that defineModels is quite different from defineModel, which was introduced in Vue 3.3.
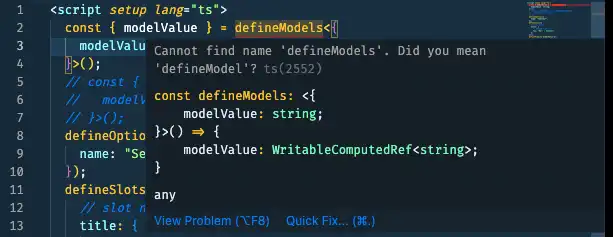
Here, we can see the Vue.js VS Code Volar extension showing a warning indicating the existence of thedefineModel. This macro does the same job as defineModels but the difference is that defineModels is available to Vue 3, Nuxt 3, and Vue 2 users provided they have the VueMacros library installed in their project, while users have to upgrade to Vue 3.3 to enjoy defineModel
Configuration
In order to take advantage of this macro, you first need to install @vueuse/core in your project. This can be done using either npm or yarn;
yarn
yarn add @vueuse/core
After this installation, we can now refactor our existing search.vue component to use the defineModels macro.
search.vue
<script setup lang="ts">
  const { modelValue } = defineModels<{ // added here
    modelValue: string;
  }>();
  const vFocus = {
    mounted: (el) => el.focus(),
  };
</script>

<template>
  <section class="search search--expanded">
    <transition name="fade-transform" mode="out-in">
      <form @submit.prevent="">
        <input
          type="search"
          name="search"
          id="search"
          :value="modelValue"
          placeholder="Search ..."
          ref="searchInput"
          v-focus
          @input="$emit('update:modelValue', $event.target.value)"
        />
      </form>
    </transition>
  </section>
</template>

<style lang="scss" scoped>
  ...
</style>
Here, we create a modelValue that is defined using the defineModels macro. This value replaces both the modelValue prop and the update:modelValue event that we’re used to, thereby helping us achieve the same functionality but with fewer lines of code.
Behind the scenes, this macro is helping us create both props and custom events, which we have been doing ourselves.
Summing it all up
Now that you understand the usefulness of macros, you can experiment with integrating them into your applications (when appropriate) to leverage their abilities to handle complex tasks, reducing the burden on your development process.