
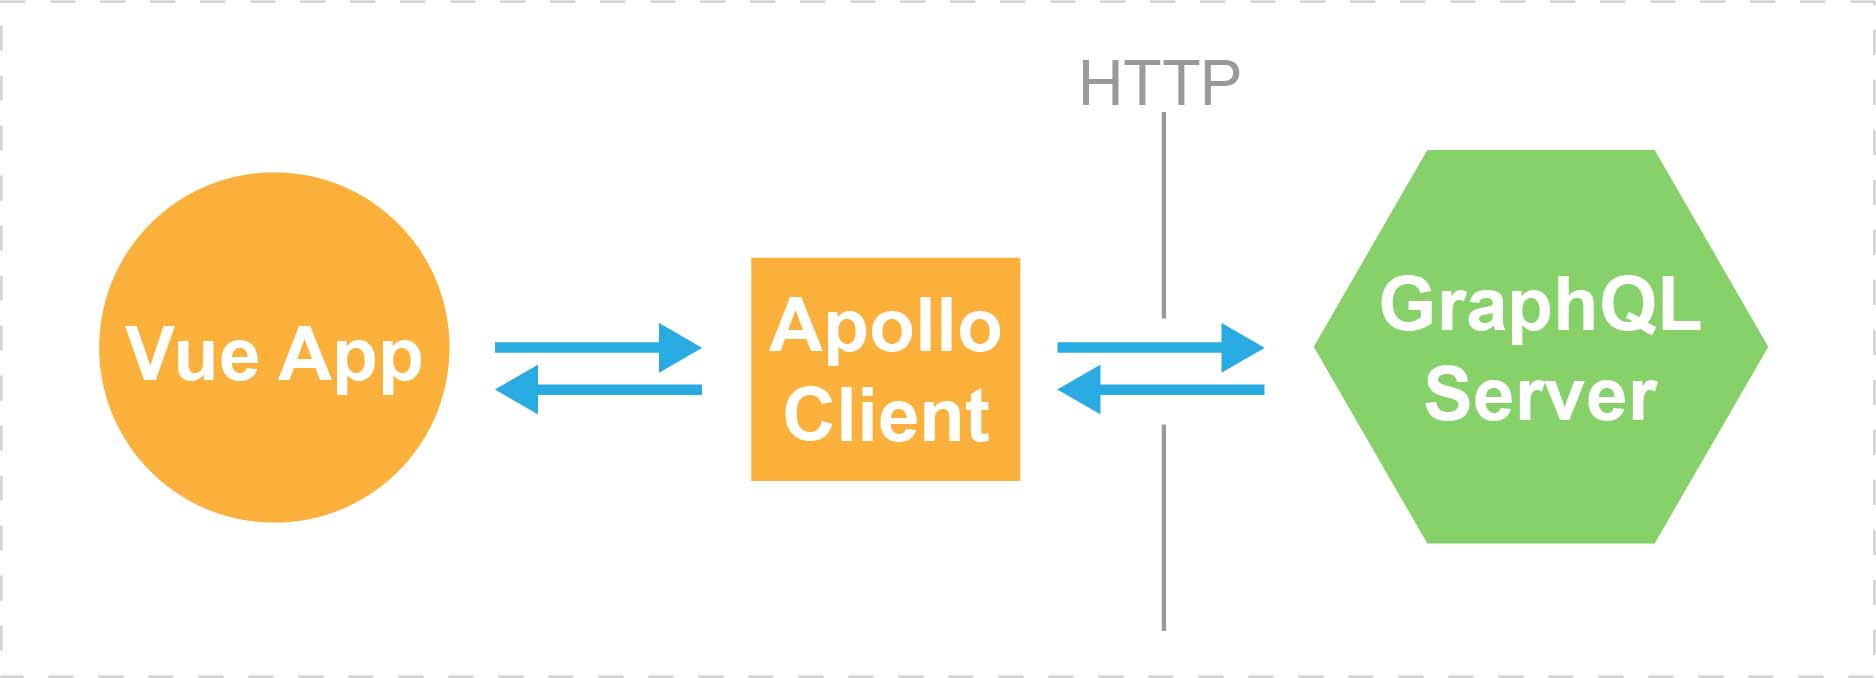
In Part 1 of this GraphQL series, we covered the big-picture concepts and theories of GraphQL. In this article, we’ll put those ideas into practice and create an actual GraphQL API server using Apollo Server. Finally, in Part 3, we’ll create a simple Vue app that utilizes Apollo Client to communicate with the GraphQL server we created in this tutorial.
At the end of this series, we’ll end up with something that works like this:
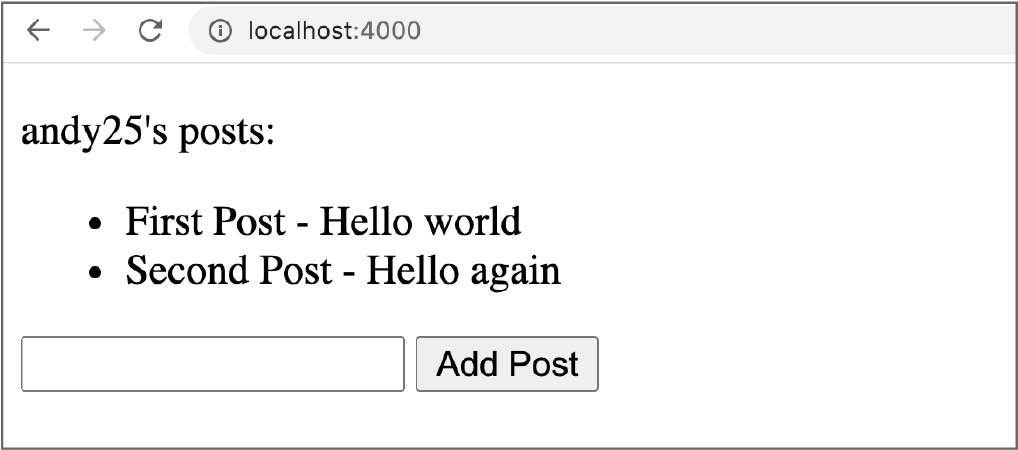
Our simple app will be able to show a list of posts, and we can also add new posts that get synced on both the frontend and backend. We’ll end up with a final result like this:
By implementing this simple app, we will cover all the fundamental aspects of GraphQL programming.
Installing GraphQL and Apollo
To begin we’ll create a new folder to store all our server code.
In the terminal:
mkdir my-api
cd my-api
Then create a new package.json file in the new folder with the following command:
npm init
We’ll then install GraphQL along with Apollo server:
npm install -s graphql apollo-server
Optionally, you can install nodemon if you want to avoid restarting the server every time the code is modified:
npm install -g nodemon
(You might have to use sudo to run the above command, depending on the way npm is configured in your system.)
We’ll then create a JavaScript file called server.js:
touch server.js
This is where we’ll soon put all the server code.
Now that we’ve installed the packages we need, we can start creating the GraphQL server.
Building a GraphQL server
In order to bake a cake, we need to have the recipe. The same rule applies here. So what does it take to build a GraphQL server?
As the minimum requirements, we’ll need:
- A schema of all the data types that the API supports. You can think of a “schema” as a set of data type definitions. All the top-level queries that the API accepts are also defined in the schema.
- Resolvers for all top-level queries. A “resolver” is just a function that returns the requested data. This is analogous to a “route handler” in Express.
- A data source where the resolvers will get the data from. Typically, this will be the database access layer of a server app, but for simplicity, we’ll just use an in-memory object to act as the data source.

We’ll primarily work on these three things, and then Apollo Server will be able to use them to automatically create our API server.
But first, let’s import all the utilities we’ll need into the server.js file.
📃server.js
const { ApolloServer, gql } = require('apollo-server');
Now we can create the schema.
Schema
In order to create a schema, we need to first think about what kind of data we’ll be working with. In our case, the API will need two types of data: User and Post. Each user will have their own posts.
📃server.js
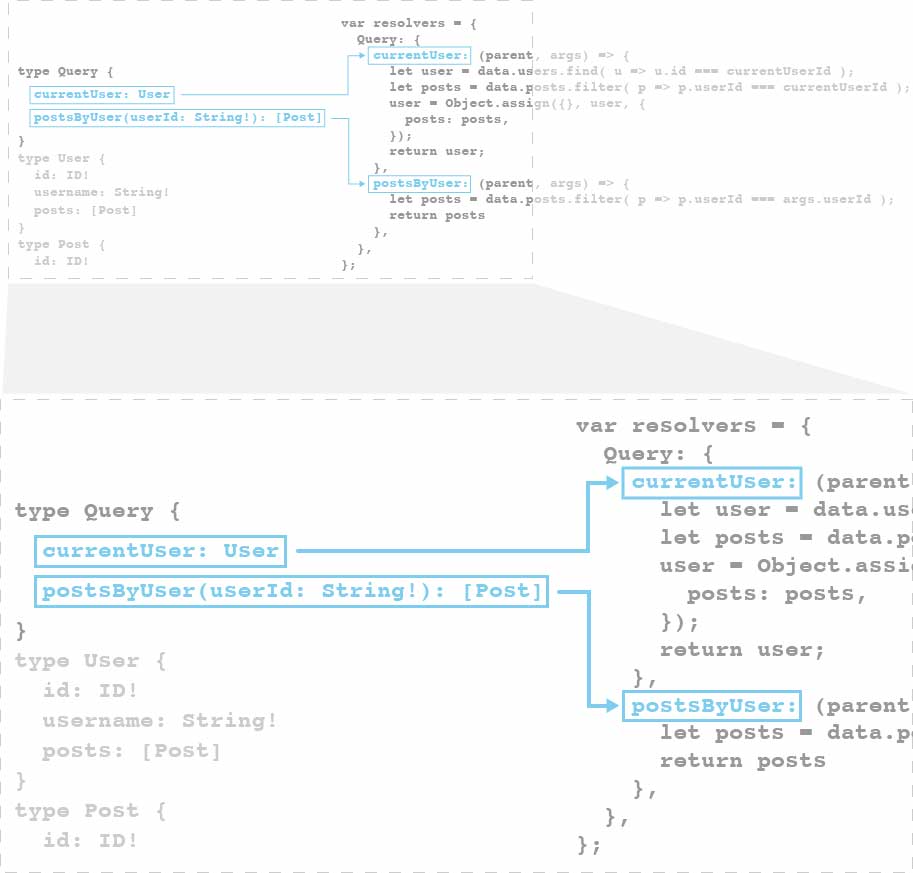
const schema = gql(`
  type Query {
    currentUser: User
    postsByUser(userId: String!): [Post]
  }

  type User {
    id: ID!
    username: String!
    posts: [Post]
  }

  type Post {
    id: ID!
    content: String!
    userId: ID!
  }
`);
First, let’s clear up a few things about the schema syntax.
This type-defining syntax might remind you of something similar looking in TypeScript, but this is not related to TypeScript at all. This schema is written in GraphQL’s own special syntax, and it is technically a multi-line string, hence it’s valid JavaScript. Passing this string to the gql function will give us the actual schema object (which we’ll need to use in a bit).
The trailing exclamation point is GraphQL way of specifying a value that can’t be null or undefined.
In addition to our “core” types of User and Post, the Query type is needed for specifying all the top-level queries, such as currentUser and postsByUser. Notice how we defined these queries as the fields of the Query type.
Looking at this schema, you can get a general idea of what this API is about. The client can send a currentUser query to get a User type object, this object has three fields: id, username, and posts.
The posts field is an array of Post type objects. Each Post object has three fields as well: id, content, and userId. This implies a one-to-many relationship between the User type and the Post type, where a user can have many posts.
The API also accepts a postsByUser query. This will return an array of Post objects. But different from the currentUser query, the postsByUser query accepts an argument called userId.
These are the specifications of our API.
Data Source
For simplicity, we’ll just use a plain old JavaScript object as our “database”, which will include all of our posts and users.
📃server.js
var data = {};

data.posts = [📃**server.js**
  {
    id: 'xyz-1',
    content: "First Post - Hello world",
    userId: 'abc-1',
  },
  {
    id: 'xyz-2',
    content: "Second Post - Hello again",
    userId: 'abc-1',
  },
  {
    id: 'xyz-3',
    content: "Random Post",
    userId: 'abc-2',
  }
];

data.users = [
  {
    id: 'abc-1',
    username: "andy25",
  },
  {
    id: 'abc-2',
    username: "randomUser",
  }
];
We just need one user for this tutorial, but for the sake of demonstration, I’ve included some sample data for a second user and a post related to that second user.
Our simple app will not include authentication features, so we’ll just hard-code a dedicated user as the current user.
📃server.js
const currentUserId = 'abc-1';
We’ll use this currentUserId variable to find the current user’s data.
Resolvers
The resolvers are the “centerpiece” that connects everything together. It’s responsible for resolving the “functionalities” defined in the schema. And it’s doing that by getting the data from a data source.
📃server.js
var resolvers = {
  Query: {
    currentUser: (parent, args) => {
      let user = data.users.find( u => u.id === currentUserId );
      let posts = data.posts.filter( p => p.userId === currentUserId );
      // set posts as a property in user (immutable)
      user = Object.assign({}, user, {
        posts: posts,
      });
      return user;
    },
    postsByUser: (parent, args) => {
      let posts = data.posts.filter( p => p.userId === args.userId );
      return posts
    },
  },
};
This code should be self-explanatory for the most part. The part where Object.assign is used to create a new user object is mainly just a good habit to keep the code cleaner without mutating an existing object.
As a minimum requirement, we only need resolvers for the top-level queries in Query type.
You can also think of the resolvers as an “adapter” layer for the actual data source, an adapter is basically a “bridge” that allows two parts of the system to talk to each other through a new interface.
As important as it is, a resolver is really just a function with a fixed set of parameters.
function (parent, args, context, info){
  // return something
}
Each resolver has the same four parameters: parent, args, context, and info. You don’t always have to use all four of them.
Let’s focus on args and parent for now, and we’ll talk about context when we come to it. But we won’t be getting into info in this tutorial because it’s for more advanced use cases.
args is a set of arguments that the client sends along on queries that require arguments. In our example, the postsByUser query requires the userId argument, and so inside the postsByUser resolver we can get the userId from args.
parent refers to the result from the previous level in a query’s hierarchy. For illustration, take a look at the following query that our server might receive:
Query {
  currentUser {
    posts {
      id
      content
    }
  }
}
It’s asking for all the posts that belong to the currentUser, so within the resolver of currentUser, the parent would be Query’s result, and within the resolver of posts (which we don’t have one of at the moment), the parent would be currentUser’s result.
Dedicated Resolver
So when would this parent argument be useful?
It is a common situation where we have one resolver for a type, but a separate dedicated resolver for one of the fields in that type. In that case, it would be useful to get access to the parent’s info within the field’s dedicated resolver. With the parent info, we can do things such as getting the parent object’s id so that we can gather the field data associated with that id.
To illustrate this, we can extract the code regarding posts from the currentUser resolver to a separate resolver dedicated to posts. Now that we have access to the currentUser result through the parent argument in the new resolver, we can just grab the user id from parent instead of relying on the hard-coded currentUserId variable.
📃server.js
var resolvers = {
  Query: {
    currentUser: (parent, args) => {
      let user = data.users.find( u => u.id === currentUserId );
      return user;
    },
    postsByUser: (parent, args) => {
      let posts = data.posts.filter( p => p.userId === args.userId );
      return posts
    },
  },

  // NEW
  User: {
    posts: (parent, args) => {
      let posts = data.posts.filter( p => p.userId === parent.id );
      return posts;
    }
  }
};
We’ve also scoped the posts resolver under a property named User because posts is a field in the User type.
Now that we know how parent is useful, let’s talk more about how this new dedicated resolver works alongside the original currentUser resolver.
With our current code, all the fields in the User type will be resolved by the currentUser resolver, except the posts field. posts will now be resolved by its own dedicated resolver.
This is the intended behavior of GraphQL. You don’t have to resolve everything in a top-level query resolver, like currentUser in this case. You can define dedicated resolvers for the fields missing from the top-level resolver.
Having a dedicated resolver for a single field has a few benefits. The most obvious benefit is that we don’t have to worry about setting the posts data as a property in the user object, since GraphQL will take care of that.
There’s also a performance benefit that prevents GraphQL from doing unnecessary work. For example, when a request is only asking for the user’s id and content, but not posts, all the code regarding posts will not get executed. On the other hand, if all three fields were lumped together in a single resolver like what we had originally, the computations spent on assembling posts would be a waste.
Server
Now with all the ingredients ready, we can create an Apollo server:
📃server.js
const server = new ApolloServer({
  typeDefs: schema,
  resolvers: resolvers,
});

server.listen(4001).then(({ url }) => {
  console.log('API server running at localhost:4001');
});
We’re using port 4001 for the API server, and the Vue app that we’re going to create will use port 4000. (They will be two different projects running on two different servers communicating through CORS
Finally, let’s start the server:
nodemon server.js
(You can also run node server.js, but make sure you restart the server every time you change the code.)
Playing in the interactive mode
Even though we haven’t built our Vue app yet, we can still try out the new API without a client app. Apollo Server comes with a tool called GraphiQL (notice the “i” in the name), which is an interactive environment for testing and developing GraphQL servers.
You can visit localhost:4001 to access the interactive environment:
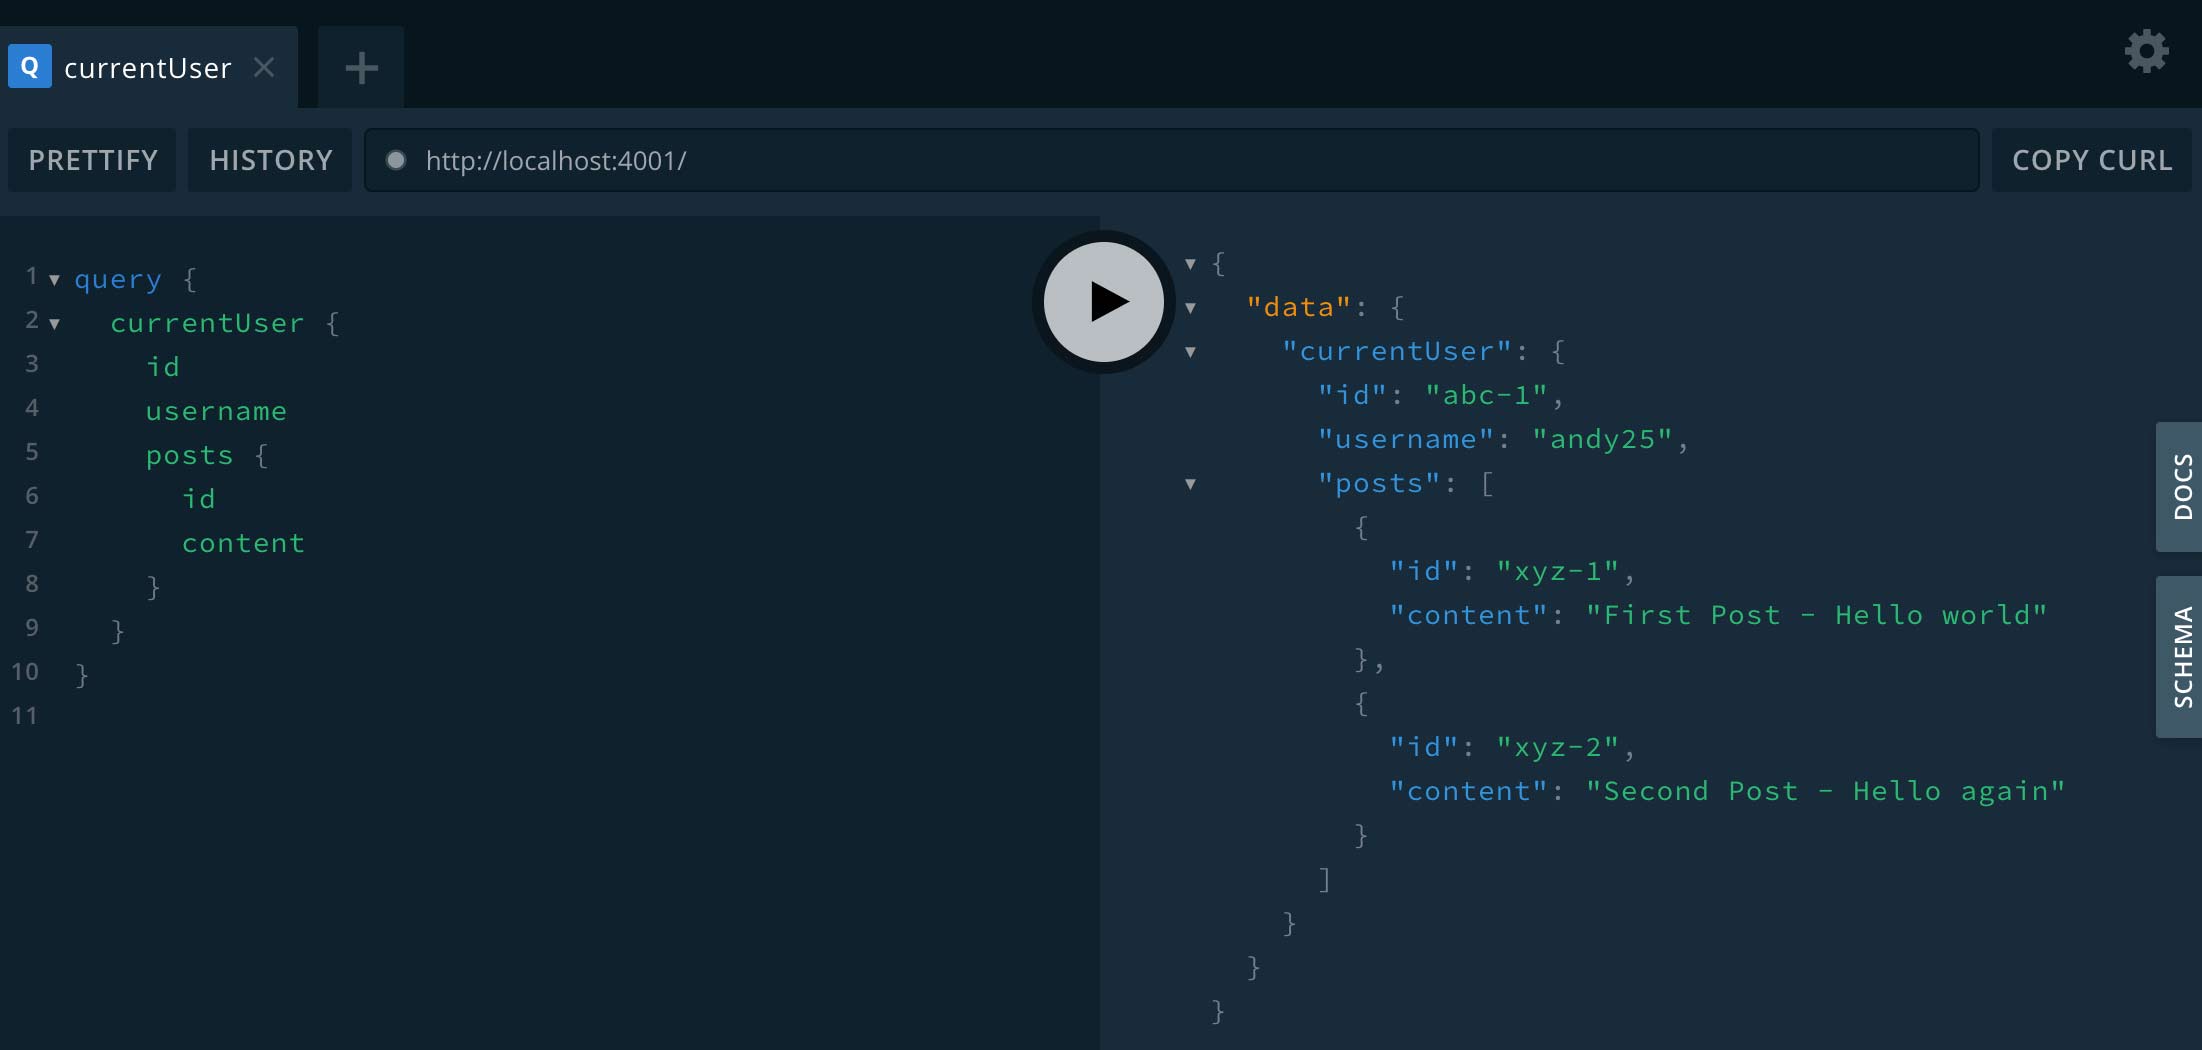
Just write a query on the left, click the “play” button, and you should see the response data on the right. This confirms that our GraphQL API is working!
Fetching Data
Aside from the interactive playground, we can interact with our GraphQL API through plain old JavaScript fetching.
First, open up the console in any browser tab.
We can fetch the data from our GraphQL API just like we could for a REST API.
fetch('http://localhost:4001', {
  method: 'POST',
  headers: { 'Content-Type': 'application/json' },
  body: JSON.stringify({ query: 'query { currentUser { id } }' }),
})
Different from a REST request, there’s just the query param that we need to worry about, which is really just a string containing the query itself. In this case, the query is requesting the id field of the currentUser.
Notice that the query string begins with the word query, that’s because we need to let the server know that we’re sending a query type query. (There’s also a mutation type query that we’ll see later on.)
And we also converted the body object into a proper JSON format with the help of JSON.stringify.
When our server receives this request, it will respond with the currentUser data. But the fetch function won’t return the data directly, instead, it will return a Promise object. So, the above code will not show the data in the console.
We need to “unpack” this Promise object in order to extract the actual data:
fetch('http://localhost:4001', {
  method: 'POST',
  headers: { 'Content-Type': 'application/json' },
  body: JSON.stringify({ query: 'query { currentUser { id } }' }),
})
.then(resp => resp.json())
.then(data => console.log(data))
This is a standard Promise unpacking technique, not exclusive to GraphQL. The first then callback extracts the data from the response. The second then callback prints the data to the console.
You should now see an output like this:
{ data: { currentUser: { id: "abc-1" } } }
If you see an error, make sure that the GraphQL server is actually running.
Best practices
Now that we know our server is working, let’s clean up the server code a bit.
First, we can use the context option to provide shared data to all resolvers. In our case, the currentUserId variable and the data object should be considered shared data.
📃server.js
const server = new ApolloServer({
  typeDefs: schema,
  resolvers: resolvers,
  context: {
    currentUserId,
    data
  }
});
By doing this, our resolvers won’t have to rely on global variables. We can just snatch the currentUserId and data from the context parameter.
var resolvers = {
  Query: {
    currentUser: (parent, args, context) => {
      let user = context.data.users.find( u => u.id === context.currentUserId );
      return user;
    },
    postsByUser: (parent, args, context) => {
      let posts = context.data.posts.filter( p => p.userId === args.userId );
      return posts
    },
  },
  User: {
    posts: (parent, args, context) => {
      let posts = context.data.posts.filter( p => p.userId === parent.id );
      return posts;
    }
  }
};
Now our resolver functions are considered “pure,” that is, a function given the same set of input data produces the same output.
Notice that we aren’t actually using all three parameters in every resolver. The recommended practice is to use underscores to name the parameters that are not used, with a different number of underscores for each argument, one for the first, two for the second, etc.
📃server.js
var resolvers = {
  Query: {
    currentUser: (_, __, context) => {
      let user = context.data.users.find( u => u.id === context.currentUserId );
      return user;
    },
    postsByUser: (_, args, context) => {
      let posts = context.data.posts.filter( p => p.userId === args.userId );
      return posts
    },
  },
  User: {
    posts: (parent, __, context) => {
      let posts = context.data.posts.filter( p => p.userId === parent.id );
      return posts;
    }
  }
};
Now we can easily tell which parameters are not used in a given resolver.
The last trick we’ll apply is the ES6 parameter destructuring syntax:
var resolvers = {
  Query: {
    currentUser: (_, __, { data, currentUserId }) => {
      let user = data.users.find( u => u.id === currentUserId );
      return user;
    },
    postsByUser: (_, { userId }, { data }) => {
      let posts = data.posts.filter( p => p.userId === userId );
      return posts
    },
  },
  User: {
    posts: (parent, __, { data }) => {
      let posts = data.posts.filter( p => p.userId === parent.id );
      return posts;
    }
  }
};
But it can get counter-intuitive if this trick is overused. Notice that I didn’t “destruct” parent, because parent.id is more descriptive than id in this case.
Getting into these formatting habits can make your code more readable as well as making it easier for you to understand other people’s GraphQL code.
Coming up
Now that we’ve built a functional GraphQL server with nicely formatted code, the next and final phase of our undertaking is to create an actual client-side app to consume our GraphQL server. So, I’ll see you in Part 3.