
Typescript has been around for more than half a decade and has amassed a sizable user-base in the JavaScript community. With the release of Vue 3.0, which provides enhanced TypeScript support, now is a great time to learn about the library.
What are the advantages of TypeScript?
- More readable code
- Better debugging experience
- Code editor support for detecting common errors
In this tutorial, we’ll first walk through an introduction to TypeScript, then we’ll get into applying TypeScript on a Vue project.
Learning TypeScript doesn’t have to be a strenuous undertaking. TypeScript is primarily a type-checking tool, built on top of JavaScript. So for JavaScript programmers, this wouldn’t be like learning a completely new language from scratch.
Since type checking is the central concept behind TypeScript, let’s start our journey with that.
Type checking: Dynamic vs Static
Essentially, type checking is the software process of making sure an object passed to a function or assigned to a variable is the right type of object. If the type checker detects that an object has the wrong intended type (or missing methods), the program will scream with errors.
There are two main approaches of type checking, dynamic and static.
Classic JavaScript uses a dynamic-duck-typing system where the type errors are reported during runtime while a missing method is called on an object.
For example:
function foo(user){
  console.log( user.getEmail() ) // ERROR
}

foo({}) // passing an empty object
In the above example code, the error will be reported inside the function, even though the error is originated from the function call where an empty object is passed as user. This misalignment between the location of a reported error and the location where the error can be fixed is the primary disadvantage of dynamic type checking.
On the other hand, TypeScript uses static type checking, in which we can define a type by describing its structure. And we can mark (annotate) variables and parameters with the names of types so that type errors can be detected during compile time or even design time (with a modern code editor).
This is one of the few cases in software engineering where “static” is better than “dynamic.” The big deal of static type checking is that it allows us to catch the type error sooner, and it’s also making it more obvious where the source of that error is.
TypeScript is called a superset of JavaScript, which means any valid JavaScript(ES6) code is also valid TypeScript code. This implies that TypeScript’s type-checking features are optional. We can start with plain JavaScript, then add TypeScript features to the code incrementally.
To test the waters, let’s get a taste of static type-checking in regular JavaScript code.
Hands-on type checking
If you’re using VS Code as your code editor, you already have a static type checker at your disposal because VS Code has built-in TypeScript support.
Let’s start with some JavaScript code:
function foo(obj){
  obj.someMethod()
}

foo({})
This code will give us an error, but only during execution (runtime).
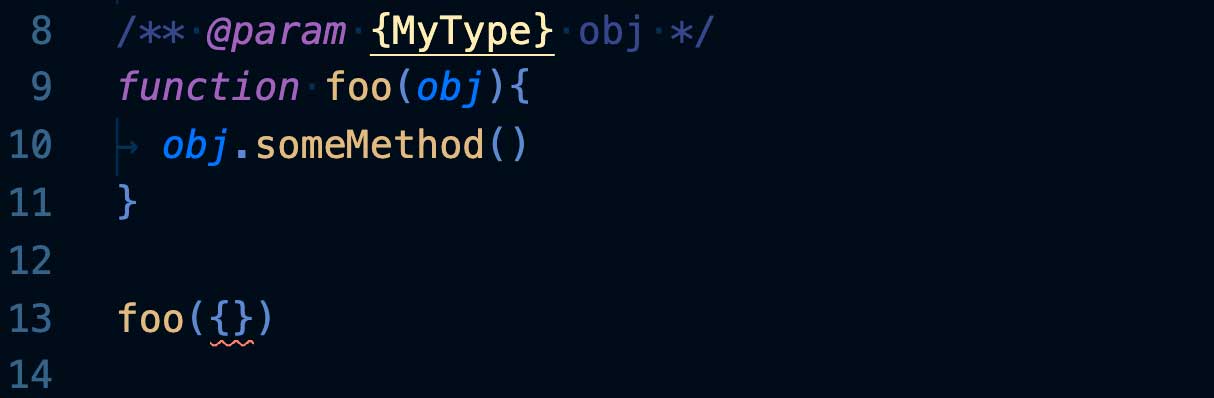
For static type checking, we can create a new type and annotate (mark) a function parameter with the new type, via comments:
📃 foo.js
// @ts-check

/**
 * @typedef {object} MyType
 * @property {() => void} someMethod
 */

/** @param {MyType} obj */
function foo(obj){
  obj.someMethod()
}

foo({})
In this code, we are using TypeScript’s type checker through the JSDoc syntax. JSDoc is a markup format for annotating JavaScript files through comments. This means that the above code is perfectly valid JavaScript. This is an experiment of “using TypeScript without TypeScript.”
@typedef defines a new type called MyType. @property adds someMethod to the type’s structural requirement. And finally, @param tells the type checker that the foo function will only accept an object that conforms to MyType’s structure.
The @ts-check line on the top of the file tells VS Code to use TypeScript’s type checker.
With this code, anything passed to the function without the required structure will raise an error.
Since the empty object doesn’t conform to the MyType structure, we’ll see a red underline indicating the type error. We no longer have to wait for execution to know there’s a type error in the code!
To fix the error, we just need to add a function property someMethod to this empty object.
...
foo({ someMethod: function(){} }) // fixed
Then, the red line should disappear. This is essentially what static type checking is about, that is, reporting typing errors during development.
But as you can see, it’s tedious to write type annotations in this JSDoc comment format. So, let’s move on to defining types and annotating variables in actual TypeScript syntax.
TypeScript 101
To write TypeScript code, we have to create a file with the .ts extension. With the .ts extension, VS Code will be able to use its built-in type checker to “spellcheck” typing errors for us. For now, our goal is to write TypeScript code without type-related errors. (We’ll talk about how to run TypeScript code later.)
First and foremost, TypeScript’s typing system is not class-based, although we can still use classes to create new types. Instead, TypeScript’s main focus is on interface, which is a TypeScript keyword used for creating new types by describing the structures of objects. This structure-oriented approach is more natural to JavaScript where objects are commonly created without classes.
We’ll start with an interface definition, which describes the structure of a custom type:
📃 myProgram.ts
interface FullName {
  first: string;
  last: string;
}
Within the type definition, each field needs to have a type, this can be one of the basic types (string, number, boolean, etc.) or custom types. Our FullName type has two string fields.
Now we can create a variable annotated with this FullName type:
📃 myProgram.ts
interface FullName {
  first: string;
  last: string;
}

let myName: FullName; // ADD
With this type annotation, only objects with the required structure can be assigned to this variable:
📃 myProgram.ts
...
let myName: FullName;
myName = { first: "Andy", last: "Li" } // ADD
On the other hand, any object that doesn’t conform to this structure will be met with an error when assigned to this variable.
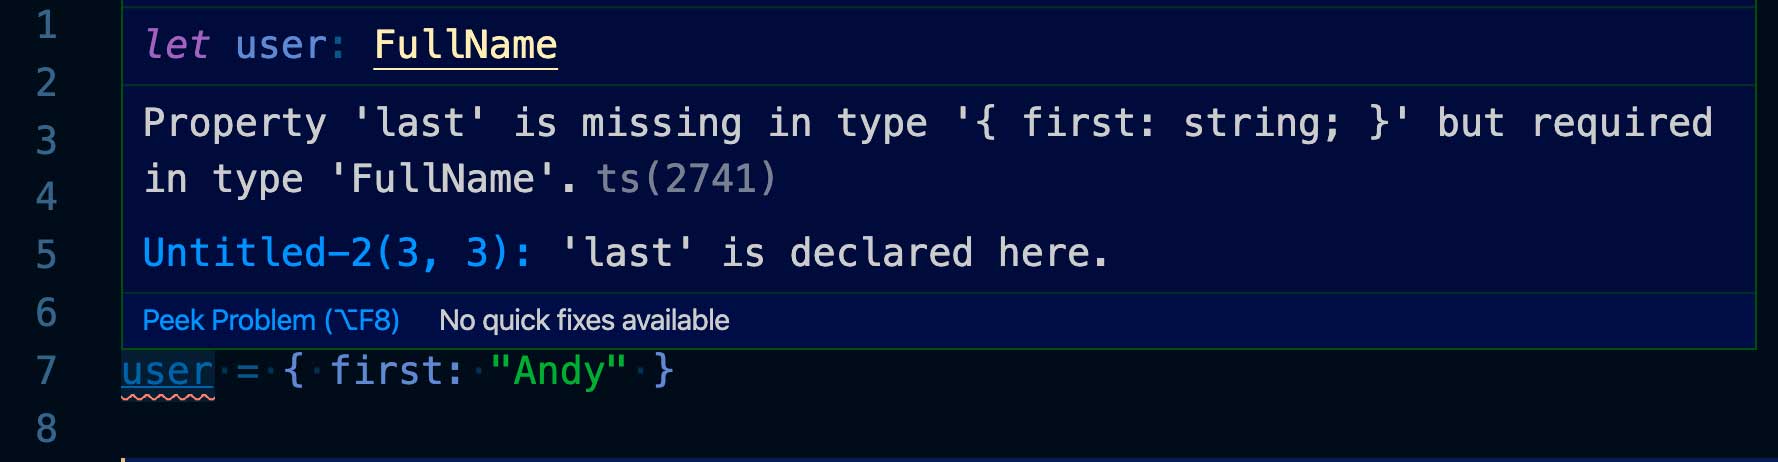
When working with TypeScript, you will be seeing a lot of this kind of error, but that’s a good thing. This simple error-guarding technique is what TypeScript is designed to do.
Although there are many other features in TypeScript, they are all built on this core “theme.”
Type Inference
Before we move any further, I want to bring up an important but passive concept called type inference.
In practice, we often declare and assign to a variable on the same line:
const name: string = "andy";
The string type annotation here is redundant because the type checker is capable of inferring the type from the string value. This is type inference.
So this code is technically the same as the above one:
const name = "andy";
The rule of thumb is, annotate the variables only when the type checker couldn’t infer the type you intended, and whenever it helps with the clarity of the code.
Type inference is ubiquitous in TypeScript, it will come up again and again.
So far, we’ve only been seeing how values and objects are getting typed. Let’s move on to functions.
Functions
Since function is a first-class citizen in JavaScript, a TypeScript introduction wouldn’t be very useful without mentioning how to create types for functions.
Here’s how a function is written with TypeScript annotations:
📃 myProgram.ts
const outputToConsole = function(result: number): void {
  console.log("Output: " + result)
}
Here, the parameter is typed with number. And since the function doesn’t return anything, its return type is void. Now if you try to return a string or a number from the function, it will give you an error.
Just like with object variables, we can use interface to create a new function type and annotate the function variable:
📃 myProgram.ts
// NEW
interface Callback {
  (result: number): void
}

const outputToConsole: Callback = function(result: number): void {
  console.log("Output: " + result)
}
Here, we created a function type called Callback, it takes a number value as a parameter and
returns nothing (void). Any function that takes a number and returns nothing will be compatible with this type, such as our outputToConsole function.
With the Callback type in place, we can actually remove all the annotations on the parameter and the return value:
📃 myProgram.ts
interface Callback {
  (result: number): void
}

// CHANGED
const outputToConsole: Callback = function(result) {
  console.log("Output: " + result)
}
The parameter type and the return type can now be inferred from the Callback annotation.
Now let’s tie everything together by creating a function that takes a FullName object and a Callback function as parameters:
📃 myProgram.ts
function getNameLength(name: FullName, callback: Callback): void {
  const len = name.first.length + name.last.length
  callback(len)
}

getNameLength(myName, outputToConsole)
This function will pass the length of the name to the callback function, which in turn will display it to the console.
Now that the code is well annotated with types, we can avoid a whole mess of easily avoidable bugs and typos.
Next, let’s see how to run the TypeScript code we have so far:
📃 myProgram.ts
interface FullName {
  first: string;
  last: string;
}

interface Callback {
  (result: number): void
}

let myName: FullName = { first: "Andy", last: "Li" }

const outputToConsole: Callback = function(result) {
  console.log("Output: " + result)
}

function getNameLength(name: FullName, callback: Callback): void {
  const len = name.first.length + name.last.length
  callback(len)
}

getNameLength(myName, outputToConsole)
Running TypeScript
To run our TypeScript code, we need to install the TypeScript compiler.
To do so, we’ll run the following command in the console:
npm install -g typescript
That’s it. TypeScript is now installed globally on our system.
Now we can use the tsc command to compile our TypeScript file:
tsc myProgram.ts
This compiles the ts file to a new js file. If we check the folder where myProgram.ts is saved, we should find a newly generated js file with the same name. This new file is the actual program that we will run.
Since it’s just a normal JavaScript file, we can run it with node:
node myProgram.js
Now you should see the program output. (the length of a name)
As you can see, we compile the ts file, but run the js file. There’s an important implication from this observation. We don’t run TypeScript code; we only compile it. The eventual program will always be in JavaScript.
If you look inside the generated JavaScript file, you won’t see any type definitions or type annotations. It’s just plain old JavaScript. In fact, it’s the same code from the TypeScript file, just with all the type-related stuff erased.
Now it should be clear that TypeScript is only a technology that helps us to write code; it doesn’t come with a runtime engine.
Now that we’ve looked at the basic rules of TypeScript, we’re ready to venture into a Vue project using TypeScript.
TypeScript and Vue.js
Let’s begin with creating a new Vue project in the console (you’ll have to have the Vue CLI installed globally first):
vue create my-ts-app
The Vue CLI will prompt you with a few options (depending on the version of the CLI):
- Default ([Vue 2] babel, eslint)
- Default (Vue 3 Preview) ([Vue 3] babel, eslint)
- **Manually select features**
Choose Manually select features.
Then, it will prompt you with a list of features that you can turn on/off by using the up/down keys and space:
 ◉ Babel
 ◯ **TypeScript**
 ◯ Progressive Web App (PWA) Support
 ◯ Router
 ◯ Vuex
 ◯ CSS Pre-processors
 ◉ Linter / Formatter
 ◯ Unit Testing
 ◯ E2E Testing
Move down to the TypeScript option, hit the space key to turn it on, then hit enter.
Finally, choose Vue 3:
- 2.x
- **3.x (Preview)**
(There will be more prompts after this but you can just choose the default options.)
After the app is generated, start the dev server:
cd my-ts-app
npm run serve
Here’s the default script code you would see in the App.vue file:
📃 /src/App.vue
import { defineComponent } from 'vue';
import HelloWorld from './components/HelloWorld.vue';

export default defineComponent({
  name: 'App',
  components: {
    HelloWorld
  }
});
It’s a little different from a non-TypeScript component because of the extra defineComponent function. This function provides some out-of-the-box type checking for our components.
For example, if we accidentally imported something that isn’t a component, VS Code will warn us:

Because the components option only accepts objects with a component-like structure. We wouldn’t have this type checking advantage without the defineComponent function.
Now let’s prepare a simple app in plain JavaScript just so that we have something to work on.
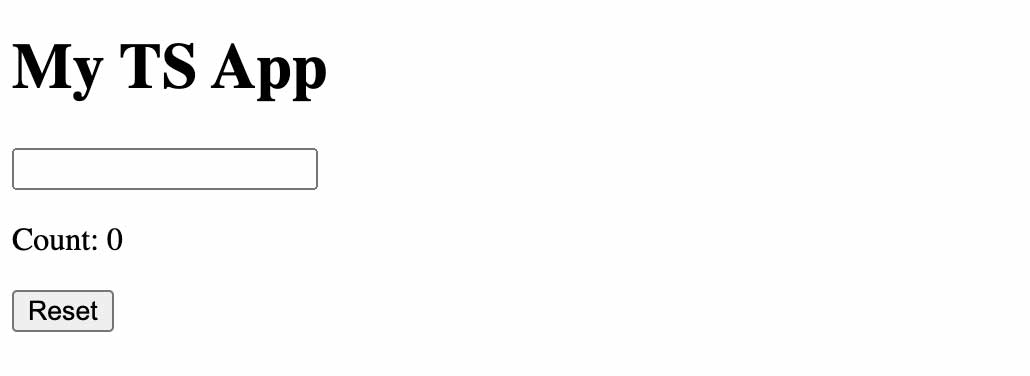
Replace the default code inside App.vue with this code:
📃 /src/App.vue
<template>
  <div id="app">
    <h1>My TS App</h1>
    <p><input type="text" v-model="inputText" /></p>
    <p>Count: {{ count }}</p>
    <p><button @click="reset()">Reset</button></p>
  </div>
</template>

<script lang="ts">
import { defineComponent } from 'vue';

export default defineComponent({
  name: 'App',
  data: () => {
    return { inputText: '' }
  },
  methods: {
    reset(){
      this.inputText = ''
    }
  },
  computed: {
    count() {
      return this.inputText.length
    }
  }
});
</script>
We have one state inputText, and the computed property count is based on inputText.
This is a simple app with an input textbox, an output element, and a reset button. When the user starts typing in the textbox, they will see the number of characters displayed below it. The reset button can be used to reset the textbox content.
Enter TypeScript
Now let’s add some types to the code. Our goal is to make sure that all the data going out from the <script> code to the <template> code are all statically typed so that we can catch any type-related mistakes immediately.
First, we need to create a State type with the inputText field, and use that to annotate the return value of the data method:
📃 /src/App.vue
import { defineComponent } from 'vue';

// ADD
interface State {
  inputText: string;
}

export default defineComponent({
  name: 'App',
  data: (): State => { // ADD
    return { inputText: '' }
  },
  methods: {
...
Now if we accidentally change inputText to a non-string value, the type checker will warn us.

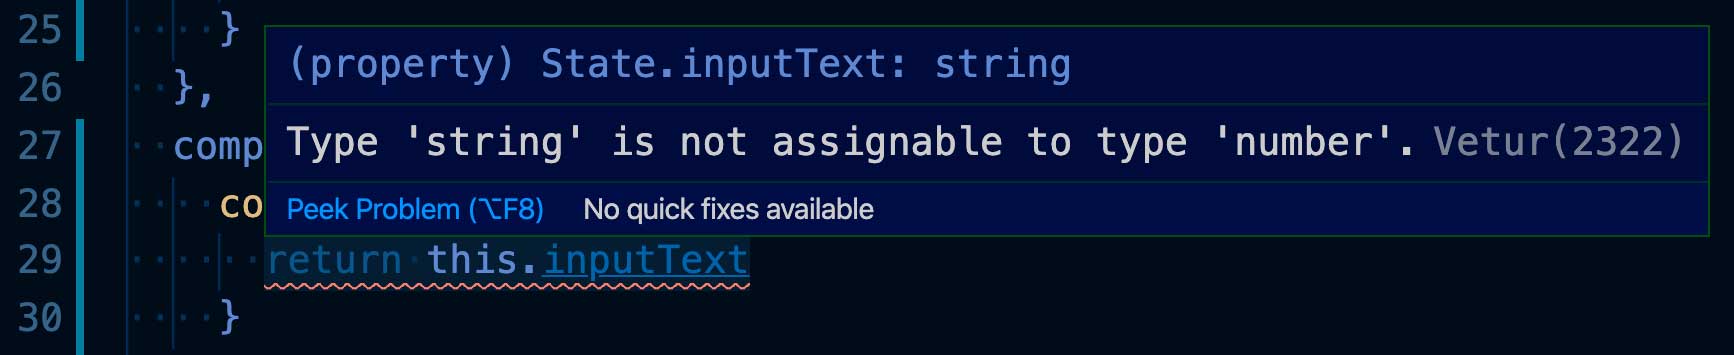
Another outgoing data that we need to annotate is the computed property count. It’s just a number, so we don’t need to create a new type. We just need to annotate the return type of the count method with number:
📃 /src/App.vue
...
  computed: {
    count(): number { // ADD
      return this.inputText.length
    }
  }
});
If we accidentally return this.inputText instead of this.inputText.length (which is a common thing), the code editor will inform us of this error immediately.
Now our code is nicely typed.
Props
Let’s create a second component so that we can demonstrate how to set types for props.
Create a new component file by extracting the <p> element that displays the count and the corresponding computed property from App.vue:
📃 /src/components/CharCount.vue
<template>
  <div id="char-count">
    <p>Count: {{ count }}</p>
  </div>
</template>

<script lang="ts">
import { defineComponent } from 'vue';

export default defineComponent({
  name: 'CharCount',
  props: ['inputText'],
  computed: {
    count(): number {
      return this.inputText.length
    }
  }
});
</script>
This new component will receive the inputText as a prop from the App component.
Let’s add a second prop label so that the parent component is able to set the label text.
📃 /src/components/CharCount.vue
export default defineComponent({
  name: 'CharCount',
  props: ['inputText, label'], // CHANGE
  ...
Also, change the template to render label:
📃 /src/components/CharCount.vue
<template>
  <div id="char-count">
    <p>{{ label }}: {{ count }}</p>
  </div>
</template>
To provide types for these two props, we can use Vue’s built-in prop type mechanism (this is not TypeScript related):
📃 /src/components/CharCount.vue
export default defineComponent({
  name: 'CharCount',
  props: {
    inputText: {
      type: String,
      required: true,
    },
    label: {
      type: String,
      required: true,
    },
  },
  ...
We typed both props as String and made them required so that we’ll see errors in the browser console if any of them are missing.
The problem with this approach is that Vue’s default prop type system is not compatible with the TypeScript system. For instance, we won’t be able to export a prop’s type to other components so that those other components can conform to the same type. As a result, we would lose static type checking for props passing.
TypeScript for props
Now, let’s see how to use TypeScript to type the props instead of Vue’s default prop type.
First, create a new type CharCountParams for the two props:
📃 /src/components/CharCount.vue
// NEW
interface CharCountParams {
  label: string;
  inputText: string;
}

export default defineComponent({
  name: 'CharCount',
  ...
(Notice that the TypeScript’s string is all lowercase, while Vue’s prop type String is capitalized.)
Now that we have a new type for the props, we need to use it to annotate the props in place of the current Vue prop type annotations.
Import the PropType generic type provided by Vue, and use our CharCountParams with it:
📃 /src/components/CharCount.vue
import { defineComponent, PropType } from 'vue'; // CHANGE

interface CharCountParams {
  label: string;
  inputText: string;
}

export default defineComponent({
  name: 'CharCount',
  props: {

    // CHANGE
    params: {
      type: Object as PropType<CharCountParams>,
      required: true,
    }
  },
  ...
Here we’re still using Vue’s default prop type system (the Object part), but we’re only using it as a middleman. We first set the prop type as Object, but we soon converted it to CharCountParams through PropType. (PropType is a TypeScript type intended for this situation.)
Although we’re setting the params prop type as PropType<CharCountParams>, the actual params object will be typed CharCountParams. This is the magic of generic.
You can think of generic types as “functions” that are used for creating more specific types. In this case, we’re using the PropType generic type and passing our CharCountParams type as a parameter through the angular brackets. This will create a new specific type for us, the PropType<CharCountParams> type that we need for our prop.
Generic is an advanced static type concept, but this is the only place we use generic in this tutorial. It’s fine to not fully understand generic at this point, just remember that you need to wrap your custom type in PropType with the angular brackets whenever you’re dealing with prop types.
Now both label and inputText will be available as properties of the prop params.
Since now we’re using one params prop to encapsulate inputText and label, we need to change the computed property and the template accordingly:
📃 /src/components/CharCount.vue
<template>
  <div id="char-count">
    <p>{{ params.label /* CHANGE */ }}: {{ count }}</p>
  </div>
</template>
...
  computed: {
    count(): number {
      return this.params.inputText.length // CHANGE
    }
  }
});
As I mentioned earlier, the advantage of using TypeScript types over Vue’s prop types is that we can export a TypeScript type so that other components can comply with it.
So, let’s export our CharCountParams type:
📃 /src/components/CharCount.vue
// CHANGE
export interface CharCountParams {
  label: string;
  inputText: string;
}

export interface CharCountParams {
  name: 'CharCount',
...
Here’s the full code of the CharCount component:
📃 /src/components/CharCount.vue
<template>
  <div id="char-count">
    <p>{{ params.label }}: {{ count }}</p>
  </div>
</template>

<script lang="ts">
import { defineComponent, PropType } from 'vue';

export interface CharCountParams {
  label: string;
  inputText: string;
}

export default defineComponent({
  name: 'CharCount',
  props: {
    params: {
      type: Object as PropType<CharCountParams>,
      required: true,
    }
  },
  computed: {
    count(): number {
      return this.params.inputText.length
    }
  }
});
</script>
Now back to the App.vue file, import the new component and the params type:
📃 /src/App.vue
// ADD
import CharCount, { CharCountParams } from './components/CharCount.vue';

export default defineComponent({
  name: 'App',
  components: { CharCount }, // ADD
  data: (): State => {
    return { inputText: '' }
  },
  ...
(Make sure you add the CharCount component to the components option, this will allow us to render CharCount in the template.)
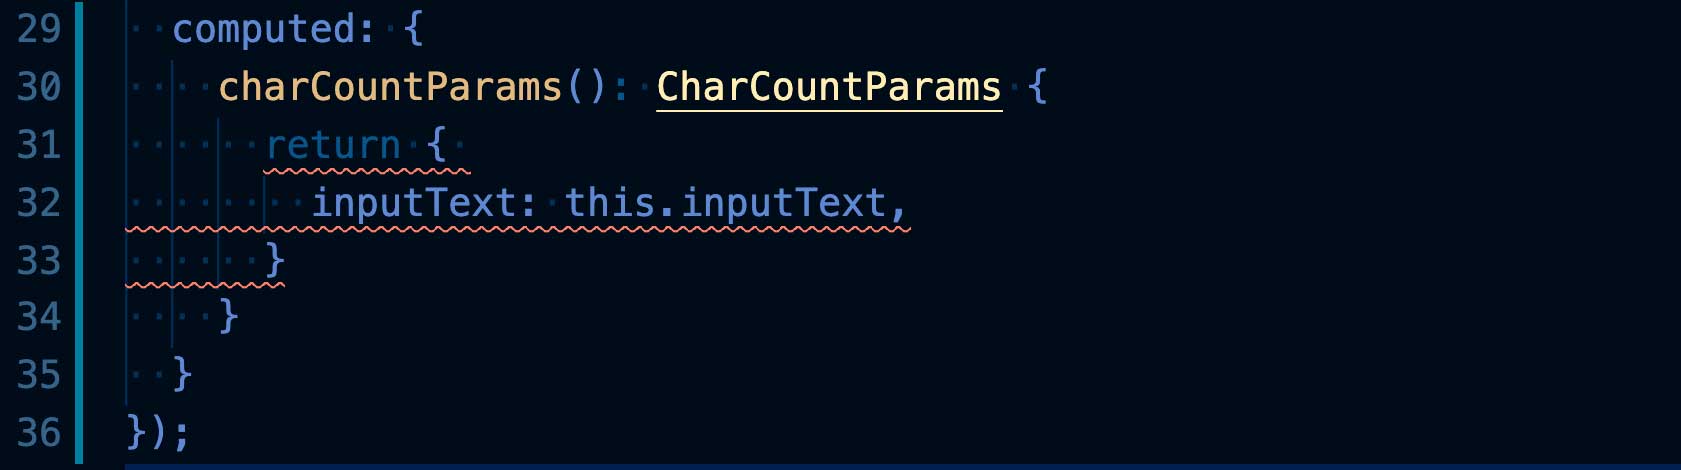
Create a new computed property with the CharCountParams type as the return type, this will be used to build the params prop for the CharCount component:
📃 /src/App.vue
...
methods: {
  reset(){
    this.inputText = ''
  }
},
computed: {
  // ADD
  charCountParams(): CharCountParams {
    return {
      inputText: this.inputText,
      label: 'Count',
    }
  }
}
...
Finally, render CharCount and pass along the computed value:
📃 /src/App.vue
<template>
  <div id="app">
    <h1>My TS App</h1>
    <p><input type="text" v-model="inputText" /></p>
    <CharCount :params="charCountParams"></CharCount> <!-- ADD -->
    <p><button @click="reset()">Reset</button></p>
    ...
We have successfully typed the params prop on both sides. If somehow we’re missing a field in the computed property, TypeScript will let us know of the error right on the code.
Our final code for the App component:
📃 /src/App.vue
<template>
  <div id="app">
    <h1>My TS App</h1>
    <p><input type="text" v-model="inputText" /></p>
    <CharCount :params="charCountParams"></CharCount>
    <p><button @click="reset()">Reset</button></p>
  </div>
</template>

<script lang="ts">
import { defineComponent } from 'vue';
import CharCount, { CharCountParams } from './components/CharCount.vue';

interface State {
  inputText: string;
}

export default defineComponent({
  name: 'App',
  components: { CharCount },
  data: (): State => {
    return { inputText: '' }
  },
  methods: {
    reset(){
      this.inputText = ''
    }
  },
  computed: {
    charCountParams(): CharCountParams {
      return {
        inputText: this.inputText,
        label: 'Count',
      }
    }
  }
});
</script>
Where to go from here
Mastering TypeScript is a huge step for a JavaScript programmer, but it’s worth the effort, as it will open up a whole new world of development experience and opportunities.
In terms of applying TypeScript on Vue projects, we have only scratched the surface. There are various other styles of Vue components such as class-based components and the new Composition API components, each one of these styles requires a different method of annotating the code with types. So this TypeScript journey has just begun.
Fortunately, TypeScript is a progressive tool, we can take it one step at a time in its adoption. It could become your new default language before you know it. In fact, we have a course on Vue 3 + TypeScript which is designed to give you all of the fundamentals to level-up your Vue app using them together.
Now that you’ve gotten started with Vue 3 and TypeScript, you are ready to move forward with confidence to our fully published ‘Vue 3 + TypeScript’ course. You can watch the first lesson for free here.