
Adding 3D graphics and animations to your web applications can be intimidating at first, but what if I told you that you can easily start your journey building 3D experiences with something as familiar to you as Vue Components?
In this tutorial, we’ll be exploring the features and benefits of TresJS, a Vue custom renderer for ThreeJS. Whether you’re a seasoned developer with 3D experience, or a total beginner, this library is definitely worth checking out.
In this guide, we’ll be exploring how to build a 3D scene in a Nuxt 3 app using TresJS using the official Nuxt Module.
Setting up Nuxt.js for 3D
Nuxt is a progressive web framework on-top of VueJS designed to make the developer’s life easier. It can be used for creating server-side rendered (SSR) web applications, statically generated sites (SSG), and single-page applications (SPA).
To initialize a new project, open your terminal of choice and run the following command:
npx nuxi@latest init tres-nuxt
Once the boilerplate is finished, open your project folder in your IDE and install the dependencies:
pnpm install
Run the local server by:
pnpm run dev
You should be able to see the Welcome Page of Nuxt in your localhost:3000

Installing the TresJS Module
Now, let’s install the TresJS official module for Nuxt:
pnpm add three @tresjs/nuxt
If you want to get all the benefits of autocomplete and TresJS component IntelliSense in your IDE make sure you install TypeScript and the types definitions for ThreeJS using :
pnpm add @types/three -D
Using the TresJS Nuxt Module
Add @tresjs/nuxt to the modules section of nuxt.config.ts
export default defineNuxtConfig({
  modules: ['@tresjs/nuxt'],
});
That’s it! You can now use @tresjs/nuxt in your Nuxt app. ✨
Adding the 3D Canvas
Jump to your app.vue and replace the default code on the template with this:
<template>
  <TresCanvas window-size>

  </TresCanvas>
</template>
The TresCanvas component is responsible for creating the canvas element in the DOM and injecting ThreeJS into it. By default, it takes the width and the height of the parent component, but for simplicity we will set window-size to true to force the canvas to take the size of the window.
If you open the DOM inspector on your browser you should be able to see the following html generated:

But the page is currently blank. That’s because we haven’t added any objects to the scene. If you want to test that everything works fine until this point, you can set another property to the <TresCanvas /> component called clear-color
<TresCanvas window-size clear-color="#82dbc5">
</TresCanvas>
That should set the background-color of the scene like this:
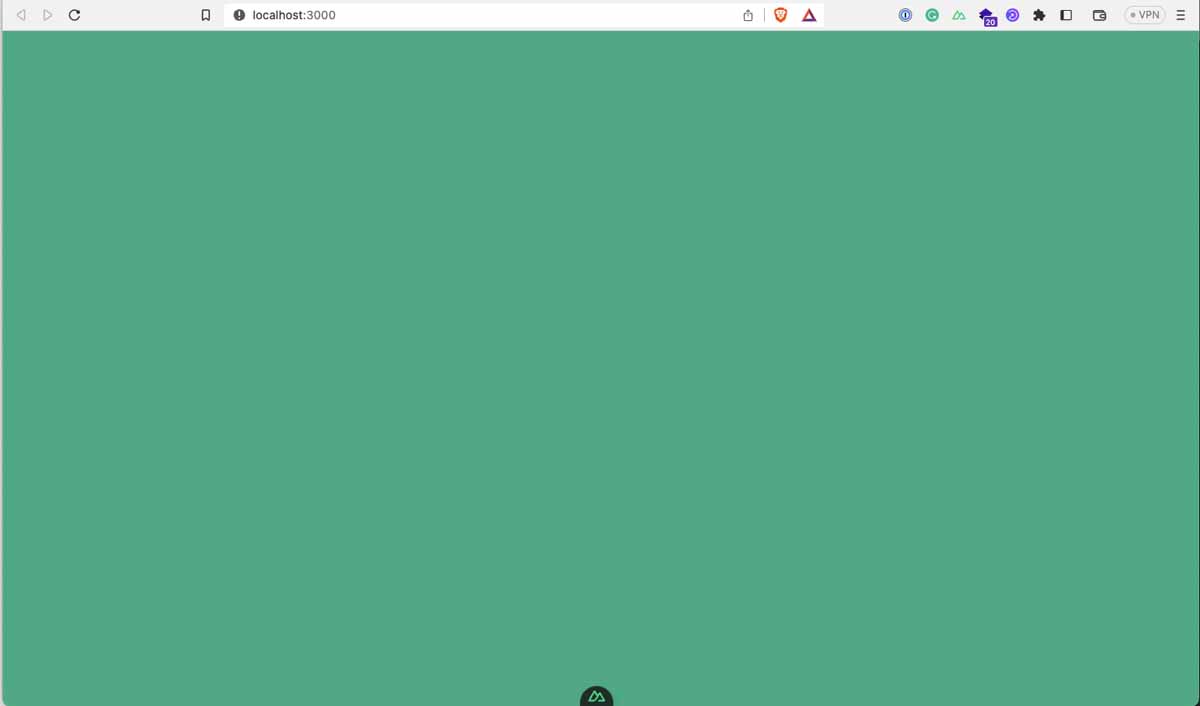
Congratulations, you successfully render ThreeJS in your browser. Now, let’s go to the fun part.
Adding a 3D Object
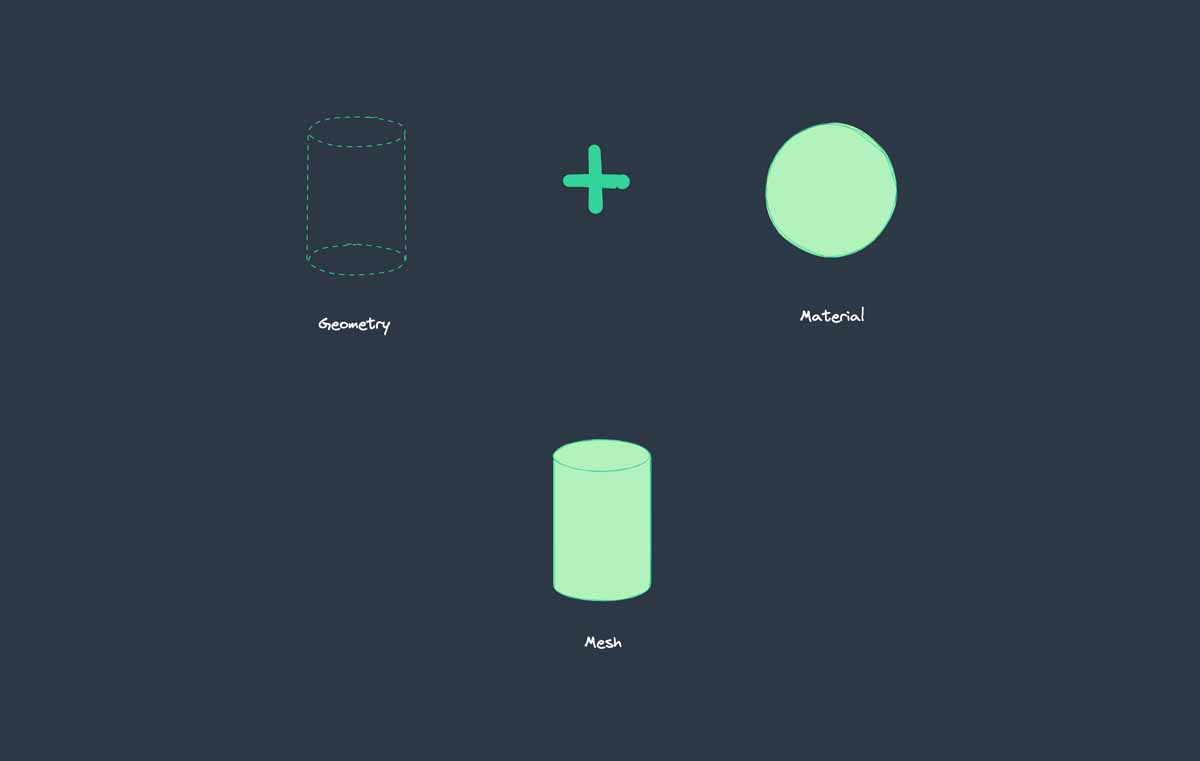
In the context of ThreeJS and 3D in general, an object is the combination of two elements:
- A Geometry which defines the structure of the object, where the vertices are located (could be a cube, a sphere, a cone, etc).
- A Material which ****determines the visual properties of the object, such as the color, the opacity and even more complex attributes as metalness and roughness
Combined together they form something we call, a Mesh.
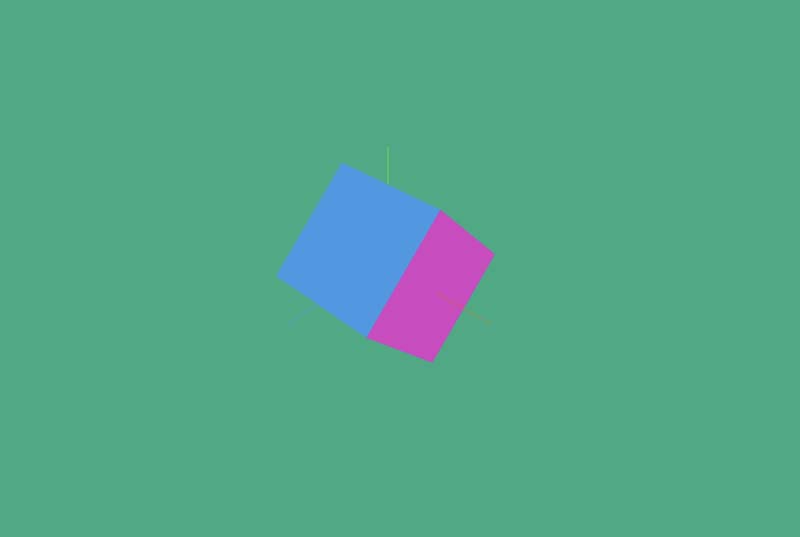
To do this with TresJS, create a component called <TresMesh /> and pass both geometry and material component as slots.
<TresCanvas window-size clear-color="#82dbc5">
  <TresMesh>
    <TresBoxGeometry :args="[2,1,1]" />
    <TresMeshBasicMaterial color="yellow" />
  </TresMesh>
</TresCanvas>
This will render something like this:

Let’s take a moment to analyze the code above. 🤔
Arguments
First we added a TresBoxGeometry component to create a box structure and we passed a special prop called args with an array of parameters.
These arguments represent the ThreeJS instance constructor parameters:
const geometry = new THREE.BoxGeometry(2,1,1) // [width, height, depth]
Every time you want to initialize a ThreeJS instance, you can do it with the args props.
Props
You can also modify the instances by passing props as you would do in regular Vue components. For example, we added a TresMeshBasicMaterial and we set the color to be yellow.
Under the hood, what the library is doing is this:
const material = new THREE.MeshBasicMaterial()
material.color = new Color('yellow')
Set Props
All properties whose underlying object has a .set() method have a shortcut to receive the value as an array.
For example, the TresMesh has a position property, which is a Vector3 object.
You can pass it to the component like this:
 <TresMesh :position=[2,-1,2]>
    <TresBoxGeometry :args="[2,1,1]" />
    <TresMeshBasicMaterial color="yellow" />
  </TresMesh>
TresJS will automagically 🪄 convert it to this:
mesh.position.set(new Vector(2,-1,2))
Colors
You can pass colors to the components using the color prop, which accepts a string with the color name, hex value or an RGB vector:
<TresAmbientLight color="teal" /> ✅
<TresAmbientLight color="#008080" /> ✅
<TresAmbientLight :color="[0.3, 0.5, 0.2]" /> ✅ /// [red, green, blue]
Transforming the Object
Properties can also be use to transform a 3D object’s:
- Position
- Rotation
- Scale
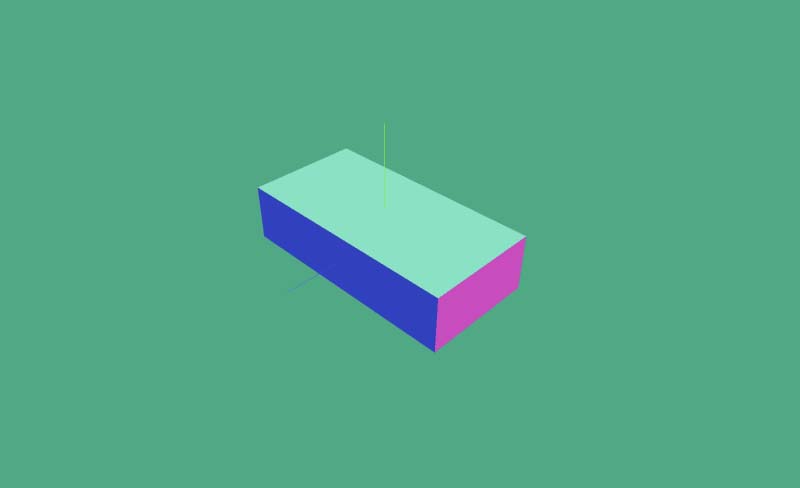
Since we already learned how to change the position of a mesh in the previous section, let’s make some changes to the cube so that we can better understand other transformations. Copy the following code:
<TresCanvas window-size clear-color="#82dbc5">
  <TresMesh>
    <TresBoxGeometry />
    <TresMeshNormalMaterial />
  </TresMesh>
</TresCanvas>
Here, we use the MeshNormalMaterial because it makes it easy to see the different parts of the geometry with RGB colors, which is really useful for demonstration purposes.
<TresMesh>
  <TresBoxGeometry />
  <TresMeshNormalMaterial />
</TresMesh>
Rotation
Rotation is simply changing the orientation of an object around an axis. This is defined by a set of three angles, one for each of the X, Y, and Z axes.
This is typically done using Euler angles in the x, y, and z dimensions. The rotation values are given in radians.
For instance, if you want to rotate an object 90 degrees about the Y axis, you will use Math.PI/2 as the value. You may specify the rotation of the object with the rotation prop, which also takes an array of three values or a Vector3, representing rotations along the x, y, and z axis respectively.
Here’s an example:
<TresMesh :rotation="[Math.PI/4, Math.PI/2, 0]">
  <TresBoxGeometry  />
  <TresMeshNormalMaterial />
</TresMesh>
In this example, the mesh is rotated 90 degrees around the Y axis and 45 degrees on the X axis. Notice that we did not rotate it around Z (values are 0).
Scale
The scale of an object determines its size in the 3D world. It’s specified in terms of the scale prop. By default, the scaling factor of an object is 1 in all directions.
You can use the scale prop to make an object larger or smaller. For instance, if you want to make an object twice as wide and half as tall, you could pass [2,0.5,1] as the value to the scale prop, like so:
<TresMesh :scale="[2, 0.5, 1]">
   <TresBoxGeometry/>
   <TresMeshNormalMaterial />
</TresMesh>
Animating TresJS Objects
The next part is really fun because we are going to bring our box to life. Up until this point, our box has only been rendered “once”, and I say “once” because under the hood ThreeJS has already started a loop using window requestAnimationFrame.
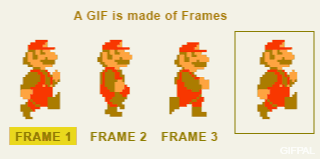
Similar to how animation works in cinema, to convey the illusion of movement for a 3D object, we need to trick the human eye by rendering several frames (typically 60 per second). This makes our brain believe that the object is being animated. This is where the concept of FPS (frames per second) comes from in video games.
ThreeJS handles rendering for you and provides a composable called useRenderLoop that allows you to register a callback triggered at the native browser refresh rate.
const { onLoop } = useRenderLoop()

onLoop(({ delta, elapsed, clock, dt }) => {
  // I will run at every frame ~ 60FPS (depending of your monitor)
})
The onLoop callback receives an object with the following properties based on the THREE clock:
delta: The delta time between the current and the last frame. This is the time in seconds since the last frame.elapsed: The elapsed time since the start of the render loop.
Now that we have the tool, we need to reference our Mesh in the script tag to use it inside of the composable. However, how can we do that if the Mesh is only declared in the template?
To obtain a reference to a DOM element using Vue, we can use Vue’s Template Refs in the same way we would with plain Vue.
const boxRef = ref()
And then in the template:
<TresMesh ref="boxRef">
Once mounted, the boxRef.value will contain our ThreeJS Mesh instance object. We can modify it as needed inside the callback.
const { onLoop } = useRenderLoop()

onLoop(({ delta, elapsed, clock, dt }) => {
  // I will run at every frame ~ 60FPS (depending of your monitor)
  if(boxRef.value) {
     boxRef.value.rotation.y += delta
     boxRef.value.rotation.z = elapsed * 0.2
  }
})
Notice how you can use both delta and elapsed to modify a certain property.
Voilá, our cube is now animated and full of life:
Adding User Interactivity
One of the main benefits of adding 3D to your website is the boost it gives to end-user interactivity. A great example of this is allowing the user to move freely around the scene and use zoom to get a better view of the objects in detail.
We can achieve this with an abstraction component called <OrbitControls /> available in the @tresjs/cientos package.
But why use another package? TresJS is meant to be an ecosystem where you can achieve pretty much everything you could do in plain ThreeJS by using the core package of TresJS. However, this can also result in a lot of complex lines of code and logic. The cientos package aims to reduce the effort required and provide cool abstractions in the form of components and composable features to improve the developer experience.
To use the @tresjs/cientos package you just need to install it locally:
pnpm add @tresjs/cientos
And then re-start the Nuxt app so the @tresjs/nuxt module auto-imports all the necessary code.
The <OrbitControls /> abstraction seamlessly implements the ThreeJS OrbitControls, eliminating the need for manual configuration or updating of the camera.
<template>
  <TresCanvas window-size clear-color="#82dbc5">
    <OrbitControls />
    <TresMesh ref="boxRef">
      <TresBoxGeometry />
      <TresMeshNormalMaterial />
    </TresMesh>
  </TresCanvas>
</template>
But what about changing the color of the background of the scene, for example?
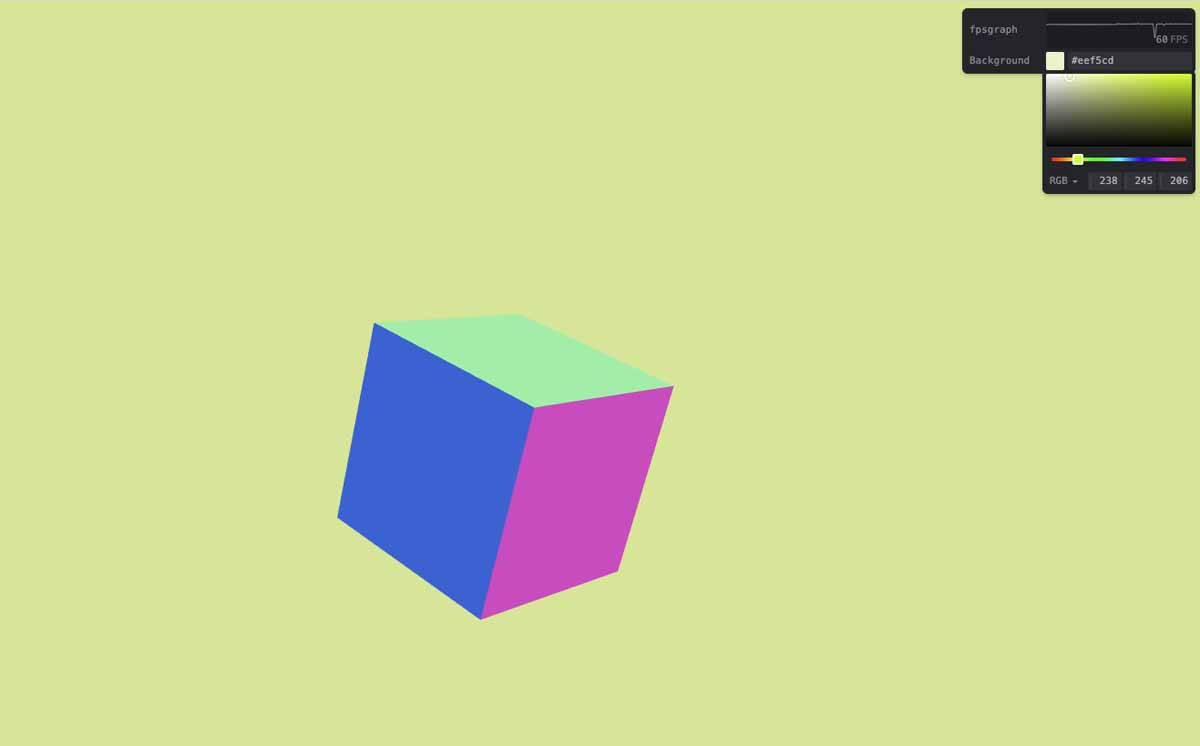
useTweakpane
Sometimes, you may want to give users control over customizing aspects of the 3D scene based on front-end inputs.
The cientos package offers a handy composable called useTweakpane around Tweakpane, a compact pane library used to fine-tune parameters and monitor value changes.
Let’s say we define our canvas props on a reactive state:
<script setup lang="ts">
  // Rest of code

  const gl = reactive({
    clearColor: '#82dbc5',
  })
</script>

<template>
  <TresCanvas window-size v-bind="gl">
    <OrbitControls />
    <TresMesh ref="boxRef">
      <TresBoxGeometry />
      <TresMeshNormalMaterial  />
    </TresMesh>
  </TresCanvas>
</template>
To modify the clearColor of the canvas, simply use the pane from the useTweakPane composable and add an input on the desired property, as shown below:
<script setup lang="ts">
  // Rest of code

  const gl = reactive({
    clearColor: '#82dbc5',
  })

  const { pane } = useTweakPane()

  pane.addInput(gl, 'clearColor', { label: 'Background' })
</script>
And voilá, now you have control over the canvas background color with a color picker out-of-the-box .😊
Wrapping Up
Congratulations! You have successfully implemented your very first 3D experience on Nuxt using TresJS. Wasn’t that hard, was it 😉?
You learned how to configure and use the @tresjs/nuxt package in your Nuxt app. You can add a TresCanvas component to render the scene, create a 3D box using geometries and materials, use props and args, and even animate your cube using transforms and the render loop useRenderloop composable.
You even earned how to extend the core package functionality by installing @tresjs/cientos. This allows you to add user interactivity to the scene and save time while improving the development experience.
Here are some handy resources if you want to continue your journey with TresJS: