

Within a large Nuxt application, it’s common to work with a bunch of data, consumed from numerous APIs. If our projects are not organized properly, we risk cluttering them with a large number of confusing and repetitive API calls. By implementing the DRY (Don’t Repeat Yourself) principle and the repository design pattern, we can set up our large-scale Nuxt 3 projects so that our API requests are handled neatly and efficiently, thus making it easy to maintain, update and add more endpoints to the application.
What is a repository design pattern?
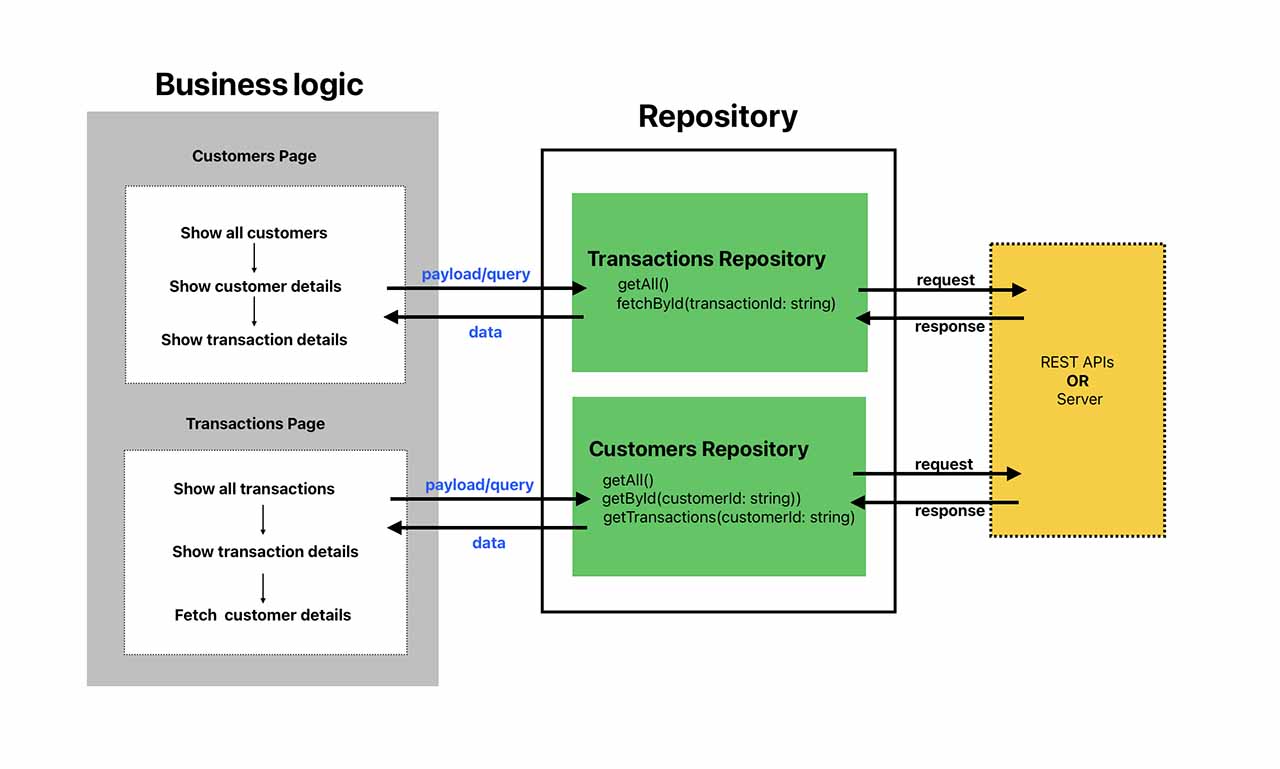
A repository pattern is a software design pattern that acts as an intermediary between business logic and the data source. It’s another layer that helps abstract the complexity of how to access data while providing easy access to the data.
So how do we implement the repository pattern in Nuxt 3? An easy mental model is to think of the repository as a collection/container of abstracts.
export default {
  transactions,
  customers,
  auth,
}
By taking advantage of the Nuxt 3 Plugin feature, we can expose the repository to the Nuxt runtime environment.
Implementing the Repository Pattern
So let’s get started implementing this pattern into a Nuxt 3 project. We’ll begin by creating a repository folder in the root directory of our project.
mkdir repository
Then, we can create a factory.ts file in the repository folder. This will be the base class from which all other repositories can be extended.
📁 repository/factory.ts.
import { $Fetch } from 'ohmyfetch';

class HttpFactory {
  private $fetch: $Fetch;

  constructor(fetcher: $Fetch) {
    this.$fetch = fetcher;
  }

  /**
    * method - GET, POST, PUT
    * URL
  **/
  async call<T>(method: string, url: string, data?: object, extras = {}): Promise<T> {
    const $res: T = await this.$fetch(url, { method, body: data, ...extras });
    return $res;
  }
}

export default HttpFactory;
As you can see, we’re importing fetch from ohmyfetch, which is the HTTP client we’ll use for making network requests.
HttpFactory is an encapsulation that accepts an HTTP client. We keep a local reference ($fetch) so that member function(s) can access it.
The async call function, which is a public function, manages how API requests are made using the locally referenced HTTP client.
Note: Any http client can be used here; you would just have to customize it accordingly.
A modules subfolder
In the repository folder, we’ll add a subfolder called modules.
mkdir modules && cd modules
All repositories will be stored in this subfolder. A repository is an encapsulation that contains all endpoint structure, payload manipulation, API requests, and other information required in the application for a specific domain (e.g. authentication, checkout, etc).
The Auth Repository
For the sake of this example, we’ll create an auth repository, called auth.ts. This will act as a repository for all things authentication, including creating a user account, logging in a user, resetting a user’s password, and so on.
📁 repository/modules/auth.ts
import HttpFactory from './factory';
import { ICreateAccountInput, ICreateAccountResponse, ILoginInput, ILoginResponse } from 'types';

class AuthModule extends HttpFactory {
  private RESOURCE = '/auth';

  async login(credentials: ILoginInput): Promise<ILoginResponse> {
    return await this.call<ILoginResponse>('POST', `${this.RESOURCE}/login`, credentials);
  }

  async create(account: ICreateAccountInput): Promise<ICreateAccountResponse> {
    return await this.call<ICreateAccountResponse>('POST', `${this.RESOURCE}/register`, account);
  }
}

export default AuthModule;
As you can see, we’ve imported the HttpFactory we created earlier, and we are inheriting from it so we have access to its properties and methods.
In AuthModule, we’ve defined two asynchronous public methods, login and create, which allow us to make API requests outside of this repository without knowing much about how they work behind the scenes.
- Each method is asynchronous, allowing the RESTApi state (idle, loading, rejected, and resolved) to be easily tracked outside of the repository.
- Because we cannot guarantee the success or failure of the API request, a promise is returned, allowing each possibility to be managed outside of the repository.
- Because
ICreateAccountInput,ICreateAccountResponse,ILoginInput, andILoginResponseare all custom interfaces, we won’t be concerned with them in this example.
With that, we now have a repository for authentication.
Creating a Nuxt Plugin
Nuxt Plugins are required to manage all our repositories and make them easily accessible throughout our application.
To make a Nuxt plugin, we’ll place a file in the /plugins directory of our Nuxt project, called api.ts.
📁 plugins/api.ts
import { $fetch,FetchOptions } from 'ohmyfetch';
import { defineNuxtPlugin } from '#app';
import AuthModule from '~~/repository/modules/auth';

/** ApiInstance interface provides us with good typing */
interface IApiInstance {
  auth: AuthModule
}

export default defineNuxtPlugin((nuxtApp) => {


  const fetchOptions: FetchOptions = {
    baseURL: nuxtApp.$config.API_BASE_URL,
  }

  /** create a new instance of $fetcher with custom option */
  const apiFetcher = $fetch.create(fetchOptions);

  /** an object containing all repositories we need to expose */
  const modules: IApiInstance = {
    auth: new AuthModule(apiFetcher),
  };

  return {
    provide: {
      api: modules,
    },
  };
});
So what’s going on here?
Nuxt 3 replaces Axios and other third-party clients with $fetch as the preferred method for making HTTP calls.
To initialize AuthModule, which is an HttpFactory, we must pass an argument of $fetcher to the constructor, which requires us to create a $fetcher instance.
We named our $fetcher instance apiFetcher, and it contains the baseURL to our RESTApi. The baseURL value is derived from the environmental variables.
Seeing as custom plugins or helpers are loaded into the Nuxt runtime via the exported key provide we exposed all of our repositories via the api node in the provide object.
Note: Plugins in Nuxt 3 have a $ prefix. Our plugin will be referenced using $api.
Now that we have finished creating our repository and plugin for use in the Nuxt environment, let’s see how we can use our solution in components, pages, or anywhere we can use a composable.
Usage
With our implementation, we can attempt to log in a user in our page or component by:
- Destructuring the Nuxt 3 runtime context using the useNuxtApp; a built-in composable
- Getting our repository
$apifrom the destructure - Creating a
handleSubmitfunction that we assign to a form button
📄 login.vue
...

const { $api } = useNuxtApp();

const form = reactive<ILoginInput>({
  email: '',
  password: '',
});

async handleSubmit(): void {

  try {
        const credentials: ILoginInput = {
          email: form.email,
          password: form.password,
        };

        const response = await $api.auth.login(credentials);
        console.log(response)
        // allow user access into the app
    } catch (error) {
        console.error(error);
    }

}
We now have a basic understanding of how to use our repository implementation in components, pages, and this same approach would apply within Pina as well.
Conclusion
Repositories help us improve code quality by reducing repetition to the bare minimum. It is critical to implement an approach like this in your application so that you do not have to worry as your application grows.