
Welcome back to the final part of our Vue with GraphQL series.
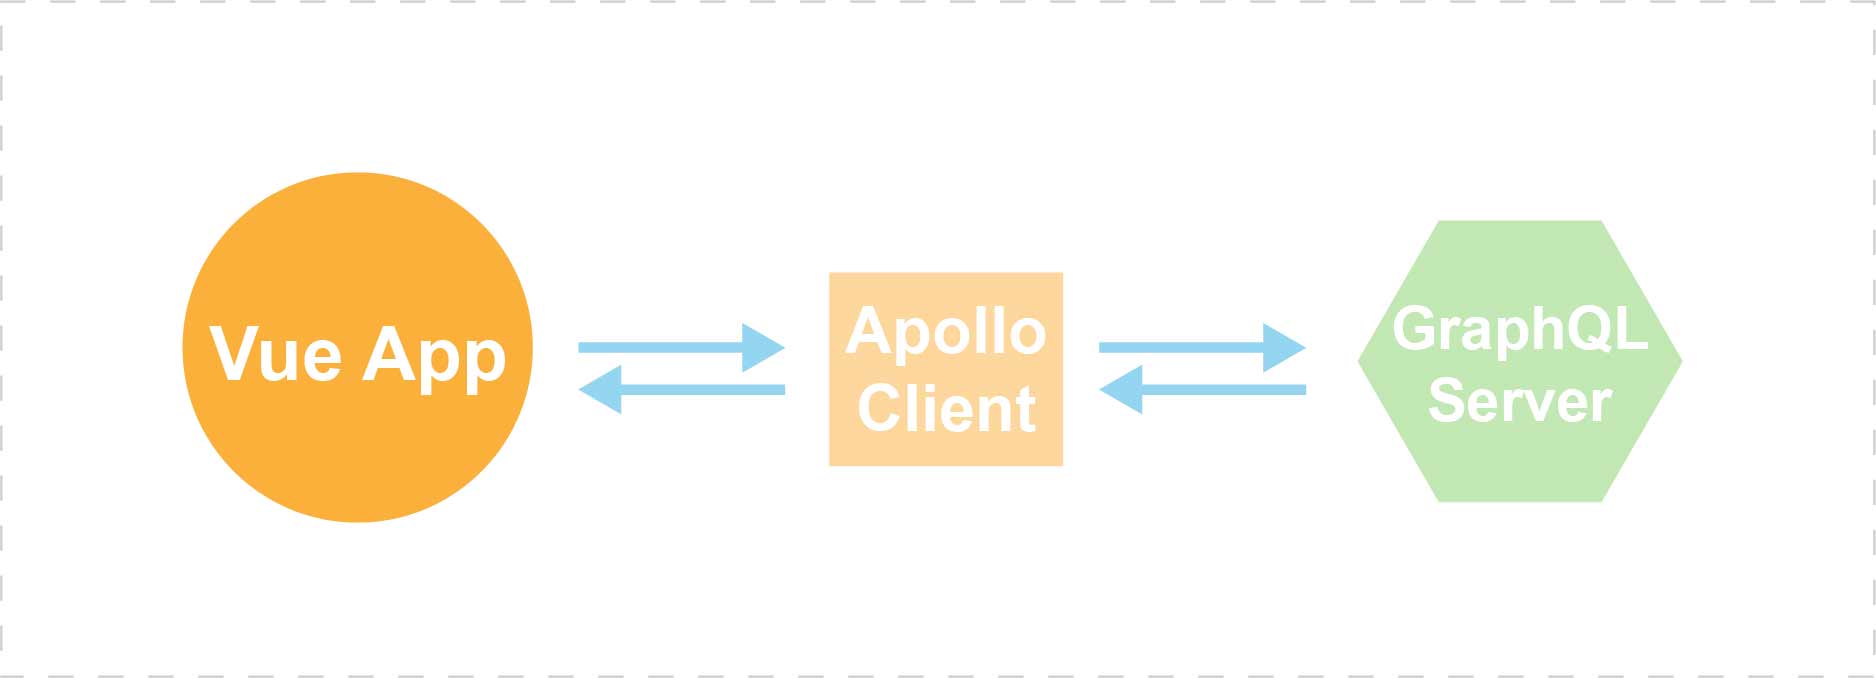
Continuing from the GraphQL server we’ve built in Part 2 of this series, we are going to focus on the client-side of the equation. In particular, we’ll create a Vue app as a separate project, and use Apollo client to connect it to our API server for data.
Preparing the Vue app
First’ we’ll create a new Vue app:
npm init vue-app my-app
Then go to the App.vue file, and replace the template with the following code:
📃src/components/App.vue
<template>
<div id="app">
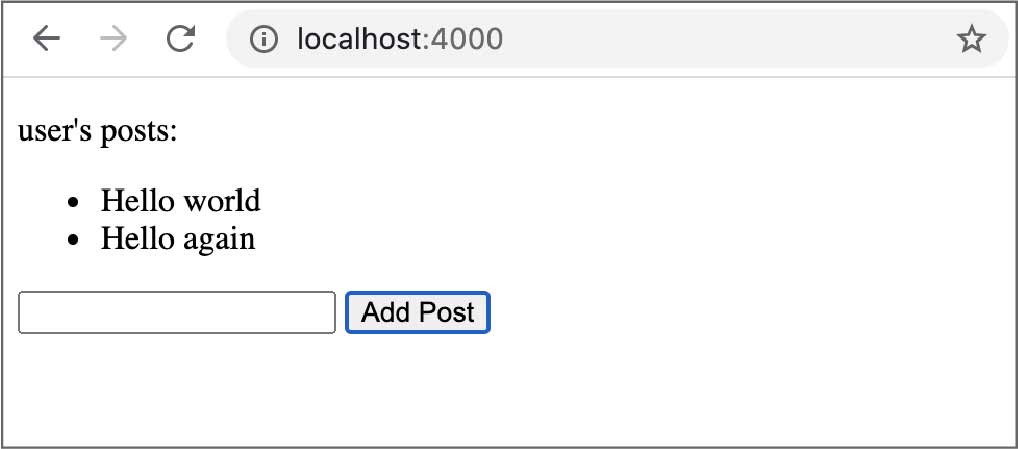
<p class="username">{{ currentUser.username }}'s posts:</p>
<ul>
<li v-for="post in posts" :key="post.id">{{ post.content }}</li>
</ul>
<div>
<input v-model="newPostContent">
<button @click="addPost()">Add Post</button>
</div>
</div>
</template>
It’s just a basic UI with a p element, a ul element, a textbox input, and a button.
The list will display all the posts that belong to the user, while the textbox and the button act as a form for adding new posts.
Next, we’ll add data and the addPost event method to the component options:
📃src/components/App.vue
export default {
  name: 'app',
  data: function(){
    return {
      currentUser: { username: 'user' },
      posts: [],
      newPostContent: ''
    }
  },
  methods: {
    addPost() {
      this.posts.push({ content: this.newPostContent })
      this.newPostContent = '';
    }
  },
}
Now, you can run the app:
cd my-app
npm run dev
It should look like a typical offline todo app:
It works, but we want to sync the data with our GraphQL server. So, we’re not done yet.
Setting up Apollo Client
To tie the Apollo server and the Vue app together, we have to set up Apollo Client in our Vue project.
First, install the required packages:
npm install -s graphql vue-apollo apollo-boost
Apollo itself isn’t specific to Vue, but the vue-apollo package is the Vue-specific version of apollo client.
apollo-boost is a package that makes it easier to set up a GraphQL client without getting into too much configuration.
Inside index.js, import the Apollo-related utilities and create the apolloProvider:
📃src/index.js
import ApolloClient from 'apollo-boost'
import VueApollo from "vue-apollo";

const apolloProvider = new VueApollo({
  defaultClient: new ApolloClient({
    uri: 'http://localhost:4001'
  })
});
Here, we’re configuring it to talk to our API server, which is listening at http://localhost:4001.
To finish the setup, we’ll use VueApollo as a middleware, and add apolloProvider to the Vue options:
📃src/index.js
Vue.use(VueApollo); // use middleware

new Vue({
  el: '#app',
  apolloProvider, // add option
  render: h => h(App)
})
Now our Vue app is bootstrapped as a GraphQL client. All components in the app will be able to send GraphQL-style queries to our API server.
Sending queries
Back in App.vue, let’s import gql and create our first query:
📃src/components/App.vue
import gql from 'graphql-tag'

const CURRENT_USER = gql`query {
  currentUser {
    id
    username
  }
}`;

export default {
  ...
This query will get us the id and username of the current user. (The current user is the one with the id abc-1, which we hard-coded in the server code in the previous article.)
To bind the query to our component, we have to use the apollo option:
export default {
  name: 'app',
  data: function(){
    return {
      currentUser: { username: 'user' },
      posts: [],
      newPostContent: ''
    }
  },
  methods: {
    addPost() {
      this.posts.push({ content: this.newPostContent })
      this.newPostContent = '';
    }
  },

  // NEW
  apollo: {
    currentUser: CURRENT_USER,
  }
}
Notice that we’re using the same name currentUser in both data and apollo. Having the same name is how the currentUser state can be synced to the currentUser query’s result.
When you refresh the Vue app, you should see the actual username from our GraphQL server. (Make sure your API server is still running at port 4001)
We’ll repeat the same process for posts data.
Create another query:
📃src/components/App.vue
const POSTS_BY_USER = gql`query ($userId: String!) {
    postsByUser(userId: $userId) {
      id
      content
    }
  }`;
Since posts is also a field in the User type, we can actually query the posts data through the currentUser query. But using the postsByUser query, we can demonstrate how to send arguments (also called variables) to the server. We’re sending the userId variable with the postsByUser query.
Our server code will be able to extract the userId from the args parameter, and use that to gather the posts data.
Since the POST_BY_USER query requires a variable (argument), binding it to the component will be a little more complicated.
First, add a new query to the apollo option as an object:
📃src/components/App.vue
apollo: {
  currentUser: CURRENT_USER,
  posts: {
    query: POSTS_BY_USER
  }
}
With this object syntax, we can specify the variables we want to send along this query:
📃src/components/App.vue
apollo: {
  currentUser: CURRENT_USER,
  posts: {
    query: POSTS_BY_USER,
    variables() {
      return { userId: this.currentUser.id }
    },
  }
}
Notice that variables is a function that returns the variables as an object. The function syntax allows us to refer to the component instance with this. We’re getting the user id from this.currentUser and setting the userId variable with it.
Apollo client will automatically match the name of the returned data with the name of the state in the component. In this case, the returned data will have a field called postsByUser. But since our state is called posts, they won’t be matched automatically.
One workaround is to use the update method to map to the postsByUser field in the returned data:
📃src/components/App.vue
apollo: {
  currentUser: CURRENT_USER,
  posts: {
    query: POSTS_BY_USER,
    variables() {
      return { userId: this.currentUser.id }
    },
    update(data) {
      return data.postsByUser
    }
  }
}
Now refresh the Vue app. You should see the posts that we defined on the server-side.
Mutation
So far, we’ve only been reading data from the server. Let’s complete the cycle by allowing the user to add new posts to the server.
We’ll start with tweaking the server code.
Add a Mutation type in the schema with an addPost field:
📃server.js
const schema = gql(`
  type Query {
    currentUser: User
    postsByUser(userId: String!): [Post]
  }

  // ADD THIS
  type Mutation {
    addPost(content: String): Post
  }

  ...
You might have noticed that addPost looks very similar to postsByUser, that’s because a mutation is just a “query” that changes the server data instead of asking for server data.
Now let’s add a new resolver for addPost under the Mutation type:
📃server.js
var resolvers = {
  Mutation: {
    addPost: async (_, { content }, { currentUserId, data }) => {
      let post = {
        id: 'xyz-' + (data.posts.length + 1),
        content: content,
        userId: currentUserId,
      };
      data.posts.push(post);
      return post;
    }
  },
  ...
We’re creating a new post object and putting it inside the data.posts array. And finally, we return the newly created post.
That’s all we need on the backend.
Now in App.vue, create a mutation query for addPost:
📃src/components/App.vue
const ADD_POST = gql`mutation ($content: String!) {
  addPost(content: $content) {
    id
    content
  }
}`;
Different from a query, we don’t have to bind the mutation to the component. Instead, we’ll use the this.$apollo.mutate method to send the mutation request to the server.
We do that inside the addPost event handler:
📃src/components/App.vue
methods: {
  addPost() {
    // this.posts.push({ content: this.newPostContent })

    this.$apollo.mutate({
      mutation: ADD_POST,
      variables: { content: this.newPostContent },
    })

    this.newPostContent = ''
  }
},
Every time we send a mutation to add something on the server, we have to also update the locally cached copy of the data. Otherwise, the frontend will not be updated even when the backend data is changed.
We can update the cache using the update option:
📃src/components/App.vue
methods: {
  addPost() {
    this.$apollo.mutate({
      mutation: ADD_POST,
      variables: { content: this.newPostContent },

      // NEW
      update: (cache, result) => {

        // the new post returned from the server
        let newPost = result.data.addPost

        // an "identification" needed to locate the right data in the cache
        let cacheId = {
          query: POSTS_BY_USER,
          variables: { userId: this.currentUser.id },
        }

        // get the cached data
        const data = cache.readQuery(cacheId)

        const newData = [ ...data.postsByUser, newPost ]

        // update the cache with the new data
        cache.writeQuery({
          ...cacheId,
          data: { postsByUser: newData }
        })
      }
    }

    this.newPostContent = '';
  }
},
To make the code cleaner, we can extract the function to somewhere else:
📃src/components/App.vue
function updateAddPost(cache, result) {

  let newPost = result.data.addPost

  let cacheId = {
    query: POSTS_BY_USER,
    variables: { userId: this.currentUser.id },
  }

  const data = cache.readQuery(cacheId)
  const newData = [ ...data.postsByUser, newPost ]

  cache.writeQuery({
    ...cacheId,
    data: { postsByUser: newData }
  })
}
And then bind the function with this (since we’re using this inside the function):
📃src/components/App.vue
methods: {
  addPost() {
    this.$apollo.mutate({
      mutation: ADD_POST,
      variables: { content: this.newPostContent },

      // NEW
      update: updateAddPost.bind(this)
    }

    this.newPostContent = '';
  }
},
Now using the app, you should be able to add new posts and see the post list updated immediately. And because the data are stored on the server, you can refresh the app and the old data will still be there. (Since we’re only storing the data in an in-memory object, the data will get reset once the GraphQL server is restarted.)
Optimistic Update
Although seemingly the new post gets added to the DOM immediately, things are not always this smooth. For example, if the data requires more time-consuming processing on the server, our Vue app will have to wait for that whole time before the DOM can be updated. The app is basically out of sync during this waiting period. We didn’t see this problem in our current app only because that waiting period is very, very short.
To make it future-proof, we’ll use a technique called the optimistic UI update. We would just optimistically assume the data gets updated on the server without incident, so we would update the UI immediately with the available data at hand. This will eliminate the need to wait for a server response on the success/failure of the mutation.
Optimistic UI update is a general programming concept, so it isn’t exclusive to GraphQL or Vue.js. But, Apollo Client has a built-in support for this.
All we have to do is to supply an object through the optimisticResponse option, which will pretend to be the actual server response:
📃src/components/App.vue
methods: {
  addPost() {
    this.$apollo.mutate({
      mutation: ADD_POST,
      variables: { content: this.newPostContent },
      update: updateAddPost.bind(this),

      // NEW
      optimisticResponse: {
        __typename: 'Mutation',
        addPost: {
          __typename: 'Post',
          id: 'xyz-?',
          content: this.newPostContent,
          userId: this.currentUser.id
        },
      }
    })

    this.newPostContent = ''
  }
},
This object that we set with optimisticResponse will be sent to our updateAddPost function. This will be the result.data in that function. Only after the server responded that we get to swap out this object with the actual server data. Basically, this is a placeholder.
The optimisticResponse object is supposed to be a response of a mutation request, that’s why it’s typed Mutation. Aside from the __typename property, it has an addPost property, which is named after the mutation request that we want to map to. The addPost property is used to set the new Post data’s placeholder.
Notice that this Post object has xyz-? as its id. Since the actual id of a new post will be decided on the server-side, we don’t have this information before the actual mutation response, so we’re just using xyz-? here as a placeholder.
So, our updateAddPost will get called twice, first with the optimistic response, then with the actual server response.
We can test it by printing a log message inside the updateAddPost function:
📃src/components/App.vue
function updateAddPost(cache, result) {

  let newPost = result.data.addPost

  // ADD THIS
  console.log(newPost.id)

  let cacheId = {
    query: POSTS_BY_USER,
    variables: { userId: this.currentUser.id },
  }

  const data = cache.readQuery(cacheId)
  const newData = [ ...data.postsByUser, newPost ]

  cache.writeQuery({
    ...cacheId,
    data: { postsByUser: newData }
  })
}
Now refresh the app in the browser, try to add a new post. In the browser’s console, you should see the xyz-? post id, and right after that you see the actual post id from the server. This confirms that the updateAddPost function gets hit twice with different data at different times.
Our GraphQL-powered app is now completed and optimized. But, you can easily extend the app by adding more schema types, resolvers, queries, or data sources.
The journey ahead
GraphQL is a huge step forward for frontend development. It’s a technology that comes with its own ecosystem of tools. After going through this three-part GraphQL introduction, you should now have a solid foundation to explore more advanced techniques and tools that the GraphQL community has to offer.