In the app development world, you’ll come across terms such as Native Apps, Hybrid Apps, Web Apps, Progressive Web apps… and the distinctions between them all can be confusing at first. In this article, I’m going to break down these differences and explore how PWAs are unique as we build a simple Vue 3 PWA together. This is part 1 of a 2 part series. In part 2, I will cover how to deploy the app to firebase, how to test it using lighthouse, and customizing the splash screen.
Breaking them down
Native Apps are apps that are built and compiled for a specific operating system, whether it is Android or iOS. These apps live on your device and appear as icons on your phone. They are found via the App Store/Play Store and are not accessible via a URL. They are also able to take full advantage of all the device features such as your camera, GPS, the accelerometer, and so on. Typically these apps are built using Swift (for iOS), Java or Kotlin (for Android). These types of apps have the best performance and widest access to the onboard device features. Because, as the name implies, it is native to the operating system.
Hybrid Apps are web apps that have been written using web technologies such as HTML, JS, and CSS and have been compiled into a native shell. They can also be found on the App Store/Play Store and installed like a native app. An advantage of hybrid apps is the ability to leverage a single code base to target multiple platforms. This cuts down development time. They are also able to access the device features such as camera and GPS if the relevant browser APIs exist. Examples of these kinds of frameworks include React Native, Flutter, Xamarin and Ionic.
Web Apps are apps built for the browser using web technologies such as HTML, JS, CSS. These apps are accessible via a URL, which makes it universally accessible to anyone with a device that can access the internet with a modern browser.
A Progressive Web App expands on this concept by enabling a Web App to be “installed” onto your device directly from the browser. This includes mobile, tablets, and even your computer’s desktop. It runs in a headless browser so it looks 100% like an app and even works in offline mode. It also appears as an icon on your home screen like any normal app. Similar to a native app, you also have access to the features of the device if the relevant browser APIs exist, including camera, Bluetooth, NFC, and more. You get all of this without ever going through the App Store or Play Store!
To discover what your browser is capable of, you can check out what web can do today and what PAW can do today. Also, here is an authoritative source to read more regarding PWAs
Advantages of PWA
PWA’s provides numerous advantages:
- Made using HTML, JS, CSS and run in a web browser.
- Content can be indexed by search engines as it is a Web App and accessible via a browser URL. Great for SEO!
- Apps are readily accessible to everyone as it can be accessed and installed immediately via the browser. Independent of App Store/ Play store regulations.
- The app can function both online and offline. A PWA is cached on the device for quick loading.
- Data can be stored locally using Cache or IndexedDB.
- Wide range of device features that can be accessed through browser APIs.
- PWAs are small in size.
- Maintenance and updates are served via the web browser so there is no need to update the app manually through an app store.
- Single code base that works for all platforms (Mobile and Desktops) through the browser.
- Can use push notifications on Android.
Disadvantages of PWA
Given that PWAs are based in the browser, there are a couple of disadvantages to take note of:
- Might not be compatible with older devices or outdated web browsers
- PWAs still lack in comparison to native apps when it comes to accessing device features.
- Not as battery efficient or as performant as native apps.
iOS-specific Disadvantages
PWAs are supported on iOS through Chrome or Safari. However, there are potential deal breakers to be aware of when choosing to embark on PWAs:
- PWAs and the cached data are automatically wiped if not used for a few weeks (~2 weeks)
- Cache API has a storage limit per website of 50MB
- IndexedDB has a storage limit of 500MB or half of the device’s free space (whichever is smaller)
- File System API is not available on iOS
- Does not support push notifications on iOS. Firebase Cloud Messaging (FCM) will not work.
There is always a trade-off when choosing the right tool to use. Consider your use-case and take into account these advantages and disadvantages when deciding which technology is the right choice for your project.
What does the data say about PWAs?
So should your next app be a PWA? Let’s look at what the data says.
PWAs in production have been shown to provide the following benefits:
- 68% increase of mobile traffic
- 15-fold improvement of load and installation speed
- 25x reduced use of device storage
- 52% average conversion increase
- 137% engagement increase
- 42.86% lower bounce rate when compared to that of mobile websites
- 133.67% increase in page views
Source: https://appinstitute.com/progressive-web-apps-infographic/
PWA Key Concepts
As mentioned above, PWAs are basically web apps that behave like a native app on your device. So what must a web app possess in order to become a PWA that can be installed on any device?
3 simple requirements
Your app must have:
- An HTTPS connection
- A manifest.json file.
- A service worker JS file
Service Worker
What makes a PWA special is its ability to work offline like any native app installed on your device. The service worker is key as it is responsible for caching all the files, push notifications, content updates, and more. It is a client-side programmable proxy that sits between your web app and the network. It has a lifecycle independent of the web app, meaning that it can receive push notifications when the app is closed or in the background. For now, it’s just important to understand that the service worker sits between the web app and the network and acts as a go-between.
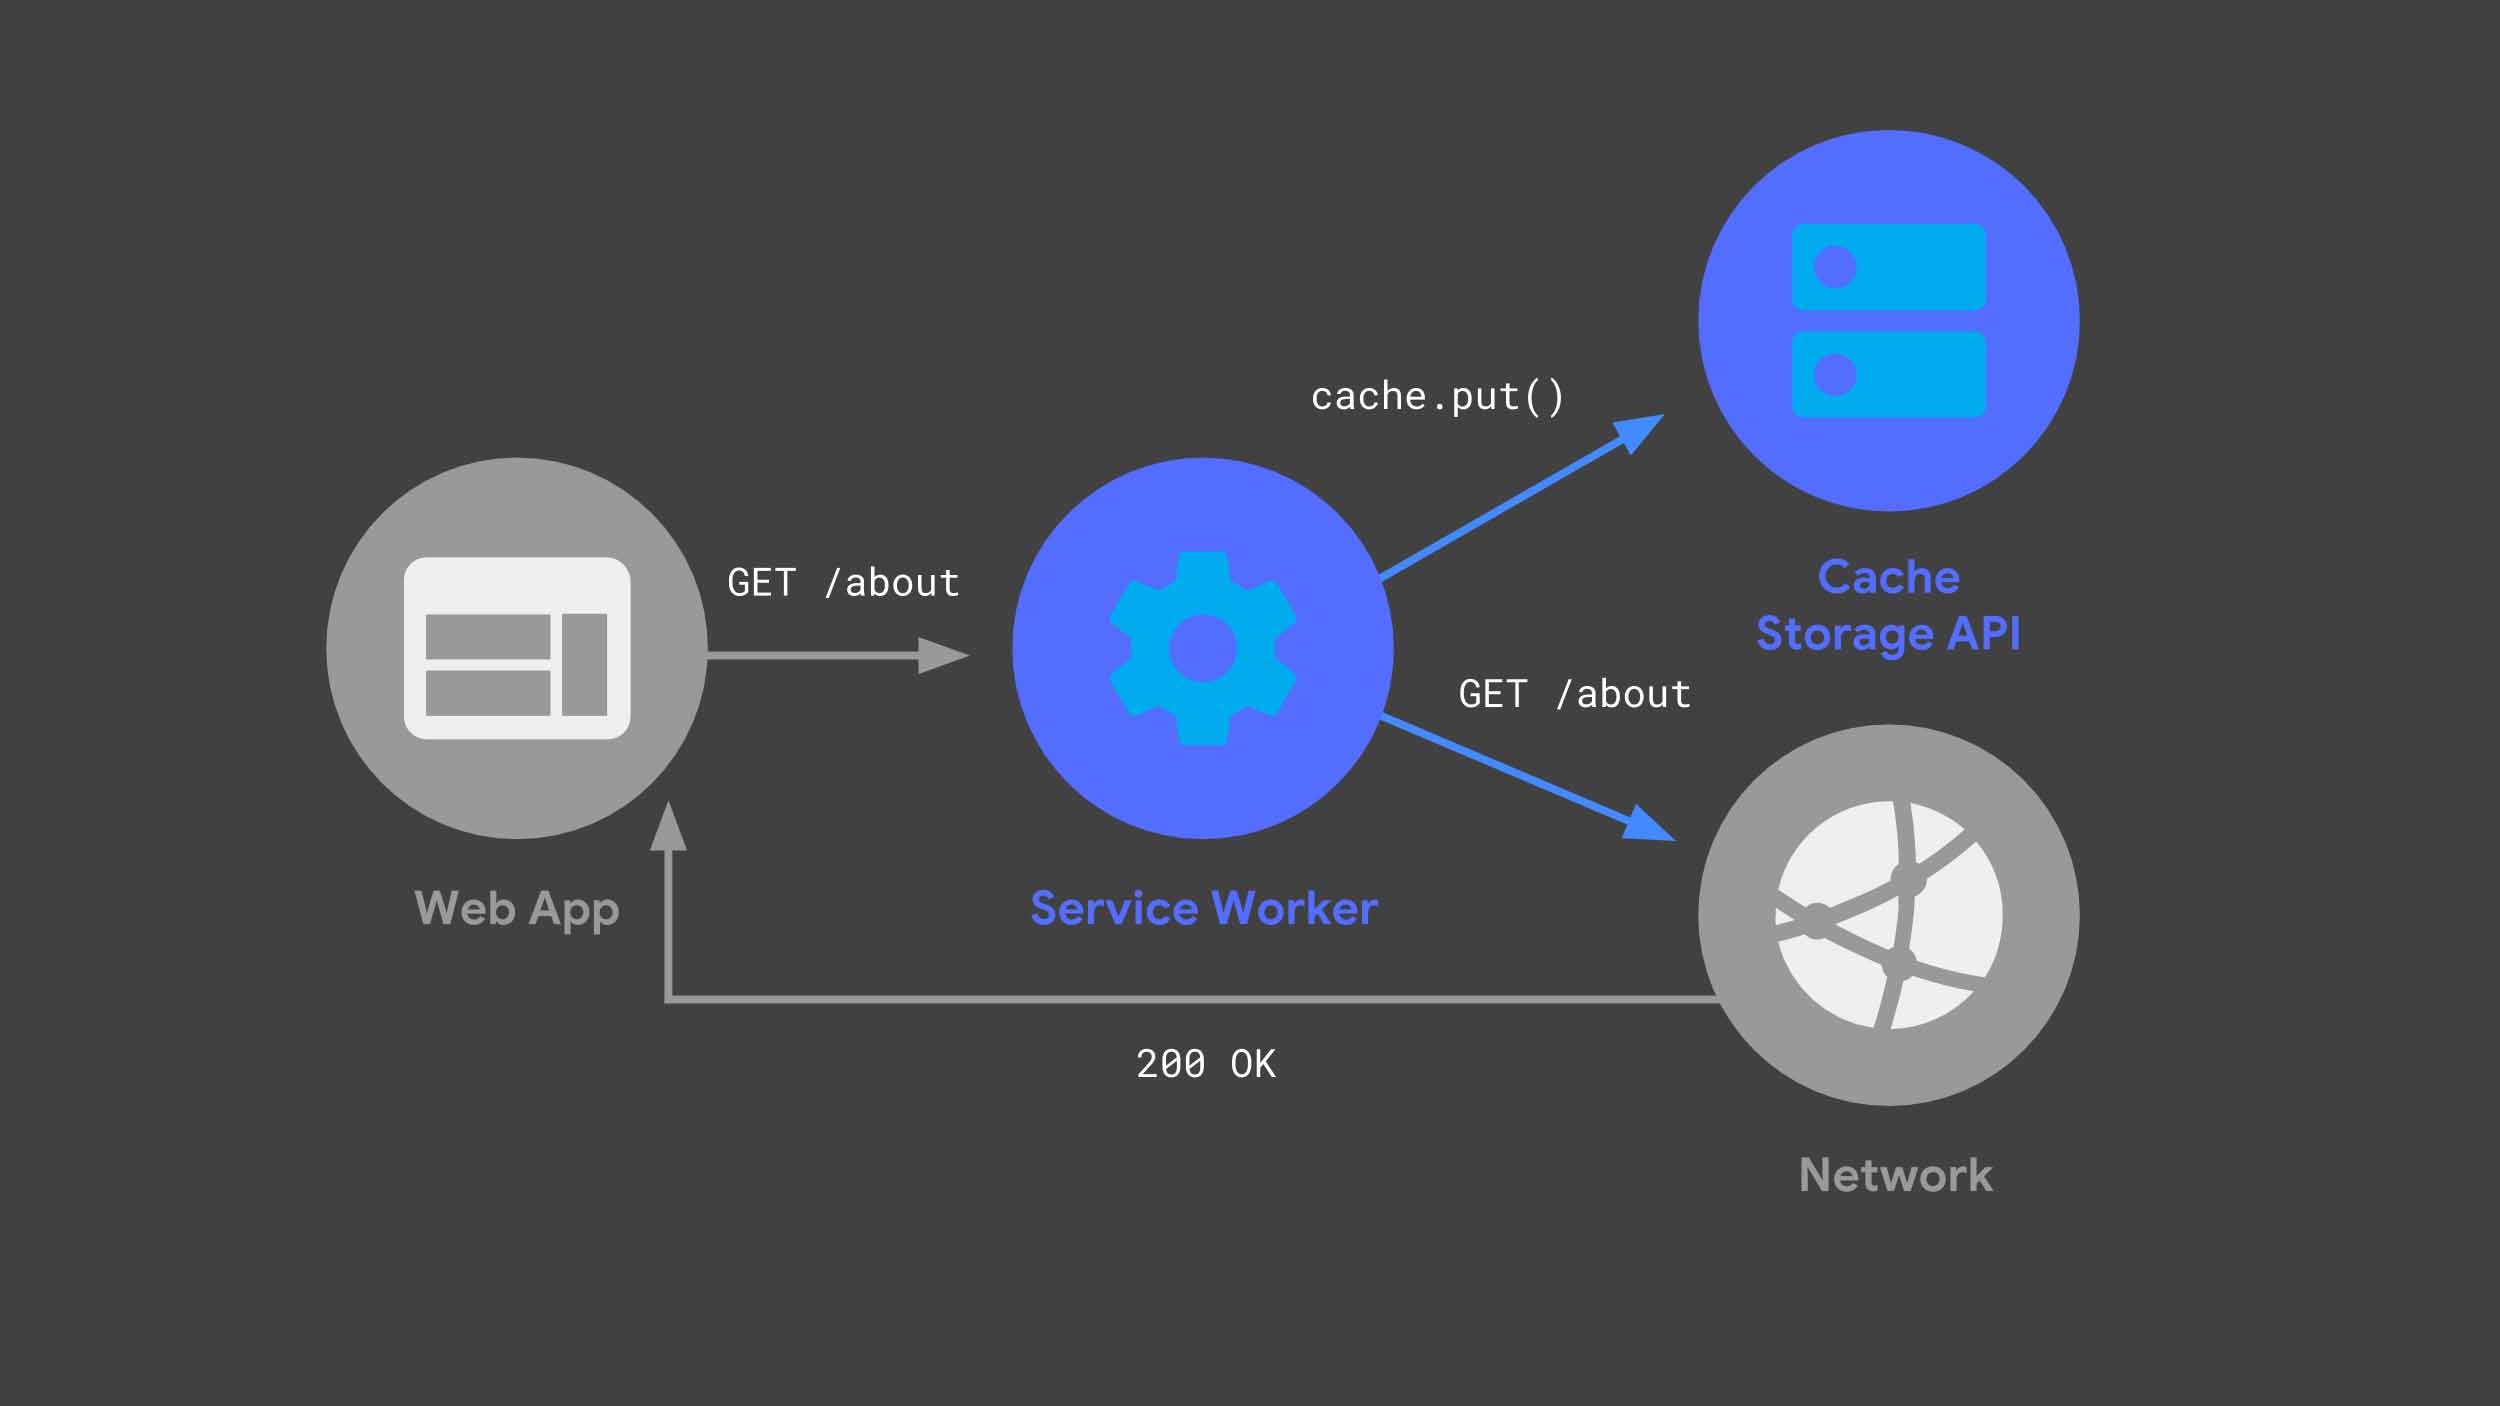
Source: https://developers.google.com/web/updates/2018/05/beyond-spa
Manifest.json
The manifest.json file provides the necessary information in order for the browser to recognize the app as a PWA. It provides information about the web application, which includes customizations for the splash screen, name, author, description, and others. We’ll cover more about this in the next article.
Let’s learn how to to turn a Vue app into a PWA.
Starting a PWA from Scratch
This tutorial assumes that you have already installed the Vue CLI. If you haven’t, head here.
To create a Vue PWA from scratch, we can utilize the Vue CLI to create a new app using the following command:
vue create hello-world
Follow the prompt and select "Progressive Web App (PWA) Support:
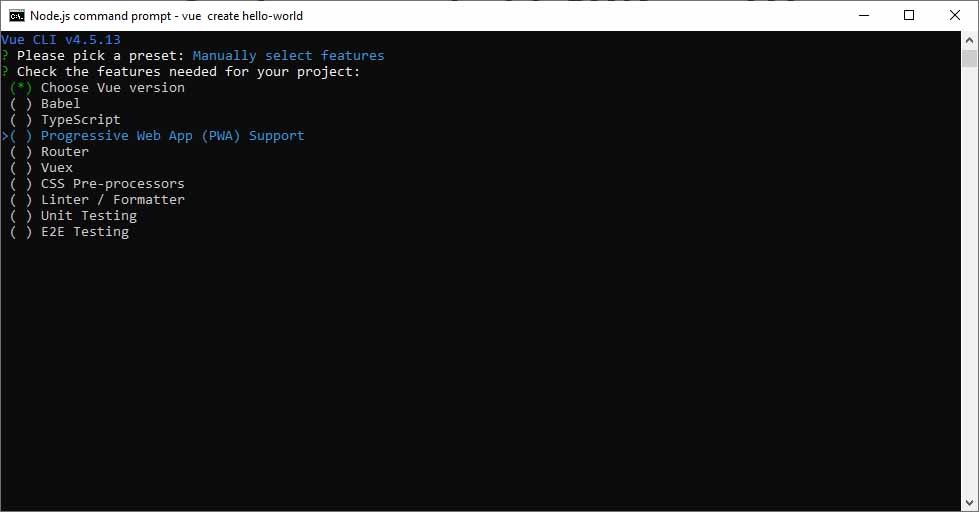
And with that, we have created an app with a service worker.
(At this point, if you tested it locally, it would technically still not qualify as a PWA since we don’t have a secure HTTPS connection on Localhost.)
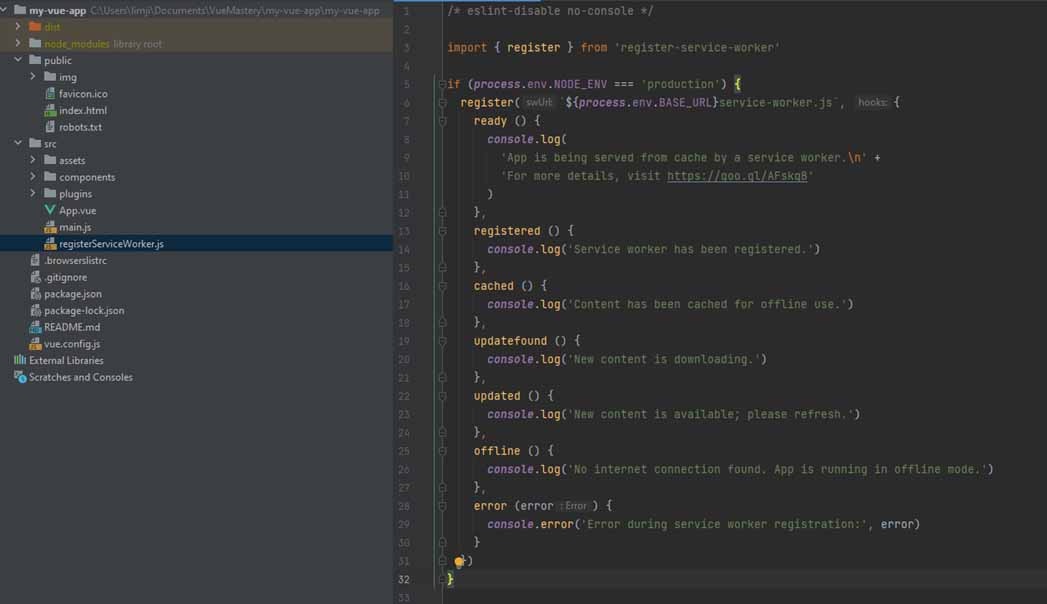
Notice that a registerServiceWorker.js was created for us inside the src folder. This is the service worker.
What happens when we build our app for production?
npm run build
This will create a dist folder where you’ll find the manifest.json file that looks like this.
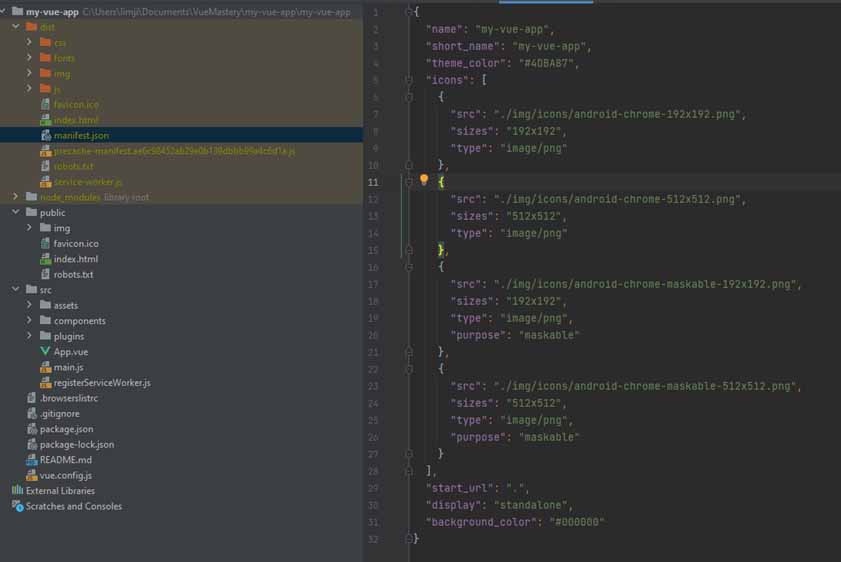
As mentioned, the manifest.json file controls details regarding the app and the relevant customizations for the splash screen when the app starts up. With the service worker and manifest.json file, we can deploy our app to any hosting service like Firebase that has an HTTPS connection and voila: Our Web App has been transformed into a PWA!
If you are interested in learning more about the package the Vue CLI uses to transform a Vue app into a PWA, check out this documentation.
Customizing our files
In order to customize the settings for the manifest.json file and Workbox, you can add a “pwa” object to the vue.config.jsfile. More information regarding the parameters can be found in the documentation, and it will be covered in further detail in the next article.
vue.config.js
module.exports = {
  // ...other vue-cli plugin options...
  pwa: {
    name: 'My App',
    themeColor: '#4DBA87',
    msTileColor: '#000000',
    appleMobileWebAppCapable: 'yes',
    appleMobileWebAppStatusBarStyle: 'black',

    // configure the workbox plugin
    workboxPluginMode: 'InjectManifest',
    workboxOptions: {
      // swSrc is required in InjectManifest mode.
      swSrc: 'dev/sw.js',
      // ...other Workbox options...
    }
  }
}
What is Workbox?
Workbox is a set of libraries that removes boilerplate when working with service workers. It helps you write and manage service workers and caching. It comes baked in with the @vue/cli-plugin-pwa package.
More details can be found here.
The next section will cover what to do if you have an existing Vue 3 App that you would like to turn into a PWA.
How to turn your existing Vue 3 App into a PWA.
If you have an existing app that you want to transform into a PWA, you just need to install the @vue/cli-plugin-pwapackage. Again, this can be very easily done through the CLI:
vue add pwa
The outcomes are the same as “Starting a PWA from Scratch”, where the CLI adds a service worker and generates a manifest.json file.
More to cover…
This article has covered the basics of what a PWA is, how it differs from other ways of building apps, and we learned how to create a new Vue app as a PWA using the Vue CLI tool, which can be used to easily turn an existing app into a PWA. To explore this topic more deeply, you can check out the Progressive Web Apps with Vue 3 course here on Vue Mastery.
Additionally, in the next articles, we will be exploring how to deploy your app to a hosting service like Firebase, how to test a PWA’s performance using Lighthouse, and how to edit the manifest.json file to customize the splash screen logo, background color and text. We will also be covering how the service worker functions so you can take advantage of its power. See you in the next PWA article!