

One of the things that makes Vue such a versatile framework is that it has evolved to include several ways to write and structure components as the framework itself has grown and matured. Currently, there are three different ways to compose our components: the Options API, the Composition API, and the newest version of the Composition API: Script Setup.
If you’re just getting started with Vue, this can be confusing…
Why is there different ways to write Vue components?
Should I use Options API or Composition API? Is Script Setup the same as Composition API?
Refined by Vue Creator Evan You, the Script Setup is the recommended way to compose components that can scale. It gives Vue developers the freedom to create performant components with built-in readability, reusability, maintainability, modularity, and even makes them more TypeScript-FriendlyTypeScript-Friendly.
In this article, we’ll guide you through how the Script Setup came to be, touch on how it differs from its predecessors, and we’ll use it to build a single file Vue component to get some practice putting it to work.
What is a single file component (SFC)?
If you’re not familiar with other JavaScript frameworks, let’s first cover the foundational concept of: what is a single file component.
Let’s consider that the basic building blocks in modern web development are made up of HTML, JavaScript, and CSS. With Vue, instead of requiring three separate files (for example, index.html, index.js, and style.css) to create a webpage, we combine them all into a Single File Component (SFC) that has the file extension .vue
You can find more details about a SFC here, but most importantly, there are three sections that comprise the SFC:
- The
<template>for writing the HTML for a webpage - The
<script>for the JavaScript - The
<style>for the CSS
Originally, Vue’s SFCs were built with the Options API, and looked like this:
<template>
  <h1>{{ title }}</h1>
</template>

<script>
  export default {
    data() {
      return {
        title: 'Hello world!',
      }
    }
  }
</script>

<style scoped>
  h1 {
    font-size: 32px;
  }
</style>
Note how in one file, we have access to the component’s data, which is being displayed inside of its <template>, which is styled by its <style> section.
Where Vue began: The Options API
The Options API provided us with a set of optional objects for everything our component needed, including its data, props, methods, computed properties, lifecycle hooks, and more.
While this API saved developers cognitive overhead by prescribing an organizational system for our components, it was by its very nature prescriptive. Once components reached a certain level of complexity, this system became restrictive, especially when a component handled more than one logical concern.
In these cases, the developer experience felt a bit clunky. Code to govern the same business logic was split apart into different options objects throughout the <script> section, affecting code readability and maintainability, since refactoring was often necessary throughout multiple sections of the component.
As Vue matured, there was a desire to fix this clunkiness, along with some of the Options API’s other limitations, including not being able to easily share reactive code between components. While there was a workaround for this, using mixins to share code across components, this made it hard to keep track of where code lived, and there was a risk of namespace collisions, among other drawbacks.
With all this in mind, Evan You and the core Vue.js team worked on the next evolution of Vue, the Composition API, which debuted in Vue 3.
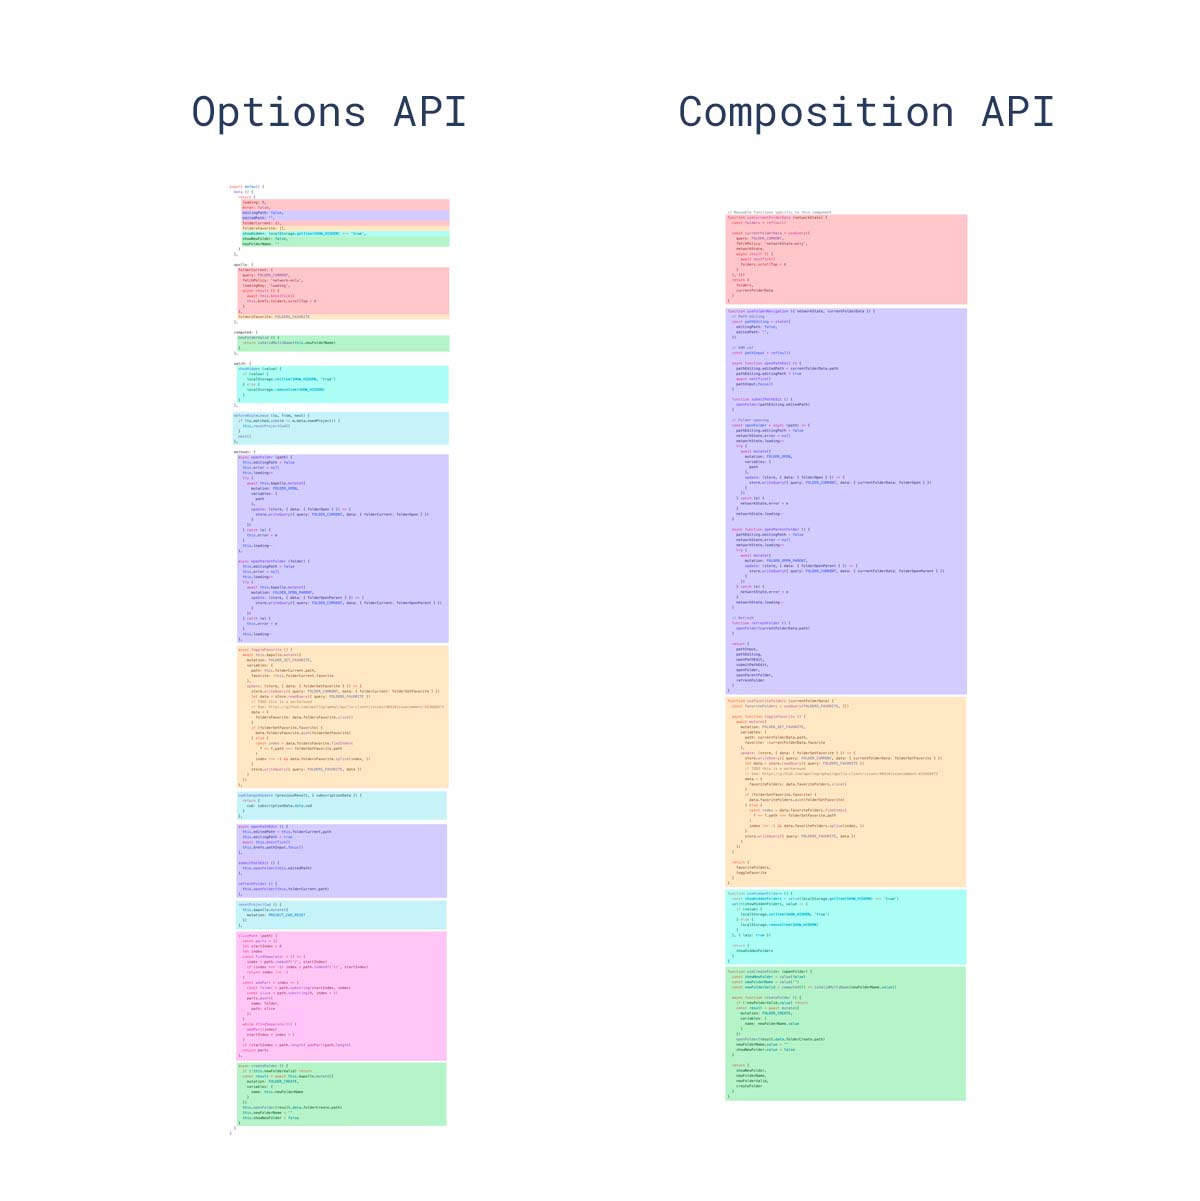
Options API ⇒ Composition API
The Composition API solved for the aforementioned limitations by loosening up those restrictive structural prescriptions, allowing us to group code by logical concern and then extract reactive code to share with other components. (This shared reactivity is called Composables).
Note this code comparison below, where the Options API code is spread across the file in an unintuitive way, whereas the Composition API code is neatly grouped by logical concern. You can imagine how this could lead to a more focused workflow for building components from scratch and refactoring them over time.
Revisiting that same simple SFC code example from above, this is how we’d write it using the Composition API:
<script>
  export default {
    setup() {
      const title = 'Hello world!';

      return {
        title
      }
    }
</script>

<template>
  <h1>{{ title }}</h1>
</template>

<style scoped>
  h1 {
    font-size: 32px;
  }
</style>
If we were to extend the functionality and complexity of this code over time, it could be inherently more readable, maintainable and modular.
Having said that, note I said it could be. Of course, without the prescriptive structure of the Options API, developers now have a lot more freedom to organize (or disorganize) their JavaScript code how they see fit. As the saying goes… with great power comes great [code organization] responsibility.
Introducing the Script Setup syntax
While the Composition API came with its advantages, its initial syntax ultimately had some of its own drawbacks, especially when it came to developer experience and what felt like unnecessary boilerplate code.
For example, in the simple code example from above, we have to rely on the setup() method and return the values we want to be exposed to the template.
<script>
  export default {
    setup() {
      const title = 'Hello world!';

      return {
        title
      }
    }
</script>
The Script Setup syntax, which is a more minimal version of the Composition API made possible by some syntactic sugar, is the latest and leanest way to construct Vue SFCs.
Here is that same script section, using Script Setup:
<script setup>
  const title = 'Hello world!';
</script>
(Notice how the
<script>section now has thesetupattribute, hence: “script setup”)
Code inside <script setup> will execute every time an instance of the component is created, and anything declared inside the <script setup> context will be accessible in the <template>. We no longer need to give the template access to the data by returning it from inside the setup() hook.
In addition to being more compact and quicker to write, the Script Setup syntax brings even more improvements including during runtime, code organization, reusability, and better type inference if you are using TypeScript. You can read more about those improvements here.
Is Options API deprecated?
It’s worth mentioning that while the Script Setup syntax is the recommended and default syntax for developing in Vue 3, it is still possible to build your Vue components using the sugar-free Composition API syntax, as well as the original Options API. In fact, some codebases even use all three.
Remember, the limitations of the Options API become evident in more complex components, so for simpler scenarios, you might prefer drafting your components using the Options API. It all comes down to choice, preference, and what’s best for your needs.
Now that we’re clear on how the Script Setup came to be, let’s look at how we can use this syntax in our Vue code.
Getting started with Script Setup
To dive deeper into the Script Setup way of coding components, let’s look at a simple code example that uses reactive data.
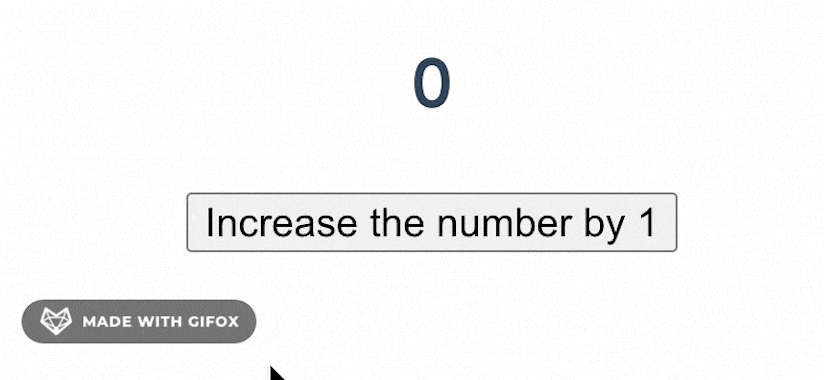
In this counter example, when a user clicks on the button, it will increase the number displayed by 1, starting at the number 0.
We can start off with this code, where we have a counter value that the addOne function increments, whenever the button is clicked.
<script setup>
  let counter = 0;

  function addOne() {
    return counter++;
  }
</script>

<template>
  <h1> {{ counter }} </h1>
  <button @click="addOne"> Increase the number by 1 </button>
</template>

<style scoped>
  h1 {
    font-size: 32px;
  }
</style>
While at first glance, you might expect this to work, if we console.log() the counter value, we can see that the counter variable is indeed increasing, but that new value is not updated in the template.
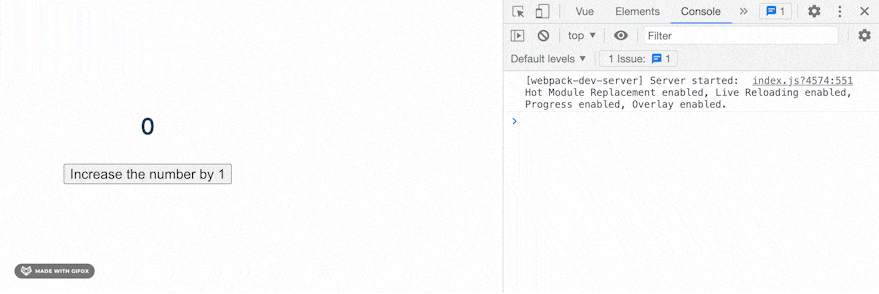
This is because while the JavaScript itself is working, we need to let Vue know that the state of the counter variable is going to be changing, since we’ll need to access the updated value from the template.
In other words, we need to make counter reactive.
Making data reactive with ref()
Vue’s Composition API (with or without the Script Setup syntax) comes with the ability to make data reactive through the use of the ref() function.
We just need to make a few changes to the code above:
- Import
reffrom the core Vue module - Wrap our data stored in the
countervariable inref - Access the value of this reactive data by adding
.valueto it (counter.value)
In the code below, our simple counter now behaves as expected:
<script setup>
  import { ref } from "vue";

  let counter = ref(0);

  function addOne() {
    return counter.value++;
  }
</script>

<template>
  <h1> {{ counter }} </h1>
  <button @click="addOne"> Increase the number by 1 </button>
</template>

<style scoped>
  h1 {
    font-size: 32px;
  }
</style>
What ref smartly does is package the variable in a reactive object for Vue to parse, and .value is the key in that reactive object called counter that holds the actual value we need.
Building with the Script Setup
Now let’s take these foundational principles and build something a bit more complex using the Script Setup syntax.

The component we’re building will behave like so:
- When you type a number into the input and click on the “Add entry” button
- The entry is added to a list below (along with a button that allows you to remove that entry)
- The total amount of water intake will be displayed
- If you click on the “Remove entry” button on an individual entry
- That entry will be removed
- The total amount of water is adjusted accordingly
Building out the form
Let’s get started building the form.
In our template, we add a <form>. On the form element, we’ll add@submit.prevent, which is shorthand in Vue for stopping a form from submitting by running event.preventDefault()
📄 waterTracker.vue
<template>
  <form @submit.prevent="addEntry">

  </form>
</template>
Notice how we’re telling the form to run addEntry when it’s submitted. This is a function we’ll define in the script setup below.
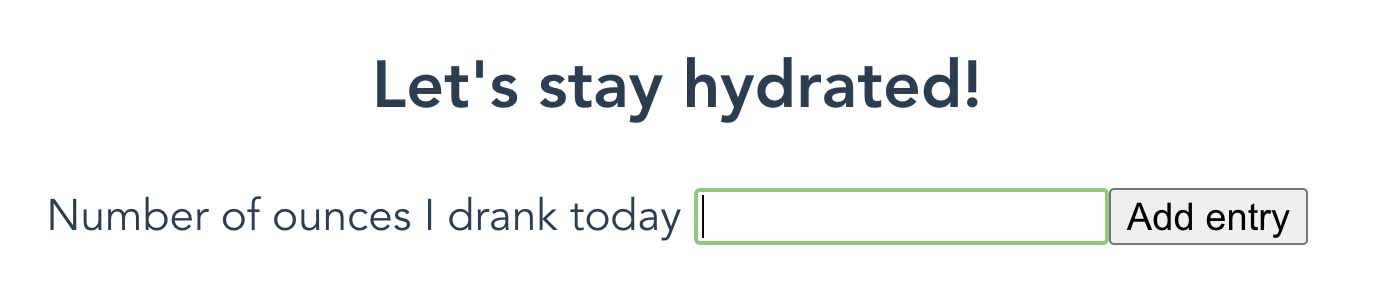
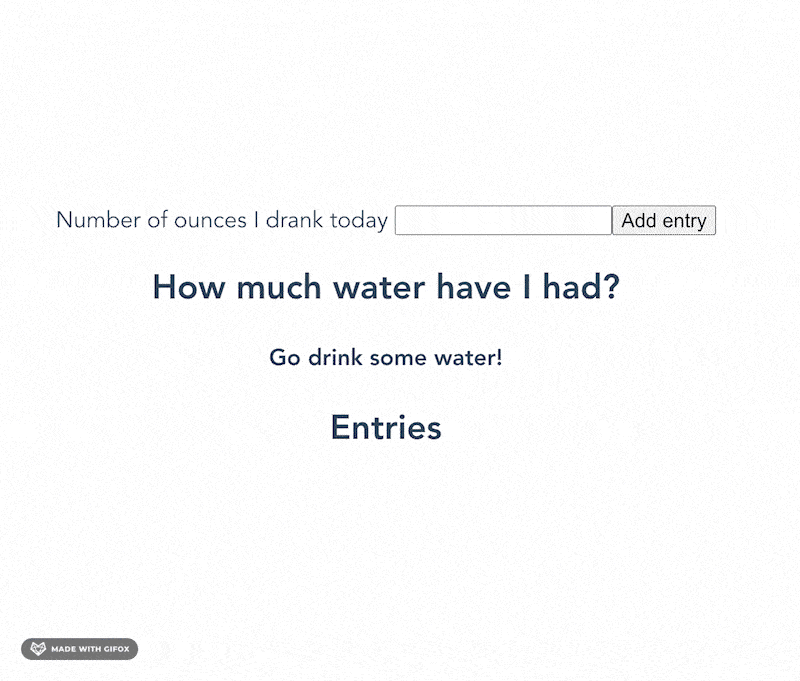
Now let’s add an <input> and <label> for our water entries, along with a button to submit the form.
📄 waterTracker.vue
<template>
  <form @submit.prevent="addEntry">
    <label>Number of ounces I drank today </label>
    <input v-model.number="newEntry" name="newEntry" />
    <button type="submit">Add entry</button>
  </form>
</template>
In our <input>, we use v-model.number
v-modelis a Vue directive that you can read more about here that allows for two-way data-binding. This means that when we combine it withinput, thetemplatewill be updated if there is a change to the state of the data inscript, and similarly, will update the data if there is a change in theinputin the template. Whatever number is typed into theinputwill be stored innewEntryin thescriptas a number.- The
.numbermodifier typecastsnewEntryto be a number
- The
Great, now our template is complete and we can move on to our script section.
The Script Setup section
In the template section, you saw how we wrote <input v-model.number="newEntry">
Since we are inputting a newEntry via this <input>, this means we’ll need a ref called newEntry.
So we’ll import { ref } from "vue" and initialize a newEntry ref as an empty string because we want the input field to start out empty:
📄 waterTracker.vue
<script setup>
import { ref } from "vue";

const newEntry = ref("");
</script>
Once we receive a newEntry, we’ll want to add it to a list of entries. So let’s create a ref for entries and initialize it as an empty array:
📄 waterTracker.vue
<script setup>
import { ref } from "vue";

const newEntry = ref("");
const entries = ref([]);

</script>
Now let’s write the function for addEntry, which does some very simple validation to check if what is entered into the input field is a number.
- If it is, we will keep track of this new entry by adding it to an array of all the
entries, and then reset the form input to be an empty string - Otherwise, we will just send an alert to the window that you should input a number, and reset the form input
📄 waterTracker.vue
<script setup>
import { ref } from "vue";

const newEntry = ref("");
const entries = ref([]);

function addEntry() {
  if (Number(newEntry.value)) {
    entries.value.push(newEntry.value);
    newEntry.value = "";
  } else {
    alert("Please enter a valid number!");
    newEntry.value = "";
  }
}
</script>
Totaling the ounces of water recorded
To make our simple app more engaging, we can display a message “Go drink some water!” to the user.
As soon as the user adds an entry, that message will be replaced with the total amount of water entered.


To do this, we will want to add one new piece of reactive data that will always hold the total amount of water, called total. This total will perform a simple algorithm for us, iterating over the array of entries and adding up the total amount of water in that array.
To achieve this, we will use a computed property, which is a method that runs when one of its dependencies changes, and then returns a new value based on the logic it just ran.
In our case, in order to have an always-updated total amount of water entered, our total will need to run whenever the entries array changes.
So, in the <script setup> , let’s add total as a computed property:
📄 waterTracker.vue
<script setup>
import { ref, computed } from "vue";

...

const total = computed(() => {
  let sum = 0;
  for (let entry of entries.value) {
    sum += entry;
  }
  return sum;
});

...
</script>
Note how we had to import computed first, then simply loop over each entry in entries to add up the total amount of water entered.
Now, we only need to add some logic in our template to display this total on our page. We can take advantage of the v-if Vue directive. It essentially allows us to easily use if-else conditions in the <template>.
In our case:
- If the length of the
entriesarray is zero (and so thetotalis at zero), it will display the message for us to drink water. - Otherwise, if there is a
total, we want to display the total amount of water in ounces
📄 waterTracker.vue
<template>
<--! Existing code above -->
<div>
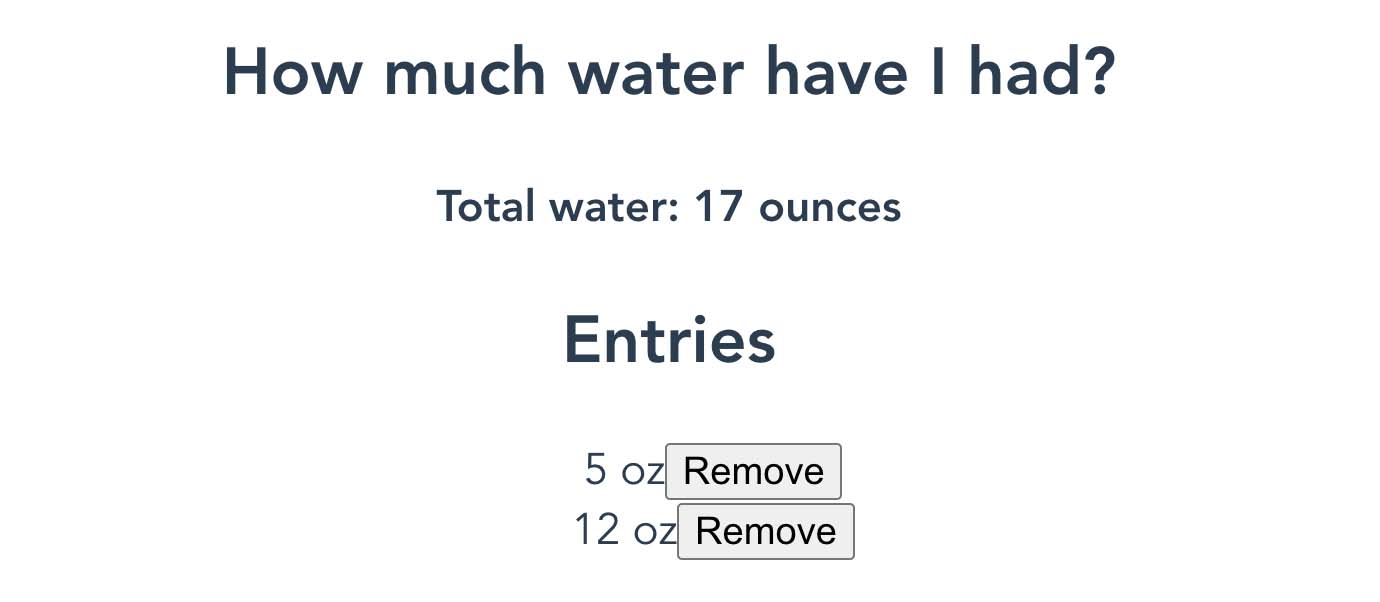
<h2>How much water have I had?</h2>
</div>
<div>
<h4 v-if="entries.length === 0">Go drink some water!</h4>
<h4 v-else>Total water: {{ total }} oz</h4>
</div>
</template>
Displaying the list of entries
So far in our simple water tracker demo, we can add an entry with the total number of ounces of water we’ve had, and the total entered amount is displayed.
What if we wanted to actually see each entry and also have the ability to remove that entry, in case we made a mistake?
We will need to do two things:
- In the
template, we will want to add the “Entries” section and have it display each entry on its own. Each entry will have a button that, when clicked, will remove that entry and update thetotal - In the
script setup, we will add a method that will allow us to remove the entry and simultaneously update thetotal
Getting started with task one, we’ll use the v-for directive, which gives the template the ability to run a for loop through a list. In our case, we want to keep note of both the entry itself (a number), and its index so that we can use it to remove an individual entry in the script setup
📄 waterTracker.vue
<template>
  <--! Existing code above -->

  <div>
    <h2>Entries</h2>
    <ul>
      <li v-for="(entry, index) in entries" :key="index">
        <span>{{ entry }}</span>
        <button @click="removeEntry(index)">Remove</button>
      </li>
    </ul>
  </div>
</template>
Note how we also added a Remove button. When it’s clicked, we will run a new method called removeEntry(), which removes that entry from the array of entries:
📄 waterTracker.vue
<script setup>
// Existing code above

function removeEntry(index) {
  entries.value.splice(index, 1);
}
</script>
One thing to note is that we don’t have to do anything to the total, and it will still automatically be updated. This is a result of having defined total as a computed property, which is updated every time one of its dependencies (in this case, the length of entries) changes.
Great! We’ve successfully used the Script Setup to construct a functioning Vue SFC, and in the process learned about some of the foundational pieces of Vue reactivity with ref and computed, while utilizing the common Vue directives: v-for, v-if, v-model.
Bringing it into the real world
As this article demonstrates, single file components in Vue have evolved from relying on the original Options API, before maturing to become more modular, maintable, and reusable thanks to the Composition API, then finally leaning out to become more minimal and modern with the Script Setup (and the added bonuses that syntactic sugar gives us).
While Script Setup is the new and recommended kid on the block, it’s important to be able to parse through any of these syntaxes. As Vue developers, there may be times we inherit a legacy code base that contains various versions of SFCs, or we may encounter various syntaxes in blogs, StackOverflow threads, etc, so it’s helpful to be able to understand them out in the wild.