
In the previous article, we took a look at Nuxt 3 performance in theory and its importance in our applications. In this part 2, we are going to get practical and look at how we can apply some of these tips to a real-world application by building a small news app.
It is important to note that while several tips can be used to optimize the performance of our Nuxt.js apps, some of them may not always apply depending on the type of application being built. Therefore, it is necessary to decide which optimization technique works best for your specific use case. Let’s dive into it.
How to Optimize Nuxt Apps
For this demo, we want to check out how to optimize your Nuxt.js applications using the following techniques:
- Image Optimization using NuxtImage
- Delayed Hydration with Nuxt Delay Hydration
- Lazy Loading with Dynamic Imports
To see these optimization techniques in action, we will build a simple news application built with Nuxt 3. This app will be a single page that fetches data from a JSON file. You can find the code for this application on GitHub.
When we’re done, the application is going to look like this;

Setting up our Nuxt project
The first thing we’re going to do will be to create a new Nuxt 3 app using npx
npx nuxi@latest init <project-name>
For my app, I replaced <project-name> with perf-app, which is the name I have given my application.
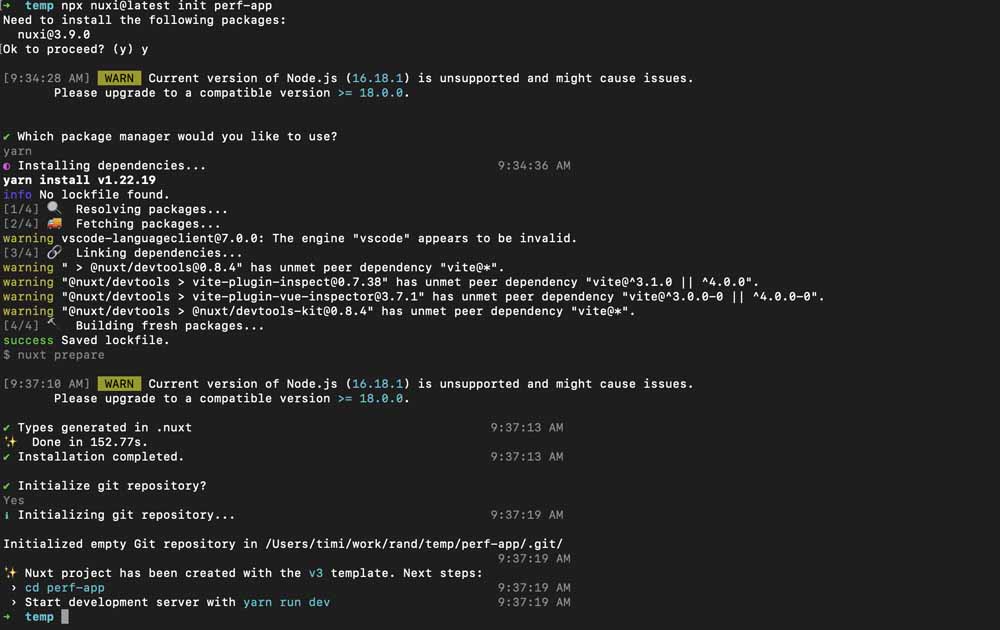
Once this setup is complete, we navigate into our app and start our server.
cd temp
yarn dev
If our setup was successful, when we enter [localhost:3000] in the browser, we should see something like this:

Our Demo Nuxt.js App
Now that our application is up and running, the first thing we are going to do is create a component that will render all our headlines along with the images attached.
I’m going to call this component ArticleCard.
<template>
  <div class="article__div">
    <img class="article__img" :src="article.urlToImage" :alt="article.title" />
    <div class="article__item-div">
      <p>{{ article.title }}</p>
      <p>{{ article.author }}</p>
    </div>
  </div>
</template>

<script setup>
  defineProps({
    article: {
      type: Object,
      required: true,
    },
  });
</script>

<style lang="scss" scoped>
  .article {
    &__div {
      box-shadow: 0px 2px 2px rgba(0, 0, 0, 0.1);
      border-radius: 6px;
      &:hover {
        cursor: pointer;
      }
    }
    &__img {
      width: 100%;
      object-fit: cover;
      height: 180px;
      border-top-left-radius: 6px;
      border-top-right-radius: 6px;
      transition: all 1s ease-in-out;
      &:hover {
        object-fit: fill;
      }
    }
    &__item-div {
      padding: 0 8px;
    }
  }
</style>
In this component, we make use of a combination of script setup and Composition API’s defineProps macro. We have just one prop, named article. This prop accepts an object containing information regarding each news headline (title, description, image, etc.). We also have some lines of CSS used in styling the component. We also have an articles.json file, which contains an array of headlines. The content of this file can also be found on GitHub.
At this point, the next step will be to import our newly created component into App.vue. To do this, we are going to replace the content of this file with this code:
<template>
  <main>
    <h1 class="article__heading">Top News</h1>
    <section class="article__section">
      <ArticleCard
        v-for="(article, index) in articles"
        :key="index"
        :article="article"
      />
    </section>
  </main>
</template>
<script setup>
  import ArticleCard from "@/components/ArticleCard.vue";
  import { articles } from "@/utils/articles.json";
</script>
<style lang="scss" scoped>
  @import url("https://fonts.googleapis.com/css2?family=Open+Sans:wght@400;700&display=swap");
  @import url('https://fonts.googleapis.com/css2?family=Lato:wght@700&display=swap');
  .article {
    &__heading {
      font-family: 'Lato', sans-serif;
      font-weight: 700;
      text-align: center;
    }
    &__section {
      font-family: "Open Sans", sans-serif;
      @media screen and (min-width: 768px) {
        display: grid;
        grid-template-columns: repeat(auto-fit, minmax(280px, 1fr));
        gap: 16px;
      }
    }
  }
</style>
In this file, we import our ArticleCard component and the articles array from our JSON file. Using these imported items, we use a v-for on the articles array to render each news headline by passing an article prop to the ArticleCard component. We also have a styling section where we import two fonts for our app, with extra CSS rules for display and alignment.
Testing the Performance with Lighthouse
At this point, when we run a performance test on our application using Chrome Lighthouse, the following is what we get when we select the desktop option.
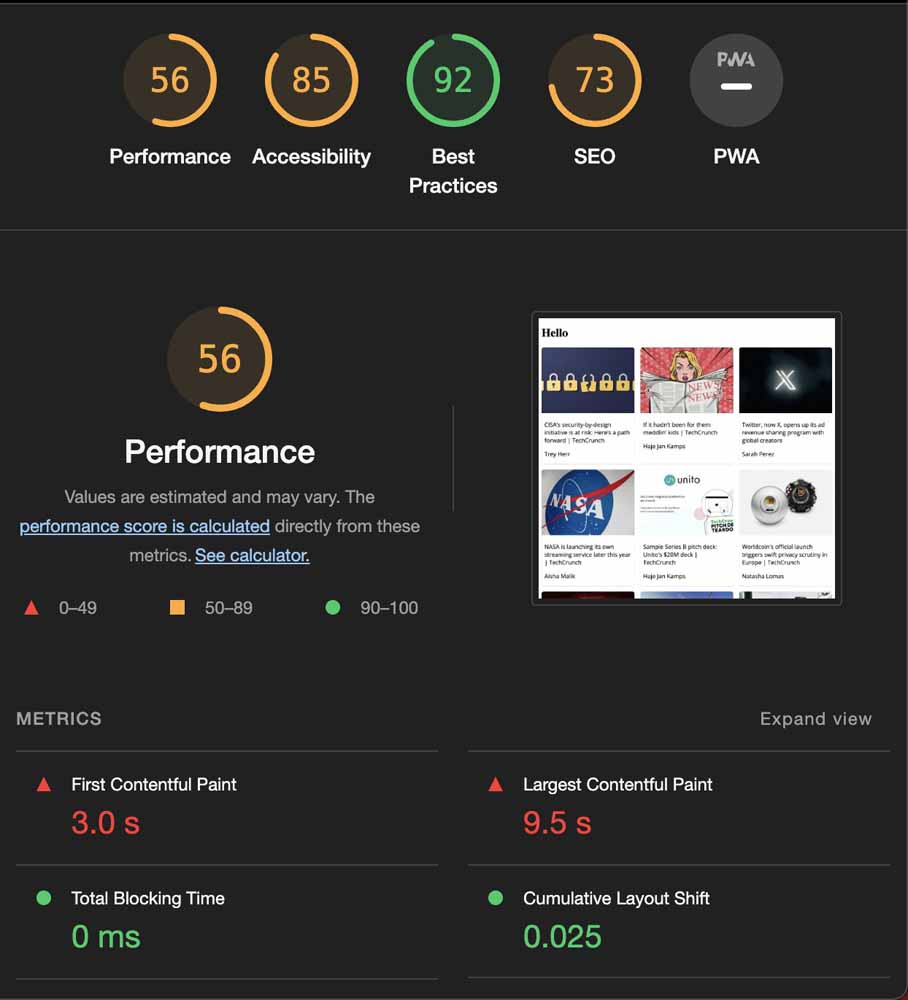
According to this score, we can see that the performance score for this app is quite poor. According to this screenshot, our app currently has a FCP score of 3s and according to the documentation, a good FCP score should be 1.8s or less.

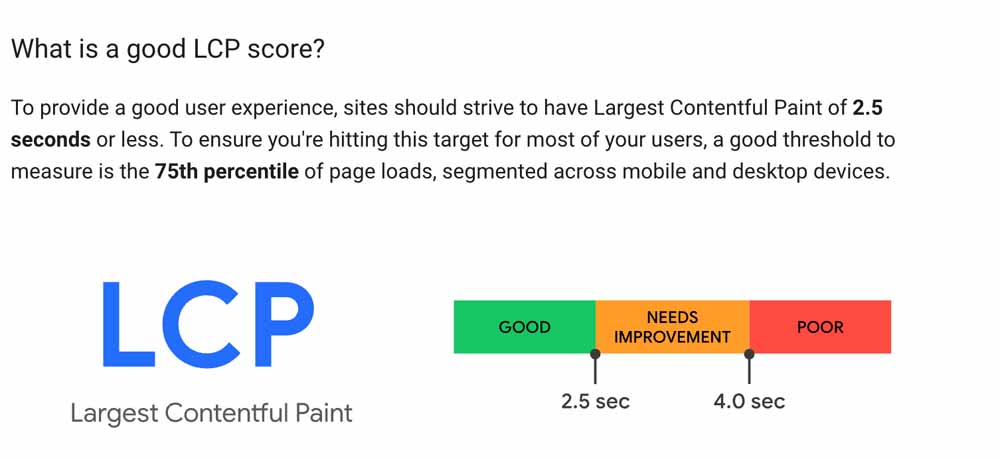
We can also see the LCP score is at 9.5s, which is also 5s slower than the recommended 2.5s.
Let us introduce some of the techniques we covered earlier to see how well it can be improved.
Nuxt Performance: Delayed Hydration
The first step to improving the performance of our application will be to install the nuxt-delay-hydration module. Installation can be done using your preferred package manager (npm, yarn, or pnpm)
yarn add -D nuxt-delay-hydration
After installation, the next step will be to configure this module in our nuxt.config.ts file.
This config will look like this:
export default defineNuxtConfig({
  devtools: {
    enabled: false,
  vscode: {
    reuseExistingServer: true
  }},
  modules: [
    'nuxt-delay-hydration',
  ],
  delayHydration: {
    // enables nuxt-delay-hydration in dev mode for testing
    debug: process.env.NODE_ENV === 'development',
    mode: 'mount'
  },
  components: true,
});
Here, we add the nuxt-delay-hydration option to the modules array. Additionally, we include a delayHydration object to configure the optimization of our application.
Within the delayHydration object, we enable the debug option, which allows us to hydrate our app in development mode. By turning on this option, we can view hydration logs in the browser console after our application loads.

With this option turned on, we can create a visual identifier for the hydration status of our app. Here’s an example of this in our App.vue file:
<template>
  <main>
    <h1 class="article__heading">Hello</h1>
      <HydrationStatus /> // new component added
      <section class="article__section">
        <ArticleCard
          v-for="(article, index) in articles"
          :key="index"
          :article="article"
        />
      </section>
  </main>
</template>
In this code, we add a HydrationStatus component just before the div wrapper for our article’s card. When we view it in the browser, it appears like this:

We also added a mode option, which is used to determine the hydration mode we want. Before settling on a specific mode, it is important to understand all the available modes and how they work.
For example, I have configured the mode option as mount, which implies that Nuxt will be delayed during the mounting process. This means that plugins and certain third-party scripts will function, but our layout and page components will be postponed.
As stated in the documentation, this approach yields an approximate reduction of 70% in loading time. If we assess the performance of our application at this stage, the results should resemble the following:

However, you’ll want to ensure that you’re using the most suitable mode for your specific use case. For example, if we set the mode to init for this app, the performance score improves even further, resulting in the following benefits.
Performance rating when hydration is set to init
Nuxt Image Optimization
Another way we can improve the performance of our Nuxt.js application is by optimizing the images using the Nuxt image module.
The first step is to install the image module. You can do this using yarn, npm, or pnpm (I am using yarn).
yarn add @nuxt/image@rc
Once this installation is complete, we can add it to the list of modules in nuxt.config.ts
// https://nuxt.com/docs/api/configuration/nuxt-config
export default defineNuxtConfig({
  devtools: {
    enabled: false,
  vscode: {
    reuseExistingServer: true
  }},
  modules: [
    'nuxt-delay-hydration',
    '@nuxt/image', // added here
  ],
  delayHydration: {
    // enables nuxt-delay-hydration in dev mode for testing
    debug: process.env.NODE_ENV === 'development',
    mode: 'init'
  },
  components: true,
});
After doing this, we can use either the NuxtImage or NuxtPicture tag to render the images on our application. The NuxtPicture component, which is a drop-in replacement for the native <picture> tag, is quite similar to the NuxtImage and can be used interchangeably, the only difference being that it allows serving modern formats like webp when possible.
For example, if we update our ArticleCard.vue component to look like this:
<template>
  <div class="article__div">
    <NuxtImg class="article__img" :src="article.urlToImage" :alt="article.title" />
    <div class="article__item-div">
      <p>{{ article.title }}</p>
      <p>{{ article.author }}</p>
    </div>
  </div>
</template>
Here, we can see that we replaced the native img tag with the NuxtImg tag while every other thing remains the same. When we check this out in the browser, there is no obvious difference in the look of our images.
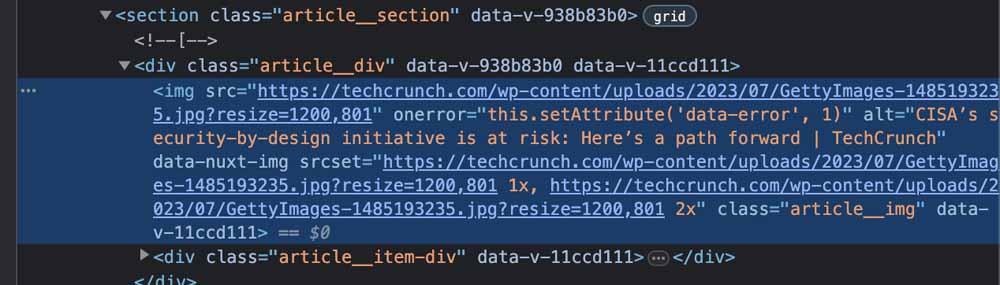
But on inspection of the code being rendered in the browser, we will note a few things, including:
- It renders with the native
imgtag and the attributes attached to it - While our code does not have an
@errorevent attached to it, theNuxtImagecomponent already handles that for us and attaches asetAttributemethod to it. - Finally, we have a
srcsetattribute that is used to ensure the correct size and image are being applied during render
There is a long list of configuration options that allow users to set parameters such as format and quality if needed. However, for our application, we will not be utilizing any of those options.
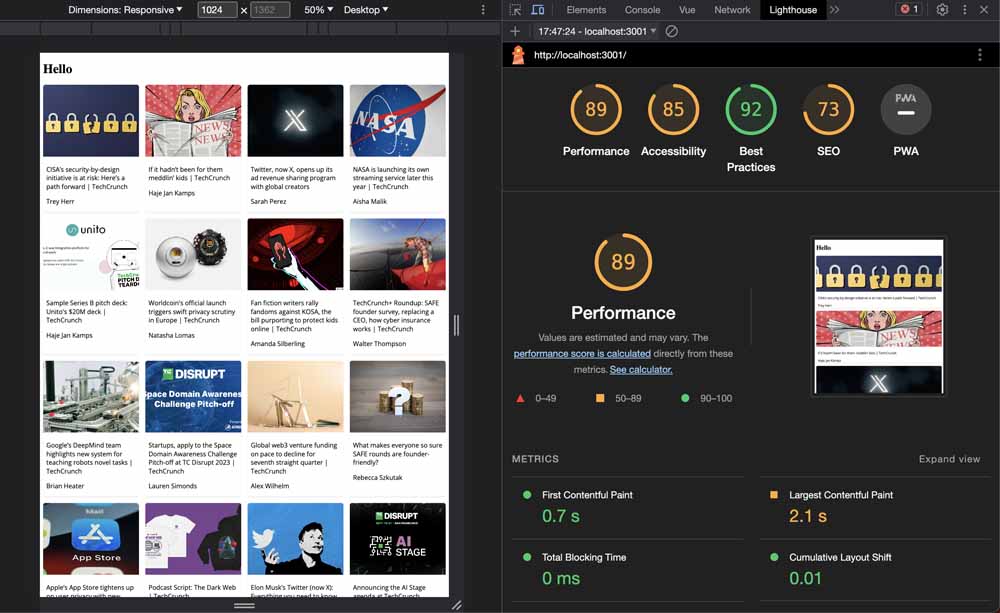
Testing the performance again
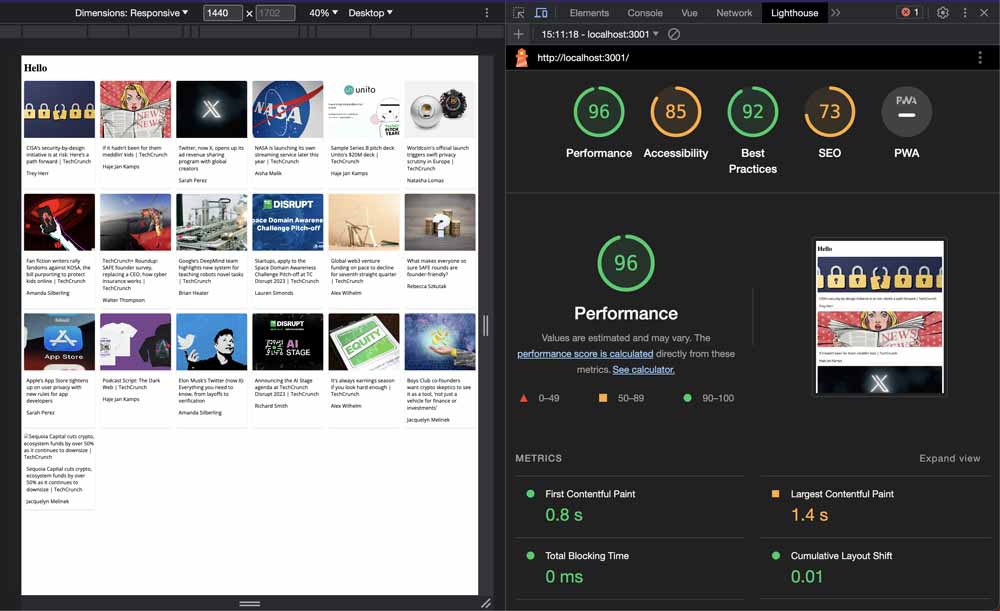
If we run a performance check on our app after updating, this is what we get.

Performance test score after using NuxtImage
Based on this result, it is evident that there has been an improvement in the performance score of our app. Specifically, the Largest Contentful Paint time has decreased from 2.1s to 1.5s. This improvement has contributed to the overall enhanced performance of our app.
Dynamic Imports
Another way to enhance the performance of our app is by employing lazy loading for components until they are required. This is especially beneficial for components that rely on a specific condition (e.g. a button click) before being displayed to the user. This technique is commonly referred to as dynamic import).
To lazy load a component in Nuxt 3, we prefix the component name with Lazy. Using our existing App.vue code, this is what we have:
<template>
  <main>
    <h1 class="article__heading">Hello</h1>
      <section class="article__section">
        <LazyArticleCard
          v-for="(article, index) in articles"
          :key="index"
          :article="article"
        />
      </section>
  </main>
</template>
In this snippet, we can see that we have changed the tag from ArticleCard to LazyArticleCard. Despite that change, our component still renders correctly and nothing is broken.
It is important to note that this method is more effective when applied to components that do not always render to the user. By using the Lazy prefix, you can delay loading the component code until the right moment, which can be helpful for optimizing your JavaScript bundle size.
Continue Learning
As we’ve seen, there are a number of ways we can boost the performance of our Nuxt.js apps with helpful modules such as Nuxt Hydration and Nuxt Image and mindfully using Dynamic Imports to lazy load components when relevant.
By implementing these optimization techniques, you can significantly improve the loading speed and overall user experience of your Nuxt.js applications, making them more efficient and impactful in your professional role.
To continue elevating your Nuxt.js skills, I recommend exploring the Nuxt content here on Vue Mastery with the free lessons in the courses below.