

Vuex is the ideal tool for managing large and complex state in a Vue.js app. But when the code base gets huge, it might start to feel chaotic stitching your Vue components together with basic Vuex without using its additional features such as helpers and modules.
This tutorial will introduce these useful tools that can simplify your Vuex setup. Let’s look at how to apply them to an existing Vuex-driven app.
The sample app
We have the code uploaded to Github: https://github.com/Code-Pop/Vuex_Fundamentals.git
You can clone it to your local:
git clone https://github.com/Code-Pop/Vuex_Fundamentals.git
cd Vuex_Fundamentals
The L5-end branch is what we’re starting with here.
git checkout L5-end
This repo is originally from Vue Mastery’s Vuex Fundamentals course. The last lesson of that course is Lesson 5, and we’re picking up from there. That’s why the branch we’re starting with is L5-end. (If you can’t wait to see the final code with all the refactoring done, you can check out the refactor branch and take a look.)
Before we get into the code, let’s run the app first and get ourselves familiar with what it does.
First run npm install to install all the dependencies:
npm install
Then we can start the server:
npm run serve
Go to localhost:8080 in a browser, and you can play around with the sample app.
The app has three pages:
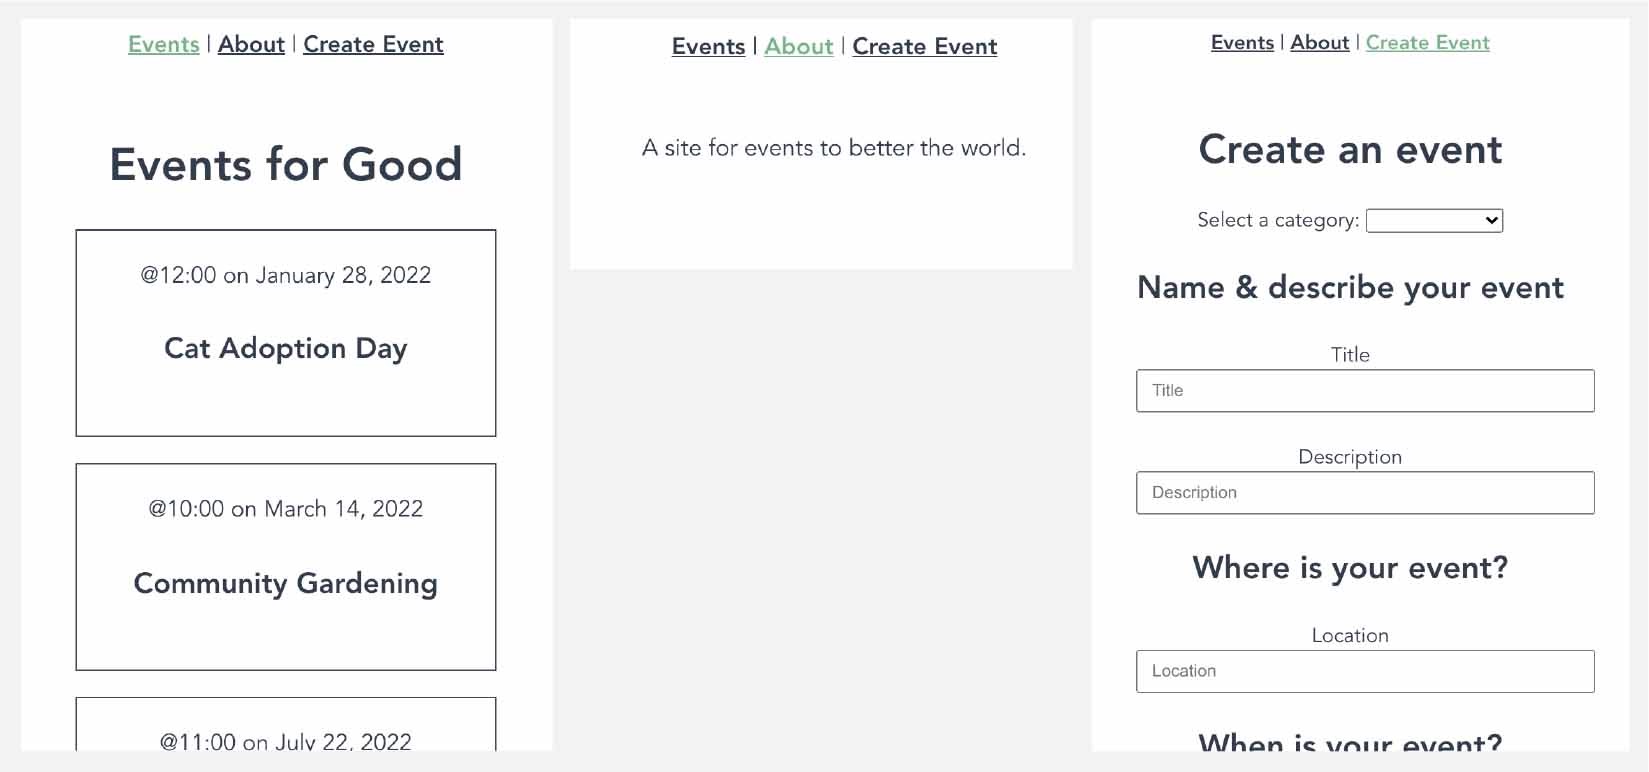
- Events: a page that shows a list of events (like a simple Meetup.com)
- About: a page that shows some text describing the app
- Create Event: a page with a form to create a new event
Now, let’s take a look at the code. Our main components are hosted inside the src/views folder.
The focus of the tutorial is on the relationship between the Vue components and the Vuex store. Not all of our components are connected to Vuex, only these three components are:
- /src/views/EventCreate.vue
- /src/views/EventDetails.vue
- /src/views/EventList.vue
Here’s an illustration of how these Vue components are currently connected to the Vuex store:

As you can see, the Vuex store has three state items: user, event, and events. And the components are consuming all three of them.
These three components are also dispatching various actions to the Vuex store, and here’s an illustration of that:
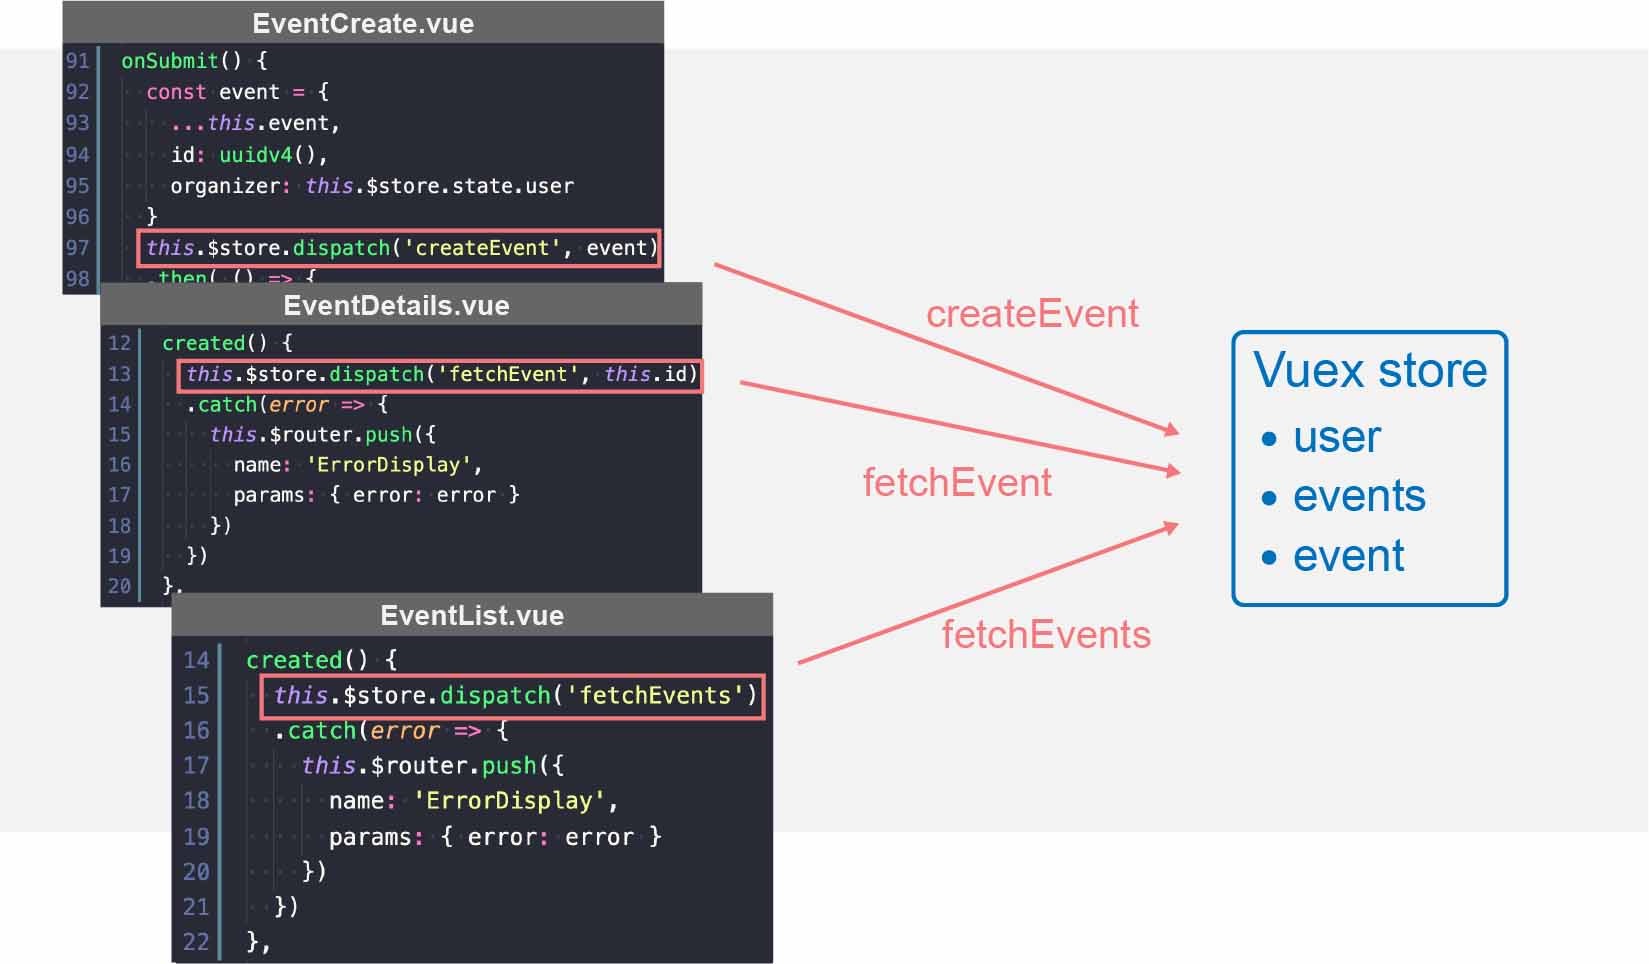
We have other components in the code base, but these three components are the only ones linking to the Vuex store, so they’ll be our focus in this tutorial.
Map Helpers
Map helper functions offer simpler ways for our components to connect to the Vuex store. Currently, we are getting the states and dispatching to the store all through this.$store. Instead of this.$store.state.event, using a map helper would allow us to simply write this.event.
There are four map helpers from Vuex’s API.
mapStatemapGettersmapActionsmapMutations
For our app, we’ll be using mapState and mapActions.
mapState
First, we’ll use mapState to simplify the way we’re accessing user and event from the Vuex store.
We have three components to change, let’s start with EventCreate.
First, import mapState:
📃 /src/views/EventCreate.vue
<script>
import { v4 as uuidv4 } from 'uuid'
import { mapState } from 'vuex' // ADD
...
Then we’ll use mapState to add a computed property user to the component:
📃 /src/views/EventCreate.vue
computed: {
  ...mapState(['user'])
},
(the three-dot syntax is an ES6 syntax called the spread operator)
In the above code, the mapState function will return an object that contains a user method, and the spread operator (the three dots) will help us to put this user method in the computed object. As a result, user becomes a computed property for the component.
Now we can use this.user in our component instead of this.$store.state.user:
📃 /src/views/EventCreate.vue
onSubmit() {
  const event = {
    ...this.event,
    id: uuidv4(),
    organizer: this.user // CHANGE
  }
  ...
The mapState function has added a computed property called user that is “tracking” the user state from our store. This is functionally the same as using this.$store.state.user directly.
For the EventDetails component, we’ll remove the existing computed property event, and create the same computed property using the mapState function:
📃 /src/views/EventDetails.vue
<script>
import { mapState } from 'vuex' // ADD
...
  computed: {
    /* REMOVE
    event() {
      return this.$store.state.event
    }
    */
    ...mapState(['event']) // ADD
  }
And for the EventList component, we’ll do the exact same thing again:
📃 /src/views/EventList.vue
<script>
import EventCard from '@/components/EventCard.vue'
import { mapState } from 'vuex' // ADD

export default {
  ...
  computed: {
    /* REMOVE
    event() {
      return this.$store.state.event
    }
    */
    ...mapState(['events']) // ADD
  }
If we need to map to multiple state items from the store, we can just add it to the array argument:
📃 /src/views/EventList.vue
computed: {
  ...mapState(['events', 'user']) // CHANGE
}
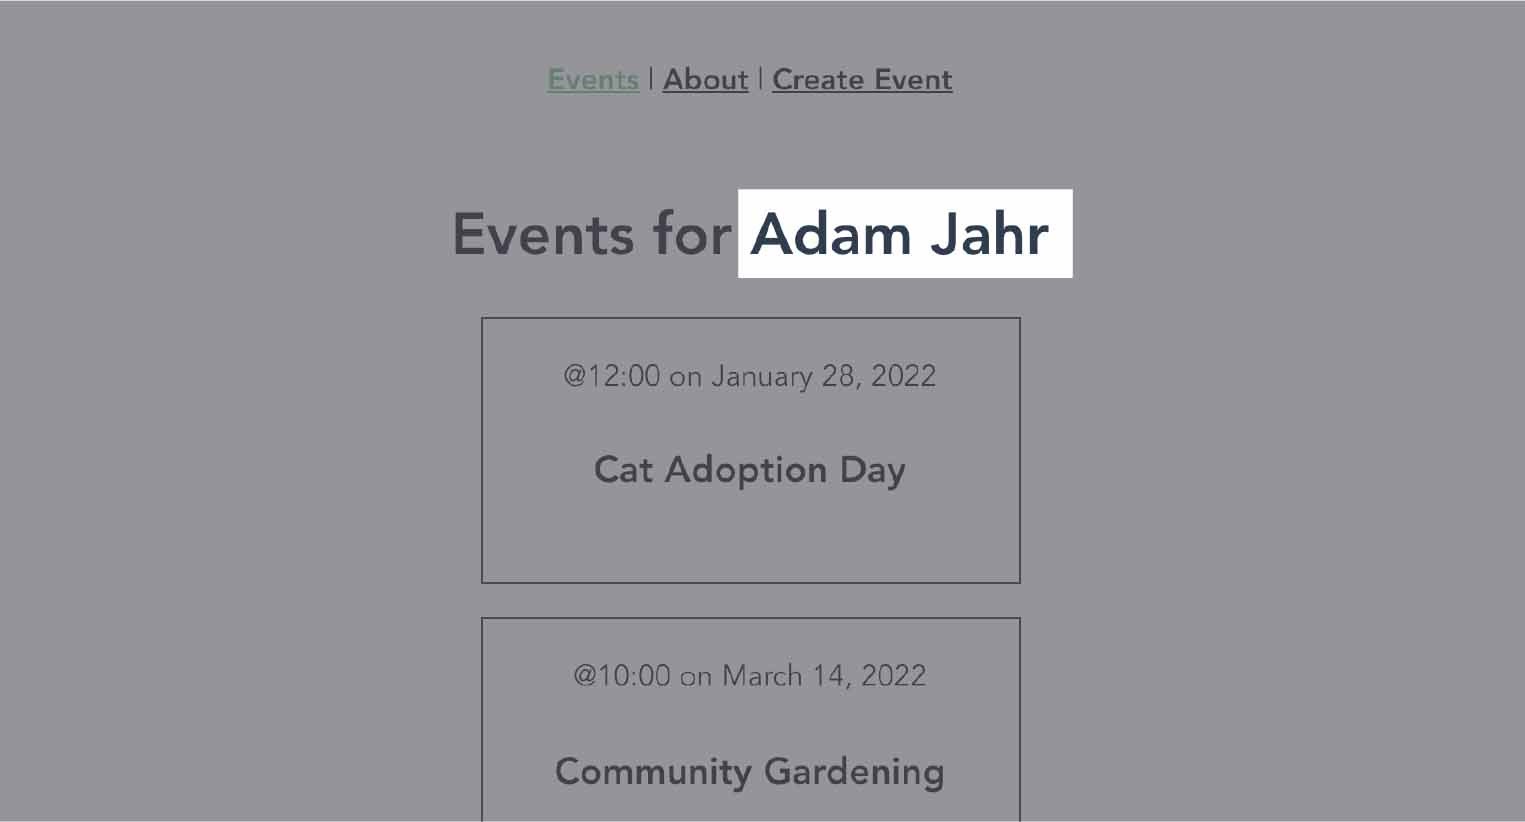
With user added as a new computed property, we can render it in the template like this:
📃 /src/views/EventList.vue
<template>
  <h1>Events for {{ user }}</h1>
  ...
By using the mapState, we are now able to access the states just like regular computed properties.
mapActions
Although we’ve improved the way we’re accessing the states, the components are still relying on this.$store.dispatch for dispatching actions to the store. Instead of writing this.$store.dispatch('createEvent', event), we want to be able to just write this.createEvent(event).
So, we’ll use the mapAction helper next.
Starting with the EventCreate component:
📃 /src/views/EventCreate.vue
<script>
import { mapState, mapActions } from 'vuex' // CHANGE
...
  methods: {
    ...mapActions(['createEvent']), // ADD
    onSubmit() {
      const event = {
The mapActions function will inject a createEvent method into the component, which we can use to dispatch the action.
So now we can just call this.createEvent directly instead of this.$store.dispatch:
onSubmit() {
  const event = {
    ...
  }
  // this.$store.dispatch('createEvent', event) REMOVE
  this.createEvent(event) // ADD
    .then(() => {
    ...
Let’s apply the same changes to the other two components.
📃 /src/views/EventDetails.vue
<script>
import { mapState, mapActions } from 'vuex' // CHANGE
...
export default {
  props: ['id'],
  created() {
    // this.$store.dispatch('fetchEvent', this.id) REMOVE
    this.fetchEvent(this.id) // CHANGE
      .catch(error => {
        ...
      })
  },
  computed: {
    ...mapState(['event'])
  },
  // ADD
  methods: {
    ...mapActions(['fetchEvent'])
  }
}
📃 /src/views/EventList.vue
import { mapState, mapActions } from 'vuex' // CHANGE
...
export default {
  created() {
    this.fetchEvents() // CHANGE
      .catch(error => {
        ...
      })
  },
  computed: {
    ...mapState(['events', 'user'])
  },
  // ADD
  methods: {
    ...mapActions(['fetchEvents'])
  }
}
By using mapState and mapActions, our components are now much cleaner.
Now, let’s direct our attention to the Vuex code.
Modules
Currently, all the Vuex code in this app is located in the same file, and that’s fine for a simple app. But as our app grows, the code is destined to be huge and complex, so this one-file setup is not an optimal way of managing our store. As a solution, we can break it up into organized chucks with a feature called modules.
Our current Vuex code can be refactored into two separate standalone modules: user and event. The user module will contain all the Vuex code related to the user state, and the event module will contain all the Vuex code related to event and events.
We’ll work on extracting the code for the user module first. Then, we’ll move on to the event module.
Let’s create a new modules folder inside /src/store, where we’ll put all of the Vuex modules.
User module
Now, let’s begin with the user module.
Create a file called user.js inside the module folder. This file will hold all of the user-related Vuex code. The only user-related code in our Vuex store is just the user state. So, let’s extract the user state to the new file:
📃 /src/store/modules/user.js
export default {
  state: {
    user: 'Adam Jahr'
  }
}
A Vuex module has a similar structure as the main Vuex store. For example, we have a state property here just like the code in store/index.js. But since there aren’t any mutations or actions related to user, we are not using the actions and mutations properties in this module.
To make it look more like a real-life module, let’s expand the user state into an object with more user-related info:
📃 /src/store/modules/user.js
export default {
  state: {
    user: {
      id: 'abc123', // ADD
      name: 'Adam Jahr'
    }
  }
}
Now we have a module called user, which is also the name of the state that it contains. To avoid confusion down the road, let’s rename the user state to userInfo.
📃 /src/store/modules/user.js
export default {
  state: {
    userInfo: { // RENAME
      id: 'abc123',
      name: 'Adam Jahr'
    }
  }
}
Back in store/index.js, we have to import the user module and “plug” it into the store with the modulesproperty:
📃 /src/store/modules/user.js
import { createStore } from 'vuex'
import EventService from '@/services/EventService.js'
import user from './modules/user.js' // ADD

export default createStore({
  state: {
    // user: 'Adam Jahr', REMOVE
    events: [],
    event: {}
  },
  mutations: {
    ...
  },
  actions: {
    ...
  },
  modules: { user } // CHANGE
})
Since now that the user data is living inside a module, we have to modify our component code accordingly. Specifically, we need to prefix the state with the proper module name.
In the EventList component, change user to user.userInfo.name:
📃 /src/views/EventList.vue
<template>
  <h1>Events for {{ user.userInfo.name }}</h1>
  <div class="events">
  ...
In the above code, user is referring to the module, not the state. Since we’ve renamed it, userInfo is now the state, and name is a property inside the state object.
We don’t have to change the way we’re mapping to the store with mapState because the module name is user, which is the same name we are already using with mapState.
And finally in the EventCreate component, we need to change this.user to this.user.userInfo.name:
📃 /src/views/EventCreate.vue
const event = {
  ...this.event,
  id: uuidv4(),
  organizer: this.user.userInfo.name // CHANGE
}
And that’s it with the user module. Next, we’ll work on the event module.
Event module
First, create an event.js file inside the store/modules folder. Then move all the event-related state, mutations, and actions over to the new file.
📃 /src/store/modules/event.js
import EventService from '@/services/EventService.js'

export default {
  state: {
    events: [],
    event: {}
  },
  mutations: {
    ADD_EVENT(state, event) {
      state.events.push(event)
    },
    SET_EVENT(state, event) {
      state.event = event
    },
    SET_EVENTS(state, events) {
      state.events = events
    }
  },
  actions: {
    createEvent({ commit }, event) {
      return EventService.postEvent(event)
      .then(() => {
        commit('ADD_EVENT', event)
      })
      .catch(error => {
        throw(error)
      })
    },
    fetchEvents({ commit }) {
      return EventService.getEvents()
        .then(response => {
          commit('SET_EVENTS', response.data)
        })
        .catch(error => {
          throw(error)
        })
    },
    fetchEvent({ commit, state }, id) {
      const existingEvent = state.events.find(event => event.id === id)
      if (existingEvent) {
        commit('SET_EVENT', existingEvent)
      } else {
        return EventService.getEvent(id)
          .then(response => {
            commit('SET_EVENT', response.data)
          })
          .catch(error => {
            throw(error)
          })
      }
    }
  }
}
(that’s basically the entire object literal from store/index.js, excluding the modules property)
Let’s also rename the event state to currentEvent so that it doesn’t have the same name as the event module:
📃 /src/store/modules/event.js
import EventService from '@/services/EventService.js'

export default {
  state: {
    events: [],
    currentEvent: {} // RENAME
  },
  mutations: {
    ADD_EVENT(state, event) {
      state.events.push(event)
    },
    SET_EVENT(state, event) {
      state.currentEvent = event // RENAME
    },
    ...
Now, let’s head back into store/index.js. Just like what we did with the user module, we have to import the event module and “plug” it into the store:
📃 /src/store.index.js
import { createStore } from 'vuex'
// import EventService from '@/services/EventService.js' REMOVE
import user from './modules/user.js'
import event from './modules/event.js' // ADD

export default createStore({
  modules: {
    user,
    event // ADD
  }
})
With these changes in our Vuex code, our components also have to be updated to use the event module.
Since now the events are living inside the event module, we have to use the name event instead of events when we’re mapping with mapState.
📃 /src/views/EventList.vue
computed: {
  ...mapState(['user', 'event'])
(that’s basically just removing the s from events)
And then we’ll prefix the events in the template with the module name, event.
📃 /src/views/EventList.vue
<template>
  ...
  <div class="events">
    <EventCard v-for="event in event.events" :key="event.id" :event="event" />
  ...
So once again, the event in [event.events](http://event.events) is the module name, and events is one of the state items inside the event module.
We’ll make similar changes in the EventDetails component:
📃 /src/views/EventDetails.vue
<template>
  <div v-if="event.currentEvent">
    <h1>{{ event.currentEvent.title }}</h1>
    <p>
      {{ event.currentEvent.time }} on {{ event.currentEvent.date }} @
      {{ event.currentEvent.location }}
    </p>
    <p>{{ event.currentEvent.description }}</p>
  </div>
</template>
There’s no need to change how we’re mapping with mapState in this component because we are already mapping to event.
Now the app should work just like before, but the event data and the user data are living in two separate modules.
Namespacing
You might have noticed that we didn’t change the way we’re dispatching the actions, and the code still works.
When an action is dispatched, the modules with the same action will get the chance to handle it, so we don’t have to specify which module we are dispatching to. Vuex is designed this way so that multiple modules can potentially handle the same action name.
But if we do want to make it clear which specific module we are dispatching to, we can use namespacing with our Vuex modules.
In the modules, add a namespaced property and set it to true.
📃 /src/store/modules/event.js
export default {
  namespaced: true,
  state: {
    events: [],
    currentEvent: {
    ...
📃 /src/store/modules/user.js
export default {
  namespaced: true,
  state: {
    userInfo: {
    ...
Back in the components, add the right module name to mapActions:
📃 /src/views/EventCreate.vue
methods: {
  ...mapActions('event', ['createEvent']),
  onSubmit() {
📃 /src/views/EventDetails.vue
methods: {
  ...mapActions('event', ['fetchEvent'])
}
📃 /src/views/EventList.vue
methods: {
  ...mapActions('event', ['fetchEvents'])
}
And now, all of our dispatched actions are properly addressed to the right modules.
Conclusion
We’ve gone through two of the most useful refactoring tools in Vuex, map helpers and modules. As your app gets bigger, these tools are essential to keeping your code clean.
For more useful and in-depth content on Vuex, please check out Vue Mastery’s Mastering Vuex course.


